Knotless Braids On Short Hair
- Posted on 21 April, 2021
- Short Hair
- By Anonymous
Hey Beauties, I searched through my last video comments and a lot of ladies had questions about the grip method on short hair. In this Video I have explained step by step on how to achieve the perfect knotless braids on short hair. If I missed a question, submit it below and I help!
Hair Details: Africana Mayde; color 613
Social Media
IG @Beautygardenllc
Website
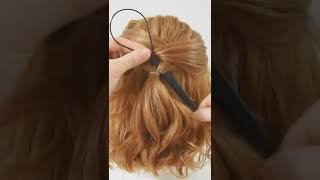
So hey, ladies in this video today i'll be showing you how to do a knotless braid on one inch, hair so doing a pixie cut. Knotless braid took me some time to learn only because i had to learn how to add the hair in with the natural hair of the client being so short, but i figured it out, and this is how i'm going to teach you guys how to do it. Now there may be a little more tension than a normal knotless braid only because i have to grip the hair, but once i let go that base, it's not going to be tight for the client. So, as you can see, i did add hair on both sides and i'm going to continue to do that until i have a comfortable grip on all three strands of the braid. So, in a few of my knotless braids 101 videos i have on my page, this video is exactly the same. The only difference is instead of just adding hair on one side i added hair on both sides. Also, if you've noticed i've added thinner pieces of braiding hair for the knotless braids, only because you don't want to add a thicker base, it will look like a box braid and you still want to keep the knotless braid light. Um. You don't want the brace to be heavy, adding so much hair, just keep tiny pieces um to the side with you. I do rack it on the rack before i start my client's, hair and just add, and as you get comfortable with the thickness of the hair on where you want it to be whatever size that you're doing, then you would flip over to continue to break down. As you can see, so i want to fast forward braiding the shaft of her hair down when we get back to the root to do the next knotless braid i'm going to go in depth and to show you and tell you how to do it. So the first thing you want to do is make sure your hair is smoothed out so comb through that natural hair add a little bit of products if you need to just to get the hair straight as possible. So first thing you're gon na do is divide the hair to three. So i'm gon na get my first base braid down and i'm gon na instantly add the braiding hair. So normally i will braid one more time before i add, but being that her hair is short, i'm going to add herring immediately. I tuck that hair behind to get it out of my way and i continue to braid to the other side i'll stop there and i get another string of hair and i add it between my index finger and my thumb braid one more time and i make Sure i keep that grip on that hair, because her small pieces of her hair will slip and as i'm braiding i'm slipping her hair back into where it needs to be. I'M slicking it down into the braiding hair. Just so it can blend and the grip can be better for me to braid. So i add another string of hair, pull it to the side and i braid again, as you can see, like i'm slicking, that hair down to combine it with the braiding hair. So it's easier for me to grip and i do the same thing on the other side. I add another tiny piece of hair and i continue to braid on the other another one. Now i don't flip to braid under to break the shaft, the rest of the shaft of the hair until i am comfortable enough that the hair is tucked in and it's easy for me to braid the rest of the hair down, i think it will be my Last one i'm adding in oh, i added one more so as you're braiding make sure you're slicking her hair down into the braiding hair. So it's easier for it to blend. Now, if you're trying to braid a blonde hair on a black root, it might be difficult to tuck, but being that most of her hair is blonde and i'm braiding her hair with blonde hair, it's easier to tuck or blend, and you see, as i flipped over To break the chef for her hair, i'm smooth out her braid make sure everything is good, tucked away and i braid them down. So i'm going to let this video play out for the next three braids just so you can. So you can see how i did it on the last spray. I will go back into details to show you how i did it one more time do when we get to the edges of the hair. It'S always the hardest, because it's the shortest piece, i'm just like, i said, make sure you get your your product in your comb to make the hair straight as possible, so your grip can be good um. This grip might look really tight, but it's actually not that bad. I add immediately, as i add in the hair, i continue to braid continue to smooth continue to tuck, honestly my hands hurt after the style, it's only with short hair. It hurts and i know a lot of braiders either charge a lot or just don't do it period because of this reason, but i honestly love the results, so i don't mind doing and i love braiding period. So, as you guys can see, you know just keep adding hair to your comfortable and this style just came out so bomb y'all. She was so in love with her hair do do. Who said you can't get knotly sprayed with half an inch hair? Well, you can't hair got to be at least an inch inch and a half to four inches in order to achieve the perfect knotless braids. Look at these braids y'all. They are so cute, but my phone died and i wasn't able to get um a finishing video of her hair, but you can check me out at beauty garden llc on ig make sure you subscribe to my channel comment below on what styles you want to see In holla at you, girl, bye, y'all, just like your hair, for me just swing your hair for me. So this one was another pixie cut, knotless braid. I did on a young lady prior to doing this client's hair. She did get him butt length. Lord y'all, it took me all day to do this, but look at it look at it just hurt it. It'S so freaking gorgeous. She was in love with her hair. It flowed well, it looked amazing. Just oh i'm obsessed, i'm so obsessed and she's beautiful. Okay, just love it. Yes, ma'am! You
Comments
Sweet Ozzie: Thank you, this is exactly what I was looking for! Nice, neat and extremely informative!
Emily Oliver: Beautiful!!! Thanks for the tutorial, amazing!!!⭐️⭐️⭐️⭐️⭐️❤️
Chastity Jackson: I love your work and I love watching you work! Love this! Please upload more videos. ♥️
Kiyah D: love it. Wish to see more of your DIYs as well !!
Destinie Little: This looks so good omg!!!!!!
zoey: i'm getting my hair braided soon but i recently big chopped my hair and i'm sooo afraid of the braids slipping out fingers crossed they work out
Truluv Travelers: Beautiful, I love it..
Abegail Raymond: Awesome work. You totally rock. Wow
Shedell Win: Flawless technique this is dope!!
Tiff_original: You did that!!!
GangLand Lee: The best ones I’ve seen ❤️
Miss BeautifulJ: I definitely was tuned in the intro and forgot what I came here to watch love your videos sis !
sza: These look pretty.
LargerThan Lyfe: Instagram brought me. Love your work...looking to make an appointment
ALLISON WILLIAMS: Just perrrrrrrrfeccctttttt
Robyn Thomas: Whoever disliked this video are just some pure haters
Anumi: What inch hair and brand hair did you use on that client at the end?
Henri: What products do you use ?
Tyras Humphrey: You does a wonderful job wish you were in buffalo I would get u to do my hair
LoveHim1st: Your work is SO FLAWLESS! You make it look effortless! How much do you charge for this style?I LOVE LOVE LOVE your tutorials. Keep blessing us with your knowledge Huntie. God Bless!
Lyza Jones: Are you booked up ?
Kat TheMechanic: Awww this is my cousin!!!!
hazel ferguson: Omg I need to book with u . where r u located
Your WHATEVER HOMEGIRL: Girl where are you located!!!!
Portia Michelle Bwanali: Hi stranger . Just wanted to let you know that Jesus loves you and so do I <3.
Mehhhh: This is another clip at the end Not the same client from the beginning