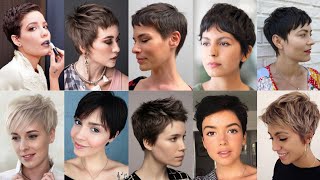
Step-By-Step Tutorial For Fixing Pixie Wig Cap(This Is For Beginners)
- Posted on 15 May, 2021
- Short Hair
- By Anonymous
Hi guys, this is a step-by-step tutorial for fixing pixie wig cap , this is a very detailed video for beginners. Please give this video a thumbs up if you found it informative and don’t forget to subscribe to my channel and share with your friends.
PRODUCTS USED:
- Pixie hair: Tara pixie hair (color 2)
-A pair of stocking caps
-bonding glue
-Spritz
-Razor comb
SOCIAL MEDIA HANDLES
Facebook :
https://www.facebook.com/suzzieberrie/...
Instagram :
Beauty_bay1
#Trending#Subscribe#pixiewig
Music: my last teen
Musician: summer soul
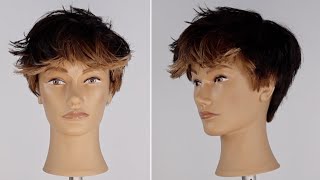
Hi guys welcome to my channel and today's video i'm going to teach a step-by-step tutorial. I mean like a friendly tutorial of how to fix a pc haircut, a pixie wig, all right, so you're gon na need a bunting glue, sprays and two pack of tara, a peasy hair and a stocking cup. So right now i'm going to put on the stocking cup on the i'm going to fix the stocking cap on the mannequin head, and i make sure i didn't stretch it too much. If you stretch it too much, it's going to be so tight on your head and you don't want that so right now, i'm going to straighten some wefts for the beginning of the wake up, so that the reason why i straighten it is to um to make The back or the back of my neck, like lay flat the first three lines, starting from the back. I straighten it to make it flat i'll to lay flat on, like perfectly on the back i and i'm going to face to the line i'm drawing that yeah. So um, basically i'm going to double wefts double i mean like that's how i like um, that's how i fix mine, because you know i want the the back head a little bit bulky, because you know we all have different hair shapes. Some people really have flat back head and you know with pixie haircuts when you have flat back head. It'S not like it doesn't really look good, that's my opinion so like when i'm fixing my pc, i stuck the back head so that it should look bulky. Not that bulky though, but yeah it looks a double wave to make it look a little bit bulky a so now, i'm done with the second step, and i'm heading to the test step, which is the upper hair and yeah, and i'm fixing it horizontally, like just Like that - and i also double wefted and i made sure, like it's really close to each other - some people even put it on top of each weft but um yeah. I left a little space and i'm putting on the glue. So you see how close each weft was uh. So, finally, finally, i've got into the the ceiling, the ceiling part and i'm going to go ahead and measure some piece of weft to the same size of the space there and stick it on second and on. I make sure i put one with on another ver i mean like very close ceiling was long enough like it's okay, so i started um closing the gap at the back. You know like yeah before i finally close with my enclosure with the closure, i'm going to um fold a piece of wefts like to the size of the space i left on top for the closure, yeah and um, i'm going to fold it all around and make Sure it's very close, like it's very tight yeah, so you have to like take your time and fold it piece by piece, then i went ahead and opened. Look at this. The middle then flatten it foreign hurting me, but i have to pretend no one cares about me yeah. So i'm going to go ahead and separate the upper hair from the lower the side inside the lower hair. So i'm going to go ahead with the cuts and for a beginner. You have to go ahead and like cut bit by bit, because you don't want to ruin your um, your wig, so you got to cut it by bit. That'S like the way i'm doing the video foreign hey so hey, so i'm almost done with the cutting and now i'm going to put in a leave-in conditioner to like moisturize, the hair and um. You know to keep it smooth and yeah, and now i'm going to blow dry it and um so yeah. If you notice, you realize i didn't like touch the side and side here the hair and then like trim it in the back neck. One thing about pizza is um when you're fixing for someone you don't have to like trim the ear and the batman, because we all have different hair shape and when you're training your mind, it might be shorter or too long for your client. And so you have to like, do it on your client's head. So that's why i place it on my head to um to trim it perfectly to the ear the side inside here perfectly and with the back. I'M still not done, because the hair is not mine. It'S for someone, so i have to like leave the bag and um. Now i know where i know where the ear will be so i'm going to go ahead and trim off any unwanted hair, excess hair off and yeah. Hey, hey! So now i'm almost done and what i'm doing now is trimming all the flyaway hair. You know when you face uh ceiling, you normally get a little flowery hair and you kind of like trim it off to make your your wig neat. Oh, my god and i know i've got the most horrible mannequin head ever, but that's the only thing mannequin head. I'Ve got at the very show so like i had no choice. So sorry for that yeah. So that's a simple to show you for um peasy haircut. Please, if you like this video, please like comment and share - and please subscribe to my channel thanks for watching and have a great day, bye.

Comments
Sarah King: good work