How To Customize Short Cut Pixie Lace Wig
- Posted on 17 August, 2020
- Short Hair
- By Anonymous
#PIXIEWIG #LACEWIG #SHORTCUT
HEY YALL !
SO IN THIS VIDEO, I SHOW YOU HOW TO CUSTOMIZE YOUR PIXIE WIG.
TOOL NEEDED:
STYLING MOUSSE
RAZOR
FLAT IRON
LINK TO HAIR :
BUSINESS INQUIRIES:
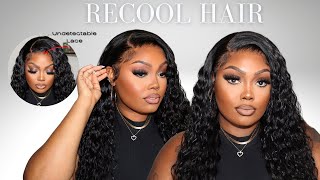
All right, y'all, what's up it's your girl, shea skylar! Today, i'm going to be styling, this pixie wig um! This is how it looks right now. This is the back i like that. The back is already cut short i'll. Put the link to this wig in my bio, and this right here is going to act as a vein once i get it all sorted out, um - and this is the lace here you can see. I already cut the lace, but i haven't installed it. So this is the lace. So the first thing i'm going to go ahead and do is um pluck the hairline because, as you can see, it is not plucked. So i'm going to go ahead and put the wood on my mannequin head, the first section and i like to wet it a little bit so y'all know how to go when it plucks i'm gon na put and then come back. Okay, all right. So i went ahead and plucked i'll probably do i want to pull this up a little bit i'll, probably do a little bit more plucking later, as for now, that's all the plucking that i'm going to do so um. This is how the wig looks again. So i love how this looks in the back: i'm going to go ahead and figure out how i want my part, i'm probably going to wear to my right hand side. So i'm going to go ahead and part this to my right, because i want a deep side part. So i want most of the hair going. That way is going to have this on the side and i can probably do it a little bit deeper and have this going this way now. I know i want my part, so i'm going to go ahead and wet this, so it can stay into place going. This way and then the rest going like this now. For this part, i want to go ahead and shave this down, because this is just a little bit too much hair on this side. For me, so i'm going to take my razor and go ahead. Batman baby come true, calm down, put some on the edges all right. So that's how we want it. Looking on this side here, all right, so we have the back now we're going to go ahead and work with this part here. So we know this is our part, and this is where we want how we want this part of the band to go. So we want it going this way, the hair going back all right all right now, i'm just gon na take my mousse. This is what we have. It comes with four cones. You have a comb right here. You have two on the side and then you have a comb in the back okay. So this is what we have right. Now, i'm going to go ahead and clone it now. It'S not glued down just trying to get a feel of what we have here with this part, i know now you can lay you can lay this out. However, you want um, and this is the lace, so the lace is transparent, so yeah. So if you like this video make sure you guys give me a thumbs up um, you can comment like subscribe um. This is just a tutorial on how you can go ahead and put your pixies um thanks. So much for watching guys.


Comments
Naya Spice: this pixie cut fits you so well, the way you curled it was everything.
ShanAcy: Love the work you did on her, she fits you very beautiful you have the look to rock the pixie wig.
Arion Zhane's World: I love how you have the height in the front of the wig!! that's so cuteeee and really makes this wig unique!!
Janisha Gerald: You did a good job styling this wig
Nicole G: You did such a great job You really do have a face for a cut style , I really don’t think I do lol
Life Coach Roxy: i love this hair on you sis!! Youre so beautiful:). Did you make this wig?