How To Achieve Super Sleek Half Up Half Down! | Beginner Friendly Install Tutorial | Megalook Hair
- Posted on 20 December, 2022
- Short Hair
- By Anonymous
●▬▬▬▬▬▬▬▬▬✤#MegalookHair✤▬▬▬▬▬▬▬▬●
☞Get Extra 20% Off With Code: MYtb20
♥Same Hair I’m Using in the video:➤ https://bit.ly/3Vxpwge
Hair Info: balayage 13X4 transparent lace front 26 inch straight wig
Official website ➤ https://bit.ly/3A9cKwL
New Trendy Color Wigs:➤ https://bit.ly/3EwXVpD
Fire #balayage wigs:➤ https://bit.ly/3X0UVJA
Dome Cap Hd Glueless Wig:➤ https://bit.ly/3TgjLlP
New Pop Wigs:➤ https://bit.ly/3yBsLKK
Wig Under $99 :➤ http://bit.ly/3GtbVlQ
Flash Sale every day :➤ http://bit.ly/3geRUEP
Buy One Get One Free:➤ http://bit.ly/3UMN0xZ
Products used: Mr. Pen- Elastic Band, 0.6", 11 Yards, Black, Elastic Band for Sewing, Black Elastic Band, Elastic Straps, Stretch Elastic for Sewing, Fabric Elastic Band, Waistband Elastic https://a.co/d/9kZJuXQ
Motanar Professional Grooming Scissors for Personal Care Facial Hair Removal and Ear Nose Eyebrow Trimming Stainless Steel Fine Straight Tip Scissors Men https://a.co/d/8aqqqhI
Nairobi Wrapp-It Shine Foaming Lotion, 8 Ounce https://a.co/d/7LH6UBX
Fantasia Liquid Mousse Spritz 2 oz. Super https://a.co/d/cA9NLIE
Ruby Kisses Cream Foundation 3D Face Creator 2-Color Foundation and Concealer, 12 Hour Wear Long Lasting, Medium to Full Coverage (Level 15) https://a.co/d/0Pgtw7S
Aunt Jackie's Flaxseed Recipes Curl Mane-Tenance Anti-Poof Defining Curl Whip, Smoothes and Defines Dry, Frizzy Hair for Natural Curls, 15 oz https://a.co/d/gItGfeW
My Socials
IG: @kamanijean
Twitter: @kamanijeann
TikTok: @manijean888
Wig IG: @wigssoldbymani
Email me for business inquiries only [email protected]
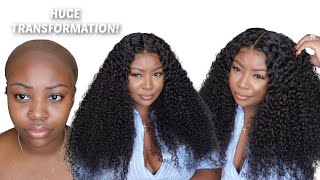
Hey you guys and welcome back to my channel, welcome if you are new here. So if you guys would like to see me install this wig from Mega Look hair 26 inch foliage highlights okay, transparent lace and see how I styled it like, because I definitely got out of my comfort zone with this one. So if you guys would like to see keep on watching so starting off, I have my bracelet back in a bun, because yeah these braids are super old, but I'm listening to the sza album. While I'm doing this I'll have to rate it like a 4 out of 10, I wasn't really feeling it was really sad, really soppy and we're not trying to be on that wave like I'm, not an insecure, and I hope you guys aren't either no shade to Sizzle but anyways uh back to the cap, so I've got the cap on this is an HD cap. This is a new version of caps that the wig companies are sending out now. So you guys will be getting this if you guys purchase from them or any company. I think nowadays like this is the upgraded version, but I am using my red Evan wondered lace, spray on my cap, smoothing that out with my finger, you know real slight real, easy, nothing crazy, so yeah we're just spinning that out right in front of our hairline, A little bit on our edges because it will not damage it and yeah just tapping that in so it won't move around too much then using some of my Erica J glue around the side Burns. What my sideburns, because yeah my calves, do not be laying flat if I don't use glue on the sides, if you know you know so yeah, I'm doing that. I'M using my blow Pro blow dryer to blow dry this down until it is completely dry. It'S going to take a minute, but I'm blow drying it on a cool high, so it can dry down without moving it around or you know so it can stay down. So now that that's dry down, I'm taking my little scissors here and I'm cutting that cap right off um yeah. It'S real self-explanatory here, because you're going to be able to see where to cut off the cap and where you should, you can see the line of demarcation so yeah you want to just cut your cap off just like this foreign to blend this cup into our Skin make it give scalp like we're, bald no hair inside I'm using this makeup brush in my rd15, Ruby kisses cream foundation, and usually I pack it on, but I'm like this cap is HD. Let me just kind of slap it on there slightly. It looks like I'm being rough, but I'm really not usually I'll, be going crazy with it, but yeah. It looks real good per yeah ball. So now here is the wig. This is the inside of the wig comes with a strap. It also comes with combs in the inside, but I cut those off to give me a flatter, install Shadow to wherever tell me that on Tick Tock, because that was super clutch very clutch information, because Google doesn't love a flat wig, a flatter wig at that y'all Know I'm big on the flatness of the wig so yeah now that it's on I'm cutting around my ear tabs, I'm making sure that those are off before I actually install it just so. I can know exactly how to map out my glue when I put it on so yeah and it just is a more comfortable fit for when you're installing your wig. So this is what it looks like I low-key kind of over plucked it, but we'll get into that later. For now I took the wig off and I'm using my except for alcohol in a cotton pad and I'm cleaned off my skin of all oils makeup. All that extra that will up the install Okay, because we don't have time for that. We need this glue to stick to this lace, so it can be a smooth process of an install. So I'm using my Erica J holding me down glue and I'm just really applying this around my cap directly around my cap and smoothing it out with this Popsicle stick. This is how I really get the perfect placement for my wigs. I keep it really close to my cap and smooth it out towards the side and then pushing it in the front, though so it won't fits or like sit so high on my forehead, because I do have a bigger forehead and even though I like to keep My forehead looking like mine, I don't really like how it's it would sit all the way back there, so I kind of keep it forward in the front. I did four layers of glue in which each layer I take my blow dryer and blow dry it on a cool high setting, because warm setting will kind of make the glue not sticky, because it's warm and it's kind of messing with the texture of the glue. So it won't stick, so it has to be a cool setting, guys make sure to do that and high so that it can, you know, do it fast. We don't want to be sitting here all day. Also when applying glue. You don't want to use a lot. You want to use a thin amount so that one it won't get messy and you don't have too much to move around, but also so it can dry down faster and give you a clear finish, because that's what you want. You want the glue to be clear. Not white at all in tacky, that's how you're going to know to move on to the next layers when it is clear and tacky, as you guys can see here what that looks like so I apply more to the size, because I've realized when I apply glue To the side like where I'm doing it now, I'm not going to explain that, because you guys see it like helps with okay, how to explain this, and it helps with the placement of the wig, like I get more Sideburn more scalp towards my ears. So definitely make sure to apply glue to your cap right next to your ear. How I did if you want to go back to see how I did that, go back to see how I did that, but now that the wick is on I'm kind of just placing this exactly where that glue is not kind of. But for surely - and I'm pressing my hand too, to really get it pressed into that glue. Now the thing about this wig, which I've been saying in my past videos, it's biggest it's humongous like this lace, was extremely big, so I kind of had to finesse and really try to press it in and also using my blow dryer in my comb to get That glue really stuck into the lace too, because yeah, it was really big, like I hate that for me, because the wig don't be laying as flat as I would like it too. You know I'll be getting it right, because I know what I'm doing, but it is definitely not fun when you have a wig that is too big. But I let that sit for 12 minutes and now we're back we're here, and this is what it looks like it looks good so now it is time to cut off this lace. Before I take my Razor, I like to take my scissors and cut two pieces right on the side, so I can cut a piece in the middle and then both on these sides just for a cleaner cut and more Focus. You know what I'm saying: yeah, that's really the two reasons, the two core reasons, so I'm taking my eyebrow razor and shaving this lace off kind of in the upward emotion, I usually would say, do a zigzag motion. But since it's a razor, it's kind of already going to be Jagged, anyways, so yeah you guys. That is what I'm doing so. Usually I take my scissors to cut off extra lace. So that is what I'm doing here, but I don't recommend cutting it straight across, because that kind of makes the lace look unnatural and that's why it is very important to get it right. The first time and just use the eyebrow razor because cutting it with scissors. In the front, at least now I can do this on the sides because you can't tell but right in the front, you can tell like the straight line demarcation, so don't recommend doing that. But I did it and it didn't. Look that bad, but yeah perfectionist reasons. Don'T do it I'm taking some more glue, though, to lay down those extra pieces of thin layer, and I use the back of my Edge brush to apply that glue or smooth out that glue. I should say yeah thin layers, because this wasn't the thinnest layer, but yeah don't do what I did here: use a thin amount, so it can dry down quickly. You don't need that much, but yeah, I'm just pressing that in with my finger once that's dried down, cutting some more of that extra lace off that we don't need. And now I'm taking this fluffy maker brush with my rd15 cream foundation and just fluffing that around and Swinging that around the lace, so it can melt even more like with melting. It'S three melts. You have to do. Okay, not just one, not just two three for the scalp effect that you would want. So I'm using my red ebb and wonder, lay spray, and I'm tapping this into my lace like directly onto the lace kind of on my skin, because it's going to do that. Anyway, like it's liquid, it's going to touch it. So did that wrap that back up with my um elastic band and we're gon na, let that sit while I'm styling this hair. So I'm mapping out how I want this to lay how I want the ponytail to lay and how much hair do I want into the ponytail. So that's what I did. That is what I came up with and I'm hot combing, the hair out that isn't going to be in the ponytail and also the hair. That'S going to be in the ponytail to really smooth everything out before I actually make the ponytail a ponytail kind of going deeper into the part, making it more perfect, not perfect, perfecting it more so yeah, I'm pulling up my baby hairs. You guys kind of kind of zoomed into that part, because I kind of didn't require me pulling out the paper, but I pull out my baby hair. It'S pretty much the same in every video, even though I'm doing a ponytail. It'S not really any different, but you guys still see what I'm doing here really just pulling out the perfect amount of baby hairs. For this look not too much not too little. I'M plugging out some hairs of these baby hairs only on this side, because I could tell that this was thicker than the other side and I told y'all how my baby hairs have been thick, and I don't like that. So basically, I just tried to make it as even as possible and put out a thin amount. So yeah I had those wrapped up again and I'm taking my red ebb and wonder: lace spray in a fine tooth comb to get this ponytail stationed and molded like this really molded it. But honestly, I don't recommend using the spray because it does get crunchy. I would recommend using got to be glue spray or Sebastian hairspray, but this is all I had at the moment. I'M using my character wax stick to smooth out this hair even further and let it lay even flatter so and also a plate that applied that to where the ponytail is going to be as well. So I'm taking my hair tie, I would recommend using actual rubber bands like two or three but the ones I was using kept popping. So I took this instead, but the reason why I don't recommend using that matter of fact we'll get into that later. Let'S focus on the ponytail, so you you really want to get it tight. Okay, y'all see how I'm pulling it, but keeping it tightened and stationed like this is what you have to do, but the slickness of the hair and how we molded it is helping it get into that ponytail and keeping it flat and tight. So but you do want to make sure you're using your arm strength to really get that ponytail correct. So that is what it looks like around the edges, not the edges, but around the ponytail to Flat it out even more using the back of the hot comb, because it's hot there too, so yeah just smoothing that out even more, which it definitely helped and I'm Taking a strand um, I can't really tell you how much this is, but you guys can see how much it is by looking at it and I'm wrapping it around the ponytail. Now I will tell you guys why I would not recommend using a hair tie for this, because it's just bulky, like the finish of the hair type, was bulky and wrapping it around and making it look. Super Sleek was hard, even though I managed to do it, but it would be a lot easier if you use an actual rubber band, so you can get it around the band A Lot smoother and a lot easier, rather than having to struggle like how I was To get around the hair tie with it looking smooth at the same time, because it was a little you see that, like the hairs aren't smooth around it, but that's okay! I'M telling y'all what to do instead, foreign! So now I'm taking a bobby pin to clip that in place, so it can stay and that did the trick taking some more of that ebb and wonder, lay spraying that around and then my blow dryer on a heat setting not cool this time but heat. So it can mold and yeah got that right in place, and it definitely lasted just like that. But now we have this band off and I'm cutting off these baby hairs usually use a razor, but I honestly prefer using scissors now, just because it's easier to do and it gives me a really clean cut and I really like how these baby hairs came out. So I'm cutting them right above my eyebrow, you guys know, that's how I like to do it. That'S how I get the perfect length, I'm taking my kiss Pro fly iron in half of a inch and curling the baby hairs in the front upwards, letting it boom. Just like that and then under for my sideburns, because I just like the way that looks y'all know and now, I'm using my Nairobi holding foam in my Edge brush here this new Edge brush that I have it's real clutch, it's real cool. I got it from the hair store, my local hair store, but yeah yeah. You guys, I'm just using my C motions and my finger to help Maltese baby hairs in place and also molding it into the lace to give it that super natural look. But you guys will get that if you cut it the way that I cut it regardless and map them out regardless, because you, you know what I'm saying like the length of the baby: here's not the length, but the width. I should say the width of the baby hair is just long enough to actually go into the lace of the hairs, but this is me kind of bringing it into the front more because this was a ponytail and I wanted to look more, like you know, aligned With the ponytail, so I pushed it more towards the front, but yeah guys. It'S me doing these sideburns kind of flipping it with my finger to give it a like a extra curl extra spoon, but I'm just repeating the same thing on this side. Okay, so usually since I just sit here and let y'all watch me do my baby hairs. This is the perfect time for me to tell y'all the good news that I had to tell y'all in my next video, which here we are so you guys I got monetized. Finally, um yeah - I told y'all previously that I was not getting paid for my videos, which is really crazy, huh to think that I have been on here, motivating inspiring for four years with no pay behind did, but those days have ended and it's over. So now you guys we are going to get into the bleaching tutorials the in-depth tutorials, the blogs any type of content other than hair. That you guys would like to see from me and that I would like to create is coming 2023, so yeah. That was the good news. I just had to tell you all that, because I know y'all was real like what the like. How are you not getting paid? I know crazy, but you don't have to worry about that. No more and it's about to be up so anyways back to this install, I just finished, straining out this hair. You guys know I like to straighten out my hair on my mannequin head before actually putting the wig on and I'm using rd15 that was left over on that maker brush to help it look more natural. But this is really the end of the tutorial like this. Was super quick and a fun style to do? Thank you guys so much for watching. I hope you guys learned something make sure to check the description box for more information on this hair. More information on me, okay and yeah, make sure to leave a like comment. Subscribe I'll see you guys in my next one


Comments
Mani Jean: Heeeyy, missed me? by the way, this wig did come pre plucked!! Like really well so don’t over pluck like me, you don’t have to do too much with this one!! We are MONETIZED so plucking and bleaching tutorial coming real soon! Love y’all ❤
Urban Jae: Another flawless install. You actually encouraged me to start doing baby hairs now!
DricaK Officially: I love how her wigs give her the full frontal space…Or maybe I just couldn’t see if it didn’t…but every wig I seem to order online these days are cheating me of the full frontal space lol if I do a side part it’s like im already running into the lace but anywho I always enjoy your videos
Shyaja Newton: I love the back to back videos
My lyfe as Nia: Great video my struggle be the baby hairs I’m going to keep on practicing fo sho
Carlynn Annessa: Whatttt! I love the sza album, but I do feel like she was tripping a lil bit with the lyrics so I'll give you that lol. Love your installs this is so cuteeee <333
Dajah Fenner: I love her hair tutorials
Krystal Lira: I’m so tempted to get this wig.
Lola Bombshell: the way you pronounced balayage made me chuckle lol. but this was a fire install
Tiffany Green:
Shay Johnson: I’m so obsessed with your videoss
Tiera Nicole: I thought I was the only one bro I wasn’t feeling the album I’ve been real good about myself finally
Malikah Green: congrats on getting monetizedddddd!
My lyfe as Nia: Oh wow you just now getting paid you have so many subscribers I’m sure you had the watch time well Glad you’re monetized now
littleliarsvideos: How do you get rid of the white cast / cruchyness from ebin spray
Zapporia Hobson: congratulations your finally getting paid ! ❤️ that’s crazy that you weren’t tho ! wtfff
J Jupiter: Congrats on the monetization!!!!!
PrettyB Dior: It giving
Megalook Wig: wow dear you are so pretty honey so beautiful
Siani: i tried the moose method on my baby hair and it didn’t work at all
Iamdejahair: Where do you find free music for your videos
Megalook Wig: Over $99 Get 15% OFF Code:xmas15 Over $169 Get 18% OFF Code:xmas18 Over $229 Get 25% OFF Code:xmas25 Over $349 Get 28% OFF Code:xmas28 Over $359 Get $100 OFF Code:xmas100
WT B: she eats every time!
NeoishaNeshaleyTv: How weren’t yu monetized with 72k ?
timo store: can we collab