How To Do A Pixie Wig With Long Hair
- Posted on 12 April, 2021
- Short Hair
- By Anonymous
SHORT PIXIE CUT WIG by @Stecybenz
BOOK YOUR NEXT APPOINTMENTS WITH US
SHANGHAI
Wechat @Stecybenz
MAKEUP
FOLLOW : beat_by_stecy_benz on IG
MUA @Stecybenz
WHATSAPP:+8613197868201 ( link on my bio
WECHAT ID : Stecybenz
BOOK YOUR APPOINTMENTS WITH @Stecybenz
WE HAVE MAGICAL HANDS !!!
YOU ARE WELCOME TO BOOK YOUR NEXT APPOINTMENTS WITH US
WE BRAID ANY HAIR TEXTURE
CHINESE ✅
WHITE ✅
BLACK ✅
ETC
Wechat: Stecybenz
Subscribe to our YouTube channel for more detailed videos
YOUTUBE:Stecy Benz
We offer 101 classes for those who aspire to be WIG GURUS
CALL +8613197868201
IF YOU ARE A FACTORY AND YOU WANT US TO REVIEW YOUR HAIR ON OUR YOUTUBE CHANNEL
CALL:13197868201
#wigguru# #bestwigmakerinchina# #blackgirlmagic##blessedandmagicalhands# #stecyBenz# #Shanghai# #hairsalonforblacksinshanghai ##stecyBenz ##braider##afrobraids # #bestbraiderinshanghai # #4x4closurewig # #sewins # #sewinswithnoleaveout ##howtoreviveyourfrizzyhair ##curlyhairwigs ##wavywigs ##bodywaveswigs ##afrowigs #gluelesswigs #wiginstall #knotlessbobbraids #bobbraids #knotlessbraids#pixiewig #shortwig #pixiewig
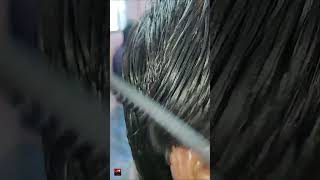
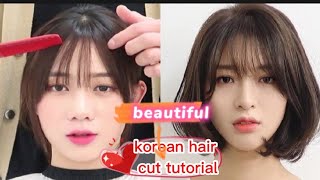
Hi beautiful people welcome to my channel if you're new here, please consider, subscribing and if, if you see this week and you like it, please just give me a thumbs up because in this video i'm going to show you guys how i actually transform a closured wig To be a nice pixie cut, which is glueless, you can wear it gluelessly and you can take it to wherever you want to take it to. You can take it off at night. Put it on in the morning. It'S not like those other ones which you have to go for the hairdresser to actually glue it on your head. You can as well glue it even if you want okay, so today, i'm going to show you guys how i actually make uh cut the the wig to be like this. It'S not easy to cut! So if you see someone selling pixie out there and then you you think, because it's a short week, it's so easy to make, because it's short and it's so cheap no here this week can never be cheap, because i took about two hours just to cut this Wig the right way so that my client can enjoy her week the perfect way she wants it so guys, if you want to see how i actually cut this week from this to this, please stay tuned and keep on watching and please do not forget to like This video first of all pause this and like this video, so that this video should go viral. Let us help others who do not know how to cut that pixie wig! If you have an old sided side padded week or close your wig at home, you can also do it. Try it on your whole week. You can see it's just a closure week. It'S a five by five closure which you can transfer into your pixie. Okay, because most of people go out there, people go um to go online to buy pigs a week and when they get it, it's not exactly like what they see. So i'm today you have to see everything the process which custom people who customize them actually do, because those from the factory are not actually full. They don't take the time to do the right thing. It'S never full! You never see it. Looking like this, so yeah, let's get straight into the video please. I just wanted to remind you guys, please, and please like this video. If you are new to this channel, please and please subscribe to this channel. It'S not good to always come and learn things for free, and you don't want to like. Please like it. Okay, i'm going to bring so many nice videos like this. If you like this video, like it, subscribe, even share, if you, if you can okay, so yes, let's go now into the video hi guys welcome back to my channel. I think this video is going to be long because i'll be explaining how i am able to achieve the pixie cut for me closure week. This is a five by five closure week, which i made myself you can see. I actually use a five by five closure to construct this wig with um 8 inches hair, so the 5x5 closure is about 10 inches or so so um the clay. I wanted a side, a side, part piece, pixie cut, pixie cut from which she is able to wear it without any problems. So she won't decide that so i'm going to first of all before cutting it, i'm going to i'll first of all create the pad. So it's supposed to be a side part, so here, let's see from here to here it should be hard here. So the side should be from here right. So i'm going to cut here. So you will need this comb a lot and also with some some clippers. Like so so, i'm going to cut here, stick it up like so and then i'll just follow this line, and then i cut i'll see you guys just look at what i'm doing just follow this line and then look like so remember: it's a closure wig. So you will see straps as you cut as you open the hair down, so you have to cut this much try to do like a circular, something and then you are actually going to measure like the part where you cut this. You made the side on this. Other side, so you have to open also here. If this was the fullest with you, it would be very okay, but since she can't actually just take it fullest, you can wear so you have to use this method which i'm showing you guys now. So i i'm not a professional, so if you see me passing it cutting the hair in a certain way which doesn't make sense to you: okay, okay, just follow what i'm trying to show you guys. So this is the scissors i'm going to use it's a wrong scissors. This is not what you're supposed to use as a professional you have to use, or instead of scissors with something that looks like i should not use, but i'm not sure i can be able to use that one. So i'm going to use this one, but i can switch between that one and this one. So this is what i'm going to use so i'll cut. The little piece here cut this length, then pull it in front, and then you now cut so now i'll have to make a line in the middle like so leave. This is the middle of the week. The center remember, i made this this week, a side part. So this is the center of the week right here. Oh my god see, this is the center of the week, so i want to cut so for the center i'm going to pick another center here like so so i cut this middle part right now. So i'm going to connect these other ones bye, so we are now at the center, hopefully see what we are doing so at the center. We have to make create the middle part here. So this is the middle part at the center. This is the middle part. So at the middle we'll have to take hair and start cutting it from upward, so to cut it, you have to measure first of all where we want it to stop. So we want to stop it right here right, so we'll pull it up and then we'll cut. We want it to end, maybe at the chin or something here so pull it up and don't cut, and so so so now i'm just going going to blow dry. It and then, and then i'll use this to flat iron, the back and then use the bigger one to flat and to curve the front, my all right guys. So this is the end result. I hope you like it and please do not forget to give me a thumbs up. Okay, i have other videos on my channel showing you guys how to actually make wig and also how to install so. You can check those uh playlists. I will leave the links up so that you can check other videos like this and also, let me know what you want to see next, so that i can make for you thanks for watching, and i will see you guys in my next video

Comments
moudio laure: More videos like this you are so talented ❤️❤️keep it up
Ms.shamenda: this is lovely! thanks for sharing!
Precious Kandwe: It came out nicely
Precious Kandwe: Where can we get the small flat iron
Coco Noir: I want to place an order?? This wig is beautiful
LifewithRo: I’m so glad I found you
Everything Yummy: Learned so much from this video, had to subscribe right away Are you on WhatsApp?
Time Health Fit: finnaly been looking for this, want to be youtube friends?