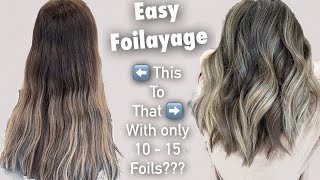
Foilayage | Creating Blonde Balayage On Red Hair
- Posted on 18 August, 2020
- Trending
- By Anonymous
FOILAYAGE | Creating BLONDE BALAYAGE on RED HAIR
Red hair with highlights
Red hair balayage
How to balayage red hair
My natural red hair client wants to blend her grey and add some blonde highlights to her hair. Doing Foilayage, we created a balayage style blonde for low maintenance. My client wants brighter blonde, Not brassy.... Used fanola no yellow shampoo to tone her hair.
◾◾◾◾◾◾◾◾◾
Follow me on Instagram @kristi.at.the.cottage
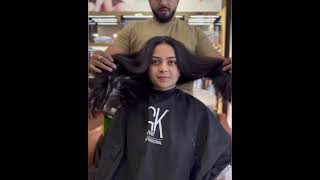
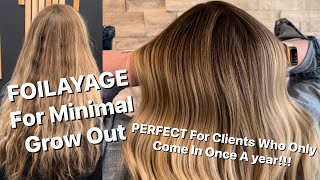
Hey guys for this video we're going to be brightening up this natural redhead, with lots of blonde dimension, keep watching to see how we created this look. You can follow me on instagram at christy at the cottage here's my client's natural hair. We ended up cutting off a couple inches, but look at that gorgeous color. It has such a nice rich, copper color to it, and she was really concerned about how she's kind of graying along her hairline. So we definitely did a little bit heavier right in the front to do some highlights to make sure that we blend it pretty good and when she came in, she said that she hasn't gotten her hair done since like october, and that she really only comes in. Like once a year to get her hair done, and originally she was thinking of doing like some basic highlights - and i just told her that i feel like we can maybe do better than just regular highlights, especially like if it's going to be quite a while before You come in again, so i kind of explained to her like. Would you want to do a balayage, i kind of showed her some pictures of how it might look and she was open to the idea of doing some balayage. So i said you know. Obviously she was saying you know the concern about the grain like around her hairline, and i told her that we can definitely still go through and blend her hairline in to make it brighter around the face and make sure that she has that nice blonde. That she's wanting to look nice and bright, but if she wants to that, we could just blend it a little bit more softly around the rest of the hair. That way, if she doesn't come back for, like you know, nine months to a year or whatever she'll have a little bit softer grow out, and she probably won't feel like she has a heavy of a line as if we did like regular highlights straight up to The root, so i told her that we can do more of a balayage look if she wants to that way. She'Ll have a little bit less maintenance, with her hair and she'll, be more comfortable being able to go longer in between without feeling like. She has a lot of grow out, so she was open to that idea and so right now we're still doing the highlights around her face to try to brighten her up and blend whatever gray that she has and then we will start doing more of a balayage. After this, except i'm doing it more down the mohawk section, because she did say that she wanted it to be a little bit more like dimensional and more contrast than bold pieces of blonde versus too blended. So that's why i decided to go down the mohawk section as you can see, because it will give it a little bit more pieciness of blonde versus being super blended. I know i get super sidetracked when i start talking about one thing and explaining the hair, and then i end up talking about like the whole thing that we're gon na be doing in the balayage when it's like. We hadn't even gotten to that point. So um, just to finish talking about the front piece which i didn't even get to um we're just going to be doing some vertical weaves back to back with minimal subsection and we're just doing them more, like some really fine baby lights. That way, it just blends really softly into her hair and that when she pulls her hair back she'll just have like a really nice, like shimmer of highlights, pulled back into her hair versus like a whole bunch of streakiness or lines. So that's how we're doing our highlights right now. Just a really nice fine weave back to back with just a little bit of a very fine amount of a subsection to break it up and still leave a little bit of her natural and because she does want to be a little bit brighter around the face. I'M going to go through and do a balayage kind of just right in these end pieces that way it will flow nicely from blending in with her natural to brighter throughout the ends, and then i'm going to go on the other side and do it too. That way, we make sure that it starts processing at the same time, and one thing to pay attention is like i had to kind of go back and forth here, because i didn't like bring it up as high as i did on the other side. So i had to go back through and like reef balayage, just to make sure it was even so always make sure you're taking the time to make sure you have balance within the hair. You don't want to do it lighter on one side like right there, you can see that side's falling down and i'm readjusting it so make sure you always take the time to correct yourself and check your work and your clients will appreciate that you're not rushing through The service that you're actually like wanting to make sure you're doing a good job and that it's even everywhere and right on her hairline we're doing just really fine weaves, not anything too heavy just because if she does go a while without coming back to get her Hair done, i don't want her to feel like she has this huge, just bright chunk of blonde right on her forehead, so i'm only doing two fine weaves right back to back, instead of like three or four little foils. So this is all we're going to do right in here. This is going to make sure that she's, nice and bright like right on her hairline around her face, and that was like her main concern so that this way she will have the foils blending with her gray all the way around. So when she pulls her hair back, she doesn't see like a heavy line of gray, because she has a lot of gray, that's kind of heavier just kind of right, underneath the hair and right at the temples i'm going through, and i found her part down the Center of her head and i'm going right off the side of the part on either side of the head and i'm doing a weave just to kind of brighten it up and blend it down a little bit more. But i don't want it to be like a huge chunk of blonde like right on her forehead, so say if i did like two or three foils like back to back red on the hairline i feel like. That would be too thick or too big of a chunk of a blonde like when her hair is parted, and it will just be too strappy of a blonde right off the hairline at the top of the forehead, but because i'm kind of going just right underneath Her part, it's not going to be too heavy and she's still going gon na have a lot of her natural kind of falling on top of it. So the blonde is gon na be more underneath. Her hair and it's gon na meet right at the center, where her part is so. She'Ll still have that brightness, but it's not gon na be too thick or chunky of a piece just right at the top of the head. So, that's why i think it's kind of nice to do it that way, because she'll still have a lot of brightness kind of throughout her hair and underneath, but just right at the top. It will softly flow and just blend to being brighter through the ends, but still maintaining her natural up in her part area and again we're just going to go through and do a weave and backcomb it and just kind of paint through the midsection through the ends To make sure that it blends from like a nice, blended, rooty section to being more bright through the ends, alright, now we're in her mohawk area and i'm taking probably half an inch of that section and pulling that forward. That way, she'll have some depth right behind the blonde pieces right on her hairline and i'm taking a weave. It doesn't have to be like too large of a weave or too small or whatever size, and i'm going to as if i was going to do a weave like directly down someone's mohawk. But i am taking maybe a little bit larger than i normally would just because she said that the color gets a little bit lost in her inner hair, because her hair is so thick. So i'm doing a little bit a little bit larger of a section and then i'm going to back backcomb it and kind of swipe the bleach up towards the root and now we're going to take another dimensional subsection, probably like half an inch are about how big My subsections are and then we're going to do the same thing again down the mohawk just like another nice weave, back comb it and then try to get it up as tight up to the scalp as we can and that back comb is going to create. Like a nice little cushion and it's going to kind of naturally make a root shadow, and this will just kind of help it to where the blonde goes up pretty high, but it's just gon na softly blend from the roots all the way down through her ends. She'S not gon na have that heavy like foil line, it's just gon na blend really softly because of that backcomb. So i think this is a really good option and honestly, if people have a hard time doing like balayage or whatever, i think this is a really good way to go about it, because she said that she likes having more like contrast and dimension and like more Bold pieces of blonde versus blended pieces of blonde. I think it's a good way to just go straight down. The mohawk do like four foils this way and that way, when her hair parts she'll have like four more bold pieces of brightness flowing through her hair, but because we backcombed it and weaved it. It'S still going to be like softer at the root area, but then gradually get more bold as it goes through the ends of the hair. So keep this in mind. This is also another video that i did recently where it was like my take on doing like a modern chunky foil. So this is the same exact technique that i used in that video just because she's wanting it more bold versus blended, and i figured that this would be the best way to go about doing it in this back section right here. This is the very last foil that i have where her part is, and i realized that i'm where her cowlick falls. So i had to go back through and refoil this or do like re-weave this section. Normally, when i do a foil like i'll, take my slice and then kind of weave off of that like section, but because i was in the back section of her cellic, i wanted to make sure that i weaved the hair, how it naturally falls that way it Like blends really nicely through the ends, so that might be something you need to take into consideration when you're foiling someone's hair or doing a balayage just kind of let the hair fall. How it naturally lays and then like just kind of weave your section without having to pull the hair out or anything that way you can ensure that you're getting a good blend from root to ends in the hair's natural state. Now that i have the majority of the hair foiled up through the top section and the front is for the most part done, i'm just gon na go through and grab a few panels to make sure that the ends of the hair and the sides and the Back have enough brightness to match the front, and then we will be done. Her hair is for the most part one length she doesn't have like really any layers, so i don't have to worry about trying to blend the hair. If the layer falls short, then i have to grab like the underneath section or anything, so we don't have to do it too, heavy through the rest of the hair. So right now we're just gon na go through and do a few panels and then call it good and before i let her just sit and process, i'm gon na go through and blaster with some heat. That way, we kind of speed up the process a little bit more to match like the front and the sides. So after sitting for probably like 20 minutes, i came back and checked her hair and we're gon na just reapply just to make sure it's not like drying out or anything. This is just the schwarzkopf blondie, with 20 volume and we're just gon na keep checking her hair to make sure that we're getting past that, like brassiness, even though her hair is very warm, i asked her how blondish she wanted. She says that she doesn't want her hair to be copper. She definitely wants it to be blonde. So that's why i'm reapplying right here, because i want to make sure that we're getting past that level of warmth that she's not wanting, even though i think it's like a gorgeous color, and it would look so pretty with her hair. So we're just going to go through reapply to make sure that we're still getting that lift that she wants again just hitting it with some heat for the last few minutes and we'll just let her finish processing for about 10 more minutes after this. And then we will wash her out. You can see that she's gotten nice and bright, but i was kind of worried that it was still a little bit too, like coppery or too warm so again, we're gon na reapply just to make sure that we're still trying to bust through this brassiness. I feel like it's not even brassy. I feel like it's just kind of coppery and warm. However, i guess it would be considered brassy if she doesn't want that that much warmth in her hair, but i just don't like calling it brass, because i think it's such a pretty color of copper. You know with the natural redhead undertones and everything so anyways we're just gon na keep reapplying and re-blasting it with heat, and i technically could have gone through with 30 volume just to try and get it to pull through a little bit faster but um. I just reapplied the 20 volume that i had there to make sure her hair wasn't drying out and i just let it sit and then it didn't take long before we were ready to wash her out and, to be honest, i didn't feel like i needed to Tone her because we got to really a nice level of blonde and i felt like the tones looked really pretty with her natural hair. So all i did to tone her hair was let her sit with the vanilla, no yellow shampoo, and that was it for probably like 15 minutes or so and that's all i had to do to tone her hair down and it turned out really really pretty here's Her hair after curling it you can see that the vanilla, no yellow shampoo, does such a good job of toning, the hair down, and i mean her hair - turned out nice and even anyways with the blonde. It'S not like. She has any pieces that are like extremely blonde or anything like everything. Just processed really nicely and turned out nice, and even you can see that she has a lot of nice brightness like around the face, and then it blends a little bit brighter through the ends and because she likes it a little bit more bold and piecy. We have a lot of dimension of her natural through there with some of those extra bright pieces of blonde through the mohawk section, and then it still blends really nicely around her face. So there's her before again, just such a really pretty color of red, and then here is her after you can see that it just blends super nicely up into the roots. It'S not like a heavy harsh line or anything as it grows out. It'S just gon na be really soft. Like i mean that's, just such a nice natural shadow root from the backcombing so as it grows out, she's gon na have just like a really soft natural blend, and it just is really softly through through the front too, not too heavy around the face or the Hairline or anything like that, so thank you guys so much for watching. If you have any questions, please ask in the section below and don't forget to like and subscribe.

Comments
Juliette Donohue: Amazing, I love how you prioritize your client's requests over your own preferences; the result is so pretty! the smile she has at 20:06 as well. i wish I had found a hairdresser with your talents last time I went to a hairdresser to get my hair blonder!
Lynn DeCarlo: From 1 stylist to another...i wish you could do my hair!!! I love your work and how you touch on every important detail while explaining.
Amy Jackman: Love that I’m a natural red head ❤️ and years ago I used to colour it really dark in a week I had roots xx
Amanda B: I am so glad I found your channel! I tried some of your techniques at school today! I really appreciate the way you do your videos!
Cynthia L: My god girl you did such a wonderful job with so little foils I wish I could get you to do my hair and Florida it came out absolutely stunning this is the exact color I want my hair bravo bravo your so Talented
paul Davies: WOW Kristi your like the colour " Nija" I love it and the no toner and fanola is just incredible your such a fabulous colourist Kristi and I just love your tutorials so Thank you So much for your hard work and effort to put out this free education for all us lucky stylists you truly are the best X
robert björnesjö: Hello there I love her naturel red tone, so prettyBut this came out just Perfect. Love the technic with the bolder pieces from the mohawk-placement