Mushroom Brown Hair Transformation Using Toner | Blonde To Ashy Brown Color | Diy Haircut & Color
- Posted on 21 January, 2022
- Trending
- By Anonymous
Hi Friends!!
.
.
Here is a breakdown of everything that I used:
Mixing Bowls- https://amzn.to/3AjhzSy
Applicator Brush- https://amzn.to/33VZbmH
Wide Comb- https://amzn.to/33zn3N8
Small Comb- https://amzn.to/3Il0zOk
Developer- https://amzn.to/3GSwBRt
----TONERS----
For the ROOT:
Igora Vibrance 6,0 - https://amzn.to/3nLYL9A
Igora Vibrance 5,00 - https://amzn.to/32jMUrx
For the MIDS & ENDS:
Igora Vibrance 8,0 - https://amzn.to/3AjjrL4
Igora Vibrance 7,1 - https://amzn.to/32lQ1PL
Igora Vibrance 7,4 - https://amzn.to/3AtIqvi
Igora Vibrance 7,65 - https://amzn.to/3FJs2HW
.
---Mixing Ratio----
Root toner: (1:1) I mixed equal parts of both colors with the developer
Mids
~Please note that this is not exact and varies depending on what color your hair is~
Toner: I mixed equal parts of 8-0, 7,1 and 7-4, then included a bit of the 7-65 for that chocolate effect, and added 1:1 ratio with the developer creme. This still gave me a mushroom brown with hints of chocolate brown.
*also note that the toners are enough for 3-4 different applications*
.
.
Let's Connect! Follow me:
IG---@mindfulgenesis
Tiktok---@mindfulgenesis
Pinterest--- https://www.pinterest.com/Genesisbatis...
Blog--- www.genesisbatista.com
Email---- [email protected]
The original video where I saw the haircut technique: Brand Mondo DIY Haircut https://www.youtube.com/watch?v=xvOLIH...
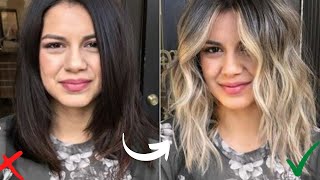
Hey guys and welcome to my channel, if you want to see how i go from this to this, then just keep watching all right so right now my hair is just terrible. So it's been through a lot of bleach, a lot of chlorine from the pool all over summer and my ends are looking just really really bad, so i definitely need a haircut. So i want to change this color. I want to make it a little more blended. I definitely want to go a little darker, as you can see. My roots are super dark. My hair is very dark naturally, but it's it's not blending as nicely as i would like. So i'm gon na blend it a little more and i'm gon na just tone. It down overall, so first, i'm going to just do a rough cut just to cut some of the length - and i saw this video of this youtuber, a hairstylist that used this method. So i'm gon na give it a try and by the way i've been experiencing a lot of hair fallout within like the last month. I would say more around the last two months, but the last month has been the worst and i'm not sure why. I think maybe i'm a little bit stressed um, since we just bought a house and we're renovating it, and maybe that could be the reason. So i think a good haircut is also going to help me with my hair fallout and thinning. So i'm looking forward to that for sure. Okay, so the method is basically you take these little rubber bands and you put them where you want to get a haircut, and i am, i think, i'm going to go three three little ties. Two and three i did four times just to make it a little bit tighter. I'M not sure that was a good idea, but okay, so i think that a good length for me is gon na be like right around here. So i think that's how short i'm gon na go. So all of this is going by mine and, to be honest, i'm not really sad about it, because this hair is so like fragile and brittle that i don't even think this is like nice looking anymore. So i'm gon na take that and do it in the back as well, and then he just recommended that the hair be super straight okay. So we'll do that! The back! You kind of see it a little bit more because the back of my hair is like longer, so that's gon na be a dramatic difference for sure. So i want the back of my hair to be kind of um, just straight um. I have a little bit of a u-shape or v-shape right now, so i'm gon na take some of that shape off and just make it a little bit straighter. So it just thinks a really good look for me. So i that's why i'm gon na place it in the back like this. So that's! This method is for that. It helps you get like the straighter cut. So i said why not right okay, so we are matching up these little. Oh we're not matching up these rubber bands. This one is falling off. Okay, so make sure that the rubber bands are tighter because mine just slid down and that's the recipe for a really bad haircut and then even haircut not too tight, jen. Okay, see perfect all right, so let's see it, let's see that it is the zing. So these are right about the same length and yeah. I think it's a little bit shorter in the front, but that's that's cool. That'S still! Okay, if it's a little bit shorter in the front this, is it the moment of truth here, all right guys. I have shorter hair okay, so i did the other side and we're we're not going to remove the rubber band. Let'S do the back first, so the back will be kind of easy. We'Ll do the same thing screw this right, bye, bye here. I wonder what my husband will say when he comes home and finds me with no hair. He'Ll say nothing because i am in charge of my hair, alright, guys officially official, i have short hair and it already looks healthier. It'S unbelievable all right, so we're gon na trim the front a little bit just because the front of my hair looks atrocious. I'M just going to cut a little bit because you know what i don't want it to look kind of crazy, so i'm just cutting this part a little bit in this part. I'M just trimming the front just slightly just to make sure that that hair is also nicely trimmed and has a little bit more of dimension and flows. Well, once i dry it, you guys, my hair is officially gone. Like look at this stuff, it looks terrible. I needed this haircut so badly, so now what i'm gon na do is give it a little wash and i'll trim it a little bit more after it's wet, because i just feel like my hair. Just does better when it's shrimp and wet so i'll. Do that and then i'll be ready for two, alright guys so we're back. I washed my hair and now i'm ready to tone it. I was initially gon na just trim a little bit more, but i think i'm just gon na leave it rough and straight, like this um to see if i like this look and then later on i'll decide. If i want to change it or not. So let's go with toner, so here i'm using two different bowls, so one is for my darker parts of my hair and another one is for the lighter parts that way i don't get confused and this application is going to take less than five minutes. It'S just basically applying the toner and brushing it um over and i'm all out of developer. So i am using all the agora, vibrance, uh, toners and i'll list, every single one that i use, but i'm gon na use this willa six volume or six percent 20 volume um with the toners, because i'm out of the toning gel, which is usually six volume. So this one is 20 volume, um, so i'll use this. It'S still a right like i, i always use um, just regular, developer 20 or lower um. I just find that when i use 20 it does cover a little bit more. So if you don't want it to lift your hair at all, then i suggest going with six volume um or just a regular gel developer, um yeah! That'S what i'm gon na do i'll list everything and when toning i start from the bottom, and i don't do small sections and i don't use the tiny brush to comb through um uh once it's toned like obviously now i'm detangling my hair, but after i start Toning, like it's important for me, not to pass this because then it's going to run a lot of the product down it's going to make it just look a mess for the toner application, i'm using this size, comb and basically i'm just going to apply through and Then the bottom and then i'll just comb it through and let's get started all right. So i mixed up my root, uh toner shade, and it's like this nice thick consistency. It'S not watery at all, and this is what i like to work with, because when it's watery i feel like, i make a lot more mess and it's tougher to apply so this cream application is my favorite and i'm going to start with just applying it. On my route, all over the root and going about two inches down with this color now, obviously i can't see the back of my hair, but i've done this enough that i can just feel it out. Trust me it's a thing. I can feel it out and see where i'm missing, and i like that this is gon na give me a very subtle lift in my um natural color, so it'll just blend a lot nicer, um and that's what i want. I feel like the blonde was getting kind of. It was too much contrast for me and that just doesn't look good and i have curly hair. So i feel like you have to watch it with the contrast when you have curly hair, because it doesn't look the same when it's straight than when it's curly. So i find that this is the best for me. Okay and very very very important, is having some sort of towel or something for you to wipe your hands, because you do not want to run your fingers through any other part of your hair, especially the part that is lighter. If you want to keep it lighter. So what i'm doing first is going through all of the roots, so just for visibility purposes. I'M gon na do this side first and i'm combing with the small comb just to make sure i don't have any tangles all right and in my application i'm making sure to evenly distribute the root toner all over and make sure it's fully coating, my hair, so That everything can just blend smoothly all right, we'll finish off the casio over here and what is going on behind my head. You ask, i don't know all right so for the remainder of my hair, i just follow the same technique. Um. I just try to fill out what i can and uh apply the product and then use the big comb just to gently comb through and blend a little bit of the product, but not too much so as you notice, i'm not over combing just applying the product. Mostly on the root, i'm mostly careful not to just run the product too low, because i want the lighter parts of my hair to stay lighter and then, if i run it too low, then it's just gon na look overgrown and not nice, so um. This is just just continue to just apply this root shadow um. If you have more hair than me, i highly recommend that you take small portions. Don'T rush um this process, i mean, if you have a dark root like i do it's not like it's gon na you know, work and lighten your hair or anything. It'S just a very subtle lift. So um, i would say this part of the application is the one that takes the longest because i'm trying to be thorough, so it takes about a good five to ten minutes, depending on how much hair you have just to apply this on yourself all right. We have the toner on the root and now we're going with our all-over toner and basically just put it all over your hair. This is what i do off so, okay, so for this part of your hair, you definitely want to work quickly. The product is going to start working on the bleached parts of your hair, so you want it to just distribute evenly throughout your hair. So this part, which is the lighter toner just go, you know, apply it all over, go to town um, don't delay and just make sure that it's as even as possible, and then you can comb through, and this is the crucial part you need to come on. Your hair, because that's how it blends for this part, you want to make sure that you're combing out all the sections just be gentle with your hair um. I am trying to be as gentle as possible because my hair is prone to be just very knotted and tangles really fast, so um, just to avoid any sort of fallout, be gentle with your hair in advance. I did leave a little bit of conditioner just so that it can be smoother for me to run this comb, so don't be afraid to apply that it's not going to do anything to the toner it'll still work, but it's just very important to comb out your Hair so that once you straighten it or even once the product works, you just have a nice uh, blended application, and you don't have contrast like i had before, and then in this part, i'm just applying any extra root. Um toner on the top and just blending out a little bit just making sure that all my edges are toned with this root shadow color and now that the toner application is put on um we're just going to let this sit for about 10 15.. Actually i'm gon na let it sit for about 15-20 minutes, because i wanted to get the color really good, um and then i'll wash off and blow-dry so pray for me just pray for me, because hopefully this comes out how i envision in my head. If it doesn't we'll deal with it, then, but be right back all right guys. So i've been processing for 15 minutes and i'm gon na go wash off this hair. I checked in on it and it's looking pretty dark, very, very dark, which is what i wanted, but let's see if we still have some dimension in there i'll be right back. I love this hair color so much this is not too dark. I feel like it's still dimensional, it's still dark here, but blended well, and the haircut is beautiful. Like a dream, i feel like if you have long hair and do not want to go to the salon or just want to do something at home um. You can definitely try that rubber band method, it's by brad mondo, so i'll tag. The video where i saw him uh post it first but oh wow like this is this is unbelievable, and the hair color also makes my hair feel and look healthier. Okay, uh yeah. So it makes my hair feel and look healthier, so i am obsessed with this um haircut and hair color. I'M excited for fall and i feel, like my hair is gon na finally stop falling out because i've been having so much fallout in the past weeks, especially so i am looking forward to rocking my new hair. Thank you for watching my video. If you found this helpful, then please drop a like and give a comment below um. I hope that i gave you a valuable resource here. I mean this is the little transformation that you can do yourself at home, and this is very user friendly like this is not permanent dye. It really does look very nice, so i hope that you give it a try. If you do, please drop it in the comments. I would like to know about it. If you haven't already done so, then don't forget to subscribe to my channel, because i will be posting more hair, related videos as well as updates on my new house. So, thank you thanks for watching all right, i am going to be including all of the details in the description box with links to where to get these toners, but if you want a screenshot, these are the ones that i used, and this is the specific developer That i used as well hope you liked my video. I am obsessed with this hair color and this haircut too. I feel like it's my favorite color. It'S not too dark.
Comments
Daniela Smith: Love it! Even though you chopped off several inches, I can hardly tell your hair is shorter! Your hair is so healthy and thick from root to end now and looks amazing! I recently bleached my dark brunette hair and dyed over it with a mix of ash blonde and the wella cooling violet additive. (That cooling violet is a GAME CHANGER for murdering brassy orange tones btw!) I ended up with a nice mushroomy light ash brown/dark ash blonde. Anyway, that hair color is stunning on you!! Your skin glows!
Anna Knight: Omg this is exactly what I've been wanting and had no idea how to get! THANK YOU, it's gorgeous!!
Amazing Makeover: I LOVE your DIY methods! Good job girl!
x: This is exactly what I've been looking for for at home! <3
Ana's Way: I love your long hair, but this cut looks sooooo good on you! ❤ And that color is so perfect and nicely blended God bless those hands
Seahorse: Beautiful, the brown color looks amazing on you!
Carolina M: wow you looked like a different person at the end, absolutely stunning!! definitely wanna attempt to do this now
Pammy Thrift: Had the same problem with a lot of hair loss, especially when washing, styling etc. Little did I know I was deficient in vitamins. Problem solved for me. Hope this helps.
Sevi Regis: Fabulous, you did a great job, that shade of brown is so beautiful, perfect for you, love it, and the cut too. BTW, hair falls out if certain hormone levels change.
Suzy Toledo: omg … your results were absolutely stunning!!!!!!!!!!!!!!!!!!!!! that light brown suits you very well!
Grace Arias: I love the color! Great job!
Crystal Vil: Beautiful transformation!
Jenny Rose: Girl my hair is brassy at I did home highlights and it ...didn't go great. Your color looks prettay! Up at midnight watching color reviews I'm going to dye mine back tomorrow to like a level 6 brown
jolss100: Wow turned out so classy beautiful! You did gooooood
Obliterator: Turned out amazing!
theoneje: Wow it came out so beautiful!!!
SinemSrc: Did you use the entire toner bottle on each color? ❤
A G: That is insanely gorgeous!! How did you know to get those toners?
Regina Brus: the result is amazing!
GWEN WILSON: you look TEN THOUSAND TIMES BETTER love it!!
Y.R: Do you use a certain shampoo/condition to make this color stay? It’s beautiful thank u. Xx
Lizzette Moya: Hey could you share how you mixed in all the toners please, like ounces wise
poppy2908: This turned out a dream
R R: hey, how long does this toner stay on for?
z-clips: do i have to buy all of the toners mentioned in the description?
Sabra-miri Savery: If my hair was completely blonde can I still follow this and get the same result?
meggie Qin: Brad definetly should watch this , its amazing
aishatoo1: Okay this is what I needed thank youuuuu
Kat: You looks so pretty! It makes me want to dye my hair darker. With the darker hair and haircut you kinda look like Meghan Markle!!
Dominika Kratochvíl: That brown is perfect for you
Aribella: So pretty
Snjezana Cakaric: Hello I can tell that hair and coluor ist wonderfull super can you tell me only how many developer goes 60 ml or more when coluor ist equally only 7.65 few drops and 1:1 please I need to knowI must made this I have also yellow hair and I want go to brown natural thanks
Stephanie Martinez: Omg beautiful
Yessii Pérez: Wwoooowww ame ese Nuevo Look!!
Sharon Knipe: this is everything i want
Emma Goulter: You didnt mention what toner numbers you used
Jayden Barbosa: But what toner did you use
Jenny Rose: Ps love your result
Stephanie Martinez: What color?
Viviana Luna: This is my current situation
unapologetic Ella: Am I the only one who likes the hair before like the blonde made her skin glow I know I'm weird