Christian Dior Inspired Hairstyle | Black Girl Hair Tutorials
This is a Black girl hair tutorial inspired by a Christian Dior hairstyle called the detached ponytail or disconnected ponytail or ring ponytail. Whichever you would like to call it! This is slightly more complicated than my other black girl hair tutorials and creative hairstyles, but Tell me what you think! Slay or Nay?
For more creative hairstyles out this playlist:
https://youtube.com/playlist?list=PLmt...
Hope you enjoy this video and always remember to: BE YOUR OWN TYPE OF BEAUTIFUL!
Don’t forget to LIKE, COMMENT, AND SUBSCRIBE!
___________________________________________________________
FOLLOW ME ON MY SOCIAL MEDIA PLATFORMS:
Instagram - CurlsOnDemand
Twitter - CurlsOnDemand
For business inquires/collaborations: [email protected]
MUSIC:
Campfire by Scandinavianz https://soundcloud.com/scandinavianz
Creative Commons — Attribution 3.0 Unported — CC BY 3.0
Free Download / Stream: https://bit.ly/_campfire
Music promoted by Audio Library https://youtu.be/9Rfykh-YzCc
Tropical Sensation by Mike Leite https://soundcloud.com/mikeleite
Creative Commons — Attribution 3.0 Unported — CC BY 3.0
Free Download / Stream: https://bit.ly/-tropical-sensation
Music promoted by Audio Library https://youtu.be/Hc6r06k-ADA
*Some of the links in this description may be affiliate links, meaning I may receive a small commission at NO ADDITIONAL cost to you if you decide to purchase something. But guurrlll, I would not recommend anything I have not used!
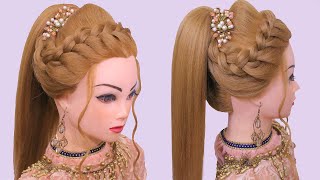
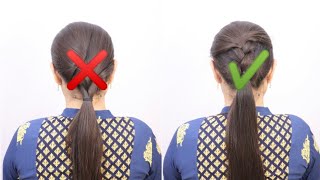
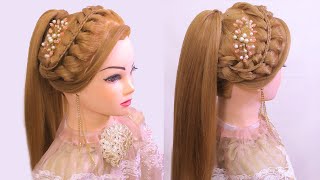
Hey guys welcome back to curls on demand, i'm your girl, spreena and if this is your first time, then welcome to the family. So today i'm going to be doing a hairstyle for you and i'm going to show you the picture that inspired this hairstyle and let's see if we can pull it off. Okay, okay, let's get into the video let's just get in the video. I am excited. Okay, so the first thing we're gon na do is my favorite thing. I'M gon na put like the one little cornrow thing in the middle of my head, which i obviously love to do so. Okay, so i'm done with this braid and now i'm gon na go ahead and like sleek down the rest of my hair. So now that i have like sleep down my hair, you can see i'm gon na go ahead and uh start working on fixing the braid portion of that um hairstyle. Let'S, just let me just show you, okay, so for this braid i'll be using pre-stretched hair, and this is just left over bundles from my last um jumbo braid hairstyle. So this pre-stretch hair is very long and i don't need the tail of the hair to be that long. So i'm going to cut it now, you can cut it in two ways. The first way will create a tail that will naturally get thinner as you go down the strands of the hair. So what i'm doing here is i'll place, an elastic or ponytail at the position of the length. I want the tail of the braid to be, then. I will cut off the remaining hair under the original elastic band. Now the second method will create a tail that is straight and blunt and a lot shorter than the first method, and this is actually my preferred method, so do as you want. So what i'm doing here is, i will keep the original elastic where it is, and i will use it as the middle demarcation and then i will use a pair of scissors to cut the length, the hair to the length that i want. Okay, moving on now, once i have the teal at the length that i want, i will take a small portion of the hair and braid it with an elastic at the end to secure the braid. Now here i'm using a large gold earring as my loop, if you have a loop, that's not an earring, then that's probably perfect, but that's what i have um. So i will use the earring to replace the current scrunchie and then i will place the hair through that earring and put it in place. You can see. I have three braids in here, don't mind that i was going to place two braids on either side of the tail, and i changed my mind. So that's okay! Now i will use an elastic band to keep that braid and tail in place around that earring. Now i'm going to take one braid and loop it around the position of that elastic band. Here'S what the braid should look like afterward to secure the braid in place. I will use gorilla glue now. This is the only time it is okay to use gorilla, glue on your hair or on hair. All i'm going to do is place some of that glue on the end of my braid and then secure it in place once the braid is secure. I will cut off the excess ends. This is what it looks like after everything is secure. Any excess glue can be disguised using black nail polish remover. Now i'm going to move on to the braid before we get into the main braid, i will take out a small portion of the hair and make a smaller braid, which will be used at the base of the ponytail to cover up the place where i attached. The bundle now i will use the rest of the bundle to do the main braid once i'm done with this main braid, it's time to attach the gold earrings with the tail to it. I first create a loop with the braid and place rubber bands where the loop starts and where it will stop once i've done that i create the loop matching, the two elastic bands up and placing another elastic band over them, both to secure the loop in place. Once i form the loop, i will use the opening of the gold earring to place the earring through the loop. Now i want to make sure that i get some of the hair into the end of the loop only because i want that loop to not move at all. If i get here from the top of the loop in there, it will allow the earring to stay in place now i'll go ahead and unbraid the ends of that main braid. Then i'll take a smaller section and re-braid it. Now i will cut off the excess hair as close to the rubber band. As i can, then i will use my gorilla glue again and place it on those tapered ends. Next, i will hide those ends with the mini braid. I just created. You can use extra gorilla glue if you need to just remember that if there's any excess glue showing disguise it with a black nail polish for me, i just wrapped it around and it seemed secure. So i kept it like that here is what the bridge looks like fully secured, and i'm about to show you what the final hair looks like here is a side-by-side comparison of the two different braids you get to choose, which one you like. I personally, like the short one, and that's it guys. Thank you so much for watching i'll, see you in the next video

Comments
amberbug90: U did a great job. The style looks nice.
The Nightshift Network: Your content is amazing. Subscribing rn
Gina Cicero: I want to do this. How do you take your hair down with the bottom of that braid glued ?
amberbug90: Where is your accent from?
Maymay: Girl no this is ugly.