Most Popular Highlight Technique Of 2021
Purchase The TriRazor Here:
https://bit.ly/TriRazor
Purchase My Scissor Here:
http://bit.ly/mattbeckscissor
Purchase My Favorite Combs Here:
http://bit.ly/favoritecombs
Purchase Ergo Brushes Here:
http://bit.ly/ergobrushes
Purchase My Favorite Clips Here:
http://bit.ly/myfavoriteclips
TEXT ME! 215-608-2612
Create a FREE Profile and Watch Hundreds of Hair Education Videos Here!
https://bit.ly/FreeSalonEducation
Shop the FSE Store Here!
https://bit.ly/ShopFSE
Get the FSE NOW App!
iPhone: https://bit.ly/FSENOW
Android: https://bit.ly/FSENOWGoogle
Follow me on Instagram: https://bit.ly/FSEINSTAGRAM
Follow me on Twitter: https://bit.ly/FSETWITTER
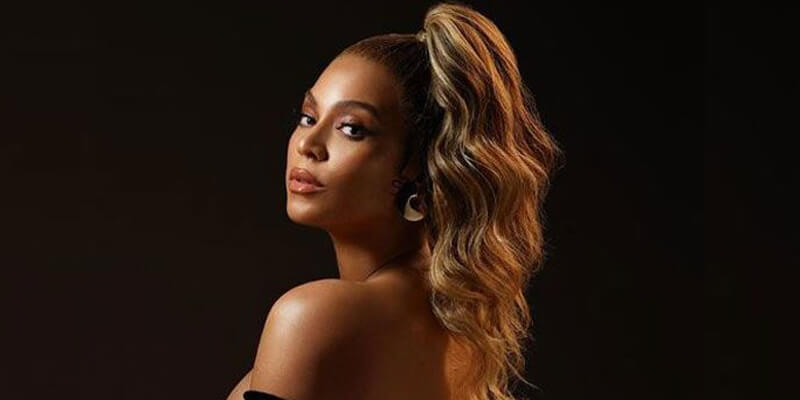
So you see as i'm getting up i'm not coming all the way to the root and i'm letting this sort of fade out. Hey there good morning, good evening, good afternoon, good whatever time it is wherever you are, my name's brian hair, and i am here on behalf of free salon, education today, i'm actually really excited about this class. It'S gon na be a quicker one, just because it's not a super complicated technique, but it's one that makes me really happy because for as long as i can remember that, since i've been doing hair, i've always been obsessed with sarah jessica, parker's color, most specifically her Color in relation to sex in the city, you know before we knew about money pieces before we knew about balayage before we knew about ombre. She was always rocking that kind of look. I decided i wanted to bring it to you guys. It'S simple! It'S cool! It'S effective and it's really really pretty. I'Ve got a photo actually three photos that i picked that i think are just so perfect because it shows the reality of this color. It is gon na, be you know that lived in balayage kind of look, but that picture on the bottom right. There is the one that makes me the happiest, because that's where the focus of this is gon na be that's all i mean those two pictures on the right. That'S the same outfit that's the same day. So that's what balayage is can be will be and does look like. So the focus of this is really really simple: we're going to take out the front hairline and treat that completely different, but the whole back we're just going to apply highlights to it. How it lays because this is an effect, that's going to be when the hair is just out and down. It, has some lightness going on focusing on these ends, not so much in here, because you've got whatever natural dimension. They have whether it's from the sun or previous color we're just going to kind of leave that and draw all the attention and focus down through the ends. My weapon of choice today paul mitchell skylights, the great balayage lightener clay base, i'm going with 40 volume because it's balayage and that's the only volume i use all right - we're gon na work with that got my palette got my bali wrap from sunlights got my brushes. I'M gon na section the hair off first taking off the hairline knot, you're, not wanting a super tiny skinny section, but you're not also taking it all the way back from the high point to behind the ear. Like you do the four quadrants and now i want you to actually look at all of this. That'S left over move it around see where it lives see where it lies, because we're going to highlight this. So i'm going to take this as a full vertical section. All the way down to the hairline, which for here is right at the ear and i'm going to paint the face side of it. So up front is going to be where this gets painted. Give myself a little elevation here. So you see as i'm getting up. I'M not coming all the way to the root and i'm letting this sort of fade out, but then, as it comes down into the hair, i want a much stronger highlight. I'M just gon na gently set that down and then move into. My next highlight that's going to be a little bit further down than that one was so now. This will be two sections in the back. Where i want the highlights, the lowest i'm you want to be careful not to have them start at the exact same place, because that's a pretty large swath of the hair to have a highlight starting at the same spot. And you don't want it to look dipped. So that last highlight started up here so for this one i'm going to bring it down much much lower. Then i see my other highlight started around here so for this one, i'm going to bring it off to the opposite side. Now we're moving back into where these highlights are going to start getting a little bit higher up the head. So i've got this left so we're going to divide that into two good sections. That'S going to be my highest one, and then this is going to be that nice transition to start making it work into that now. This is where i like to cover this, because my sections for around the face i'm going to be working back, so i want those highlights to really pop when they're back so that when it's down it creates that stronger vertical look so start with the smaller one. First, to look at this i know i want all this being super highlighted coming back, but i want this to be the biggest. This is what makes sarah jessica parker's hair sarah jessica, parker's hair, so this is going to be highlighted to hell and back you know. You might look at that and go. Oh, my god. That'S so much. How is that gon na blend with anything? But if you look at the back, it's quite dark. I'M gon na hold it straight back and then i am going to highlight as much of this section as i can possibly get my little bleach brush on. Then i'm just going to throw a piece of bally wrap over that, because i want to make sure that that lightener doesn't dry out, because this is what you want to be the lightest all right so over here we're just mirroring what we did on the other Side and then just move up, there's going to be an extra section on this side, because it's the the stronger side of the part we're still coming back. This is the super important money piece, because this is the heavy side of the part it's on the face. This is where you want to make sure you put all of your precision. Thank you guys very much be sure to download our app from freesalon education.com uh. You can find me on instagram at wrongarmhairstyle yeah. Thank you guys. So much


Comments
elsa blue: Fantastic job! I love this look so much better than basic foils usually come out. Thank you!
Verena Valkyrie: Wow, this looks amazing! Is there a risk that this gets patchy, since the sections are preeeetty big?
Vania Otaviano: Ficou linda amei está técnica ❤️
Brenda c: You are simply amazing!!!!! I love this. I didn't know how to do bayalage till you taught me, I've been doing hair since the 80s
Joanne Lahiff: Love this technique! Her base looks much lighter at the end though♀️
Giv: love this technique! but i wish i was able to see the after a little better
Alicia Davis: Soo good as usual Brian!! Did you root smudge or gloss? Thanks!!
Amy Uplinger: You're making me want to color my hair again.
vibecakes: Hi! This channel is great! If you changed your thumbnails to include a shot of finished products that would be great!
Lucy Moore: How long was the processing time?
euphoricrecall: Looks amazing!!!
Ab M: Not often that I find an education video where I’m impressed with the technique, love this, although I would def say add babylights with a low volume and bleach in the crown. Great job though!
mark Bermundo: Thank you for this man... For newbie like me Watching from Philippines
iheartsummer87: That lightner is amazing!!!!
Shane Doeshair: Honestly, Brian, I had the same obsession and still do to this day, her and Jennifer Aniston.
Bindu Bhanu: Wow! It's looks amazing
Lisa D: Excellent as always!
All Lies BStrong: Yeh I want that and I will do my best. lol I Love You Guys are So Good at This.
Roselyn Campisi: Beautiful!!
Aprill Roberts: Amazing and quick
Angela K: The part was over the middle of her right eye, and we're shown the middle part as the result.
Jane Smith: Love it!
MG W: I’m confused where is the dark root you started with
Macadamia Nutball: This is what people pay tons of money for!! I can do this .. and that looks like Saran Wrap .. how much you charge for a special name attached to it lol
darnell mcintosh: Wow Love it
Angela K: You did not show us what it looked like where the chosen part was ....we can't see what the part looks like, if you select a part, shouldn't we see what that really looks like?
Travis Davis: What toner, root smudge , color did you use after rinsing bleach
Beauty by Bims: Beautiful
Shanta Shetty: V beautiful thanks
Uma Philip:
Scott Coolidge: Yes! That’s all I can say. Lol.
Women Power Family: Thanks dear amazing ❤❤❤❤❤from Holland
lub mak:
Ha Ha: Idol
Meme Sh: good morning
Sasha Dee: How in the world.