Can You Have A Wolfcut On Fine Thin Hair Tiktok Trend 2022 Still Hot
Todays video is all about cutting a wolfcut on fine thin hair, still a big trend for 2022, but more and more people want it, my biggest request is can people with fine hair have a wolf cut
Join this channel to get access to perks:
https://www.youtube.com/channel/UCYL1K...
Hey everyone, thank you so much for joining me on this online HAIR education journey. I bring you two videos a week about all things HAIR. Thank you for all the support and love shown I truley appreciate it!!
HAIR MUST HAVES
Coloured hair -- https://amzn.to/3GPghAV
Damaged hair -- https://amzn.to/35dq6Ll
Flat hair -- https://amzn.to/33C4CXS
Dry hair -- https://amzn.to/3IsZjsS
If you would like to support my channel you can buy me a coffee
https://www.buymeacoffee.com/paulwatts...
This gives me the ability to stay awake longer making more content for you to enjoy. On a serious note, it gives me the cost of your coffee, allowing me to keep making content for you all to enjoy.
*My Salons*
www.paulwattshairdressing.co.uk
*The Products i use in all my videos*
*PWH Clothing *
https://www.merch1st.com/shop/pwh
*FREE Editing Software I use*
Vidiq code - http://www.vidiq.com/paulwattshair
*My Filming Set Up*
Camera - https://amzn.to/2R7X5H6
DJI Osmo Pocket - https://amzn.to/34bA9fq
Vlogging Lens - https://amzn.to/348lLnY
Joby Tripod - https://amzn.to/2wdeNBH
Studio Tripod - https://amzn.to/2X6hRue
Micro Mic - https://amzn.to/2wdqmZv
Studio Mic - https://amzn.to/32IH1Rz
Wireless Mic - https://amzn.to/3v2N7YW
Ring Light - https://amzn.to/3dRJzRv
Studio Lighting - https://amzn.to/34e2t0G
*get 25% off your first track from Lickd https://lickd.co/r/paulwattshair
*Follow on Instagram*
http://www.instagram.com/paulwattshair...
http://www.instagram.com/paulwatts.lif...
Business contact: [email protected]
Post to: Paul Watts Hair, 7 Market Place, Kettering, Northamptonshire, NN16 0AL
Music: @epidemicsounds & @lickd
Get Every Single Time by Bissett here https://t.lickd.co/E1ojEdLRQ5R
License ID: pv87N9y35Yn
Get this and other songs for your next YouTube video at https://lickd.co
DISCLAIMER: All opinions in our videos are our own. This description contains affiliate links. This means that if you click on one of the item links above, we will receive a small commission at no cost to you. This commission helps support and grow the channel and allows us to continue to produce videos. Thank you for the support, we really appreciate it.
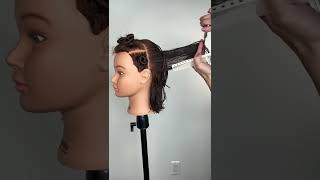
So i hope that's answered a lot of your questions for having a wolf cut and fine hair. Hey everyone! Welcome back to the channel thanks so much for being here. So today's video is probably the biggest comment or the most frequent content content comment that i get given on these wolf cup. Videos. So does a wolf cut suit, fine hair or i've got fine hair. Can i wear a wolf cup so today i'm going i'm going to be showing you so i've picked the what the thinnest the thinnest mannequin head, that i've got and to make it even thinner. I'M just going to run through this middle section and take away a little bit more weight, so you can see, but you can already see that this is really quite fine. This was a blonde mannequin and this has a mixture of joyco intensities on it. So it's got a really bright, pink and then a soft pink mixed together and it's just a beautiful color. We just wanted to bring just to try out really mixing them both together. This was on a level what nine mannequin untoned so yeah. You can see that color, it's beautiful, so the biggest question i get asked is: will a wolf cut suit? Fine hair? I want to show you today, so i just want to make this a little bit thinner for all you, fine haired girls out there soft cuts and i'm just going to literally work from that root and just take away a bit more hair just to make it A bit thinner just to show you that you can wear a wolf cut if you've got finer hair. I'M just working this mid band in just because to take some of the bulk away from underneath, but so it makes the hair bit thinner. And then what we'll do is we'll just do one more through the ends there make it even thinner and then another one through the ends there right just going to brush out all that hair i'll, get this mannequin head, wet down, sectioned out and then we're going To cut a wolf cut on fine or thin hair, essential parting first section, i'm going to be putting in is to make sure we get a fringe. Wolf cuts are renowned for having these big heavy bangs fringes. Areas. If you haven't got a lot of hair, you need to be quite careful with this. So what i'm going to do where the flat of the head? Is there see that through there, that is going to be my point to come from there and i just want to come to the corner of the brow. So that's from there follow through corner of the brow and again corner of the brow. That'Ll give us enough fringe or density to be able to put a nice sort of fringe in there, but we're just conscious of not having lots of hair to work with another section or obstacle you might come across. Is you need this sort of heaviness through here and if you take that layer up a lot you're going to end up with not a lot of density down the bottom, so we have to make sure that we're maintaining some of the density around the bottom. Now, what we would normally do section pattern is probably take just a horseshoe section to make sure we're going to isolate through this top piece start putting the texture, the heaviness and then falling through. We will do the same, but what we're going to do is we're going to zigzag it, so we're going to come down and what this will do. If you just have a look at that section. First off is we're going to dip into the length, but we're going to be maintaining quite a bit of it because we're going to be working higher and you can see there on that section. Let me just spin it around. We'Ve got it dips in there we'll go right up into here. If we were normally sort of section off that section through there, the horseshoe we'd be working around the parietal ridge, the curvature of the head, but we've actually dipped right up into there to make sure that we're keeping a bit more density down that bottom. We are going to trim it up and then we come down and i'm going to go right up back up into that section through the top and then we'll come down and then we'll go back up into that section. Excuse my sniffing if you catch it. If i don't edit it out, hay fever is crazy today. So that's the section pattern i'm going to pop all the way around. So you can see it goes up down up down up down and we're maintaining quite a bit of weight through there and what we want to be making sure is that we dip or we suppose we don't dip. We go up into that top section to make this top section smaller, so we we're maintaining length or or density, should i say around the perimeter: that's our number one and to be honest with it being sort of symmetrical and everything like that, it doesn't have to Be overly symmetrical because we're working with zigzags, so we want it to sort of be quite irregular and melt in just making sure that we're keeping the density on both sides quite similar, just want to make sure as well that we don't really come past. The curvature of the head so we're just coming in one there and then one there, which is pretty balanced and if anybody knows where to get a really good mannequin stand from, because i've bought literally every single one. This is a pivot point, one and yeah expensive, but again they're, just they're, just off really frustrating so i'll. Just show you there there's the section pattern just working around the head in zigzag. Section reason: four is because when we come down we're losing density, but when we're going back up we're holding on to density and length through there, so that's the sectioning pattern. I'M not going to put the length in just yet, because i want to see how this sort of develops and sort of falls over, because if somebody came with finer hair, they would be sort of cautious of putting layers in too much. Layering. They'D also be be cautious of i don't lose too much length. That'S a lot of sort of client experiences that i have and looking at that i i can tell that we need a good trim as we say so what i want to do. First, i just want to let me just pull this away. We want to just put in that shape around the face that you get with wolf cuts and i'm just sectioning just behind the ear. Okay, just there so we're basically just wanting to bring this all forward because with the wolf cuts, how they have this shape through here. I just want to put a bit of that in to begin with, bring it straight up and out so we're elevating and then i'm just going to take off those ends that seemed a little bit weak, but because we're elevating and over directing this away, we're going To be putting in some of the shape, but we're going to be maintaining the length, so you can see there's already a bit of shape through there same again, i'm just putting that little bit of shape through there. So you can see again. I'Ve got that little bit of sort of graduation as such layering through there just around the face. Those wolf cuts start around about here and then they taper back, which is why i'm not going to touch the back just yet. I want that to be that exaggerated length now the top really nice and simple, so we're going to section out the underneath, so i don't grab any of it because we want to maintain all of that that we've we've sort of held on to so basically the High point of the head's, what i'm looking for, i'm just going to throw that back, throw that back. So we've just got this front section that we can work with, because the hair isn't that thick and when we're looking at those ends that need coming off. We'Re going to compound cut so we're going to be cutting so we'll be cutting in one go, just making sure that we've got even tension, we're just going to bring forward and again the weak hair you can see through there. That'S what i want to be taking off and we're elevating and bringing it all to the middle, because what that's going to do is again maintain length, but elevating is just softening off and look because the hair is so fine. We'Re not gon na be getting heavy sort of lines when it comes to cutting hair, which can be creating softness because we're elevated enough to create that softness and all i'm doing now is just point cutting into there. So the hair - that's in the middle here - is going to be shorter and, as it falls out that you can see got all that shape through there and then how i'm going to find my guide for the back section. Is i'm just going to take a bit from the front that we just cut, which is this through here, i'm going to work in three sections, because this is quite a big section, so i'm just going to take a good inch section through that middle there's. My guide from the front, if you can see these little bits of hair here and i could take it up to the ceiling, so there would be my guide and i'd be taking off this, but i wouldn't i wouldn't really be losing that much from the back. I want that to be that wolf cut sort of vibe, so i'm still going to elevate to create softness, i'm just going to pull straight out and then find my guide, which is there. So you can see i'm going to cut from my guide for the length and what that does is it will just create a little bit more shortness through this point here where i'm working, because if i was to take it up to the ceiling now it goes From shorter to longer and that's what we want so, let's just grab the other side and we're just going to bring this into the middle. So we're going to maintain length around the perimeter, but we're going to do the same angle. Elevating great softness point cutting great softness, we're going to grab the last piece of this section, i'm going to mimic what we did here, pushing up into that middle same finger angle through there you can see there's hardly any hair needs to come off. So, let's take our clips out, i'm gon na get it blow dried styled with all this texture in here, but first, let's just brush this back, i'm going to put the fringe in you should be able to see, got all of that texture and weight in there To show you from the back since we start to style this out, we've got the shape from the front that we've already put in, and we've just got this weighty section on top that tapers out and then these pieces here will just refine and just be taking Those off free hand just to put in a bit of a stronger perimeter through there and then, when it comes to being dried, we can see how it's all behaving and then we can put in a stronger baseline if we want to or we can leave it Now, for the fringe, so again, if this client was real, i'd, be tucking, the hair behind the ears or just getting a clip there. Let'S take that out, we want to find a guide in that middle and this will be preference, so this will be talking between you and your client, but we're going to find a point where we want to cut it. That will work best for the client work best for the haircut, so it doesn't disconnect too much, but so there's a bit of a blend. But i i think, perfect sitting on that nose for that first guide and then, when it's sort of parted or worn a little bit heavier you'll, have it all cascading around about the cheekbones. So first off, let's put a guide in on that nose. Just there we're now just going to grab a central section, so you can see there finger angle. There'S my guide, i'm just going to point cut back again to create softness, bring this side up into it, pushing it in to that middle. If you want to exaggerate a bit more, you can push right over to this side if you want to, but when we're working. Today'S look to get the perfect balance, we're going to bring it to that middle and look. You can already see that beautiful shape. That'S falling through there grabbing this side, we're going to pull it up to middle section, same finger angle, same cutting technique. You can already see that balance, so i'm gon na get this blow-dried, get it styled and uh you'll join me when it's all all ready to show you, you can see. You'Ve got a nice weighty fringe in there. You'Ve got a nice bit of disconnection and layer. So you can get that real wolfy sort of vibe, it's just the length now. This is something we addressed at the beginning. What i'm going to do is i'm just going to freehand around until i'm happy with the density, because we've kept a bit of it there and you've got that wolf sort of shape. I just think just to make it look a bit healthier. We just need to free hand some of that length away. The big question i get asked as well is what scissors and that do. I use. I use alpha italia, so these are the 5.5 inch uh you've seen my sixes you've see. Is it 6.5 actually 36.5? Yeah 6.5 and then i've got my evos and i've got my soft cuts and all my cones and everything are all alpha italia, my hair dryer, my brushes apart from my denman, my denman is a kent brush. So all i'm doing now is just free handing in the perimeter, because i don't want it to look. I want it to look a bit wispy, but on purpose i don't want it to look unhealthy, so i'm just putting in a sort of like a silhouette line that i'll be happy and the client will be happy with walking out with, because we don't want to Look as if it's just damaged, we want it to look as if they've had a haircut and it's something on purpose. There'S there is a bit of density down that bottom still, you've got all that layer and everything in there which i'm going to refine. Now, let's just show you through here so there there's the disconnection in the length we've kept that there so on the internal layer that we put in i'm just going to soften off and add a bit more texture just by point cutting i'm not doing it to Take away weight, i'm doing it to add a bit more texture and sort of scaffolding. Let'S just get that behind the ear again elevate up now you can see all that texture. That'S all built in into there, that is the wolf cut for fine hair got the fringe. There got it's kept a lot of weight in there. You can see. I'Ve got all that texture that can build in through there and then we've still kept most of the length. I think the client would be happy, but look at that super sexy product i used was joyful by joyco. Just a volumizing gel worked in you've. Seen me wrap dry a little bit, uh just get it all smooth through here, mid lips and ends round brushed it just to give it a little bit of bump, but look at that lovely. So i hope that's answered a lot of your questions for having a wolf cut and fine hair. This mannequin is probably the thinnest hair ever i've ever had on a mannequin, and i thinned it out as well. So i just wanted to bring you this, so yeah hope you've enjoyed it. Let me know in the comments what you want to see next, if there's a pressing issue or you're going to a salon and you're not quite getting what you want. Let me know in the comments down below and i'll try and help you uh to help understand it might be the hairdresser's right it might be. You can't have that, but there might be something you can have so just that i hope i can help but yeah. I love this hope. You do too and i'll see you on the next video

Comments
CreatureChasm: Thank you so much for doing this. My hair is thinner than that, & I've both cut & trimmed a wolf cut on my self about five times now, each slightly changing the sectioning & density. I learned a lot about doing this with little hair to start plus covid thinning, exactly where you started thinning the mannequin out. What I'd love to see more of is how to then do touch up trims on this, on yourself. (for fine & thin hair, of course) Appreciated so much! Your work is inspiring & the way you speak & your demeanor is easy to understand & relatable. Makes it simpler to grasp. Keep up the good work!
Candy Kelly: I have fine, thin hair. I was hoping to be able to do this cut on myself. After watching this video, I've decided, it's not gonna happen. I can't do the zig-zag part, by myself.
Trina Hughes: Love it ! So I totally tried this from your older video- wolf cut at home - turned out pretty ok ... I can live with it.... great video
Dore: I gotta thank you. Most hairstyles and haircuts don't fit thin straight hair, so your video is very appreciated
Suzanne Watts: Looks lovely. Also loving the colour. Xx
Linda Feck: How long does my fine wavy hair have to be to do the wolf cut?
Pammz 1234: It turned out really good but can u try it on curly hair I have naturally curly hair and was thinking of doing it so it would be helpful to see if it suits on me
mycept: I would say no. It just made my wavy fine hair curl up and look awful...But watching your video to learn.
Roxanna Weaver: Reminds me of the haircut I used to wear in the 60's-70's.
B. C.: NIIIIICE! IT'S 1:00AM HERE IN L.A. WAS ABOUT TO HIT THE BED WHEN U UPLOADED UR VID, I HAVE BEEN WAITING FOR THIS ONE ,THANKS ,ANOTHER GOOD ONE VERY PRETTY CUT.✌
K McCarthy: Never new you can have a haircut like this so it's good to no .Thankyou.
Rootatoot07: Can you make this same hair cut with the 3 ponytails now??
Linda Feck: How short can a wolf cut be?
Maysa Haj: ❤