Its Giving Elegance! Easy Diy Friendly Hairstyle
- Posted on 17 October, 2022
- Updos
- By Anonymous
Todays look is brought to you by Braiders Club Braiding Salon!
We are a one stop shop for all things braids in Lagos Nigeria. We specialise in braiding services of all types. We also sell braiding products both wholesale and retail. We offer training as well, both on and off line! If you find yourself in Lagos Nigeria come check us out! We would be happy to receive you.
Address: 42B Fola Osibo Lekki Phase 1 Lagos Nigeria
Phone Number: 08183807812
Book Appointment Online - https://www.fresha.com/a/braiders-club...
Shop our products - https://braidersclub.com/collections
Register for Online Classes -https://braidersclub.thinkific.com/cou...
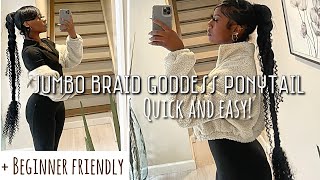
Foreign, hey guys, welcome back to my channel so today I wanted to show you guys this super quick and easy hairstyle that we found online um we've been saying this hairstyle kind of you know circulate throughout YouTube and we kind of wanted to try it out and Just have fun with it, throw in a bit of color and see what we can come up with um. This is such an easy hairstyle and super DIY friendly uh. Maybe I'll go ahead and do a tutorial on my own hair, but I cut my hair so maybe when it grows out I'll, do a quick tutorial for you guys but um. This is super super easy. You can do it by yourself, something you can do when you're in between hairstyles or maybe your hair is not. You know in the best shape, and you just want something quick, maybe for a wedding or whatever, and this hairstyle is super perfect for you. So what we're doing is we're sectioning the hair into two halves and then we're going to do a braid on the side of each halves of the hair um. So that is what you see our stylist doing right now: she's just sectioning it off now, with this braid that you're going to do it doesn't have to be perfect. If you don't have to braid, you can maybe do a stitch on it. That'S if you're doing it on your hair, but if you don't it's still very okay, and you see what I mean when we get to the very end of this look. It doesn't have to be perfect because it is not the Highlight the hairstyle um, so you can have fun with it. Honestly, you can even do like rubber bands that crisscross method on it like you, could really just go all out and just do something out of the box and unexpected with this particular one. So you can just incorporate some triangles and shapes um anything really uh. It doesn't have to be perfect. I feel like this little section gives you an opportunity to kind of like be creative and make the hairstyle your own um, so yeah, let's get back into the tutorial. Thank you, foreign foreign. So when you're done with the side, braid, that's what it should look like remember what I said earlier. It doesn't have to be perfect. It doesn't have to be perfectly stitched because honestly you're really not even going to be looking at that by the time you're done with this hairstyle so now to the main course. Okay, so for your sections that you've suctioned into two, you want to go ahead and do just two big cornrows. Now it's very, very important to make sure that you don't break this too tight, give yourself room. It doesn't have to be neat because you're not going to see this particular braid. It'S not going to show throughout this hairstyle, so you just need to make sure that the cornrows as loose and carefree as possible, because we're going to be crocheting over this particular braid and if it's too tight it could cause. You know extreme discomfort for your scalp and you won't be able to enjoy this hairstyle for long like, I said it's supposed to be quick and easy DIY friendly, and it does not require you to have the most perfect braiding skill. So that is why I particularly love this hairstyle so, like I said just make sure you braid very, very loose, very, very important, because if you don't, you won't be able to crochet your crochet braids on this particular braids. So when you get to the bottom, you want to go ahead and use your crochet latch hook to connect the ends of whatever hairstyle you did. If you did braids, if you did like elastic band crisscross boxes, whatever you decided to do on the left side, you want to go ahead and connect it to the ends of your cornrows. So when it comes to doing the crochet part, it's up to you. So you can either opt for doing the invisible method where you um or the illusion technique. Where you do your knots under your cornrows or you could just go ahead and crochet it as normal, but I wanted this to look as flat as possible. So we ended up just doing the illusion technique at the bottom of the cornrows and I'll show you guys a version of the install towards the ending of a few Clips. So just hang in there but um once that's done. We just went ahead, took a piece of attachment, some braiding hair, whatever you're, using just to start off the braids and just went ahead to braid every single um crochet that we had onto the cornrows. My uh just to remind you guys again to not braid too tight. You just want to keep your braids loose because we're going to fluff this out and you want it to look as fluffy as possible and when you're braiding don't forget to pick up every piece of braiding hair that you have shade onto this cornrow. Because you don't want anything hanging loose and as you go along with your braids, I don't know if you guys can tell, because we did the illusion technique. The side of the braid also became a cornrow at like it also weaved. I don't know how to explain it. It gave it like a 2d um braid look. So the side of the braid look like a cornrow and then the top of the braids looks like cornrows. So I just thought it was really really neat how this turned out with the illusion technique. So that is another option. You know that's another variable when you're, considering how or you know what method of installation you want to use - and I just think this is super duper cute honestly, I wish you tried this hair with like this normal black braiding hair, because I really think Simplicity is Just classy - and this would have just been such a classy design foreign. So as you can see, our cornrows are quite high, so we did use a lot of braiding hair for our look. But if you don't want yours to be as bulky just space out, your crochet um install before you start braiding. So that way, you don't use as much braiding hair and then also don't forget that when you get to the bottom or the ends of your braids, make sure you also keep it nice and loose. Don'T make it too tight because we're going to fluff it out and it's going to create such a beautiful. You know illusion foreign foreign foreign process for the other side of your cornrows. Now, for those of you wondering how we did the illusion technique so as to hide the knots at the bottom of the cornrow. This is how it's done. We put our latch hook in and crochet one strand at a time, and that is how you get your knots at the bottom of your Corners every single time. Thank you, foreign. So this is the fun part. So all we're doing is just fluffing out our cornrows. You can take your time with this have fun. This is very quick um, just be very mindful that you know the fluffier. It is the less likely it's going to last because they have a lot of loose strands, but it's prettier when it's extremely fluffed out. If you get around to try and save so just make sure they're equally fluffed on both ends of your cornrows just so it has a nice, pretty fluffy mermaidy! Look to it. So we went over and over this cornrows multiple times until we're able to get the look that we wanted foreign. Thank you, foreign, thank you. So this is the fun part, have fun with it. What you're doing essentially, is just molding the the cornrows to give it the exact fluff that you want it to have. This is where the Elegance comes into play, so you can just really have fun with it. Expand it as big as you want, or as big as the braid will allow you to without it looking funny and just arrange everything make it aligned and all of that. So when you get to the end, you want to tuck it in on the side and just hide it. So if you want it to last long, you can go ahead and use Noodle and threads. You just tack it in so that waist is hidden where it needs to be, and it stays in place throughout the night for you, if you're looking for something temporary or if you don't want the commitment of wearing it in this particular style, you can just use Some bobby pins just to keep it in place and then, when you want to wear it down, you can just take it out and wear it down. Thank you. Thank you, so guys, that's it for this video. I hope you guys enjoyed the tutorial. I hope you learned something from it: um. It was really really fun filming this book. For you know the salon. I had this video for a while. Now I just never posted it. I don't know why. But here you have it just a quick fun: DIY friendly hairstyle on the go. If you want a little Spice in your book, this would be a great look to try um make sure if you like this video, make sure you thumbs it up. Share with your friends leave a comment. Let me know what you liked about it and, if you're going to be trying this out and I'll catch, you guys on my next video have a merry day and God bless. Thank you.
Comments
judy judy: hermoso,lo quiero hacer
sheilaw1983: I agree that black would have been better but it's still beautiful.
Jessica Fianko: So beautiful and pretty
Winter Roe: That’s really pretty ❤
Pedro: wow that is so beautiful Mami..you did that..
Lafyia PrayerWorks:
Marcia Queen-Barr: Yassss