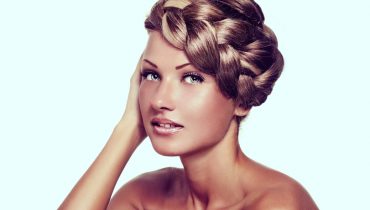
3 Easy Vintage 1940'S Braided Updos - Fitfully Vintage
#1940shair #vintageupdo #vintagehairstyle
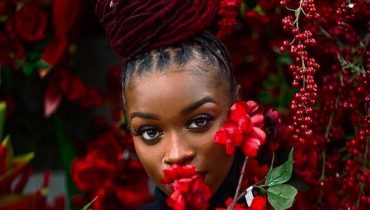
In this video I will show you three elegant and fun braided 1940's hairstyles inspired by the talented @marlavonduta over on instagram.
These hairstyles are great for many different occasions. Wear them to work or school, when you are running errands or doing anything realy. They are great for the summertime because all of your hair is off of your neck. Dress them up with flower accessories or leave them bare for a more casual look.
www.facebook.com/fitfullyvintage
@fitfully.vintage
Hair isn't the most important thing in the world but, sometimes knowing you have a super cool 'do' can make you smile and that can only be a good thing right?
Welcome to Vintagious, here, in my own litttle corner of Youtube I will show you how to create beautiful hairstyles from all eras. Sure, my main focus is on simple vintage hairstyling but I also love easy modern styles.
I don't have a favourite era, it changes all the time. One day it'll be Edwardian hairstyles that I'm all over, the next, pinup girl hair, the next I'll be all about Greek Goddesses and their crazy Barnets! I just love it all!
I do hope that you enjoy my videos and that you can learn something from them, even just a tiny bit - and even if you learn nothing I hope that they make you smile.
http://www.youtube.com/watch?v=OV0jFwe...
Hi today, I'm gon na be showing you 1940s style, braided hairstyles, inspired by the incredibly talented artist, Marla fonduta over on Instagram and her vintage hair style challenge. Don'T forget to subscribe here on YouTube to me and all my other social, which I'll link in the space underneath this video. Also, if you click that Bell thing, then you'll be notified every time I upload a video which is really useful. Just as an aside, if I do need hold today in the video and I'm going to be using and my homemade flaxseed gel, I will link the tutorial either down below or somewhere around here. If I can remember how to do it, so you can do that too, but please obviously use whatever holding or setting product that you are comfortable with, whether that be setting lotion or hairspray or whatever gel mousse doesn't really matter. But I'm going to be using this. So if you want to learn how to make this - and I do highly recommend it's the best deal ever and then click the link, so you're going to want to start with brushed through hair and then you'll make a center parting right away from your forehead to The nape of your neck, I'm using a rat tail comb with a metal, very pointy, and I'm always worried about like having these in the house with kids, because they're so incredibly sharp you can see. I have huge amounts of trouble with party my fringe, because it's just got a really odd bit at the front that just wants to go the way that I don't want it to, but once you've pretty much got that Center part from the front to the back And again, you can see mine's not perfect and ultimately doesn't matter that much because your Pat's going to be going over the top you're going to want to twist the hair away from your face on each side of your parting. And I just do this by grabbing the hair, as I'm moving my down towards my ear. Once you get to your ear, you need to make sure you separate your twist from the rest of your hair, so it doesn't get knotted up and you're going to keep twisting away from your face and then put it to the back of your head. You can now pull on the twist to give your hair more volume and then clippety clip with bobby pins at the back. Just behind your ear, you might need one, you might need two, I don't know, but what you want to get is a nice amount of volume in that twist now here you might need to use spray. You possibly might need to back home this area of hair before you twist it and if you do back home, make sure that you're not kind of pulling super tight on that back combing and you just pull and then pin now you're going to carefully without disrupting The bobby pins that you've put in take the hair over to one side or the other. It'S up to you now initially, I plaited from then kind of under my ear, and I realized that my hair didn't reach around my head enough. So take your hair as if you were going to put it in a ponytail up behind the top part of your ear. So take it quite far up - and this is where you'll want to begin your regular three-strand, plat or braid. You want to make sure that you braid quite tightly so tight to your head, so just pull on those strands as you're braiding, you notice, I'm tilting my head slightly and pulling the plat away from my face and away from my head and that will kind of Just make it a lot neater and easier to pull it up and over the top of my head, I'm just gon na secure it with the normal elastic. I thought I'd bought some of those tiny, clear ones which are ideal, but I haven't right. Keep it coming up when you pull the plat up and over your head hook, your finger one of your index fingers at the base of the plat, and this just stops the loop that can often happen in your hair, that kind of bulges out or ruins the Style it just tugs the plat down at the base and helps keep everything nice and flat and put it over in an attractive fashion wherever you want it sitting forward or back over the top of your head and then pin with bobby pins. I think I needed to on the bottom, and then you can also use. However, many you feel you need to to secure the plat to the top of your bonds, what see something libel or her flower? Very pretty. I just like to put one over the where the bobby pins me also. My ends are a tiny bit kind of thin and straggly it's nice to cover them up there. We go all done, it's pretty, isn't it just a half braid with those twists at the front, nice and authentic and it looks swept across at the back no issues they're very pretty now. So it's much more of a crown braid kind of girl. But I tell you who I saw first, where in these milkmaid braids modern June Cleaver on Instagram, she wears milkmaid braids, all the time, I'm so actually so pretty and they're super super easy to do so again, you're starting with the center parting from their very front. To the back of your head and you're going to brush your sides down nice and smooth I've got a fringe, so I have to get that out of the way and then begin to Oh tip if you've got layers in your hair spread your layers out over The whole of that ponytail, so that you have length in each strand that you'll be braiding with, because the worse worst thing is running out of hair in one strand and then having to borrow from others. It just ends up with a messy messy plat. So if you can spread your layers out so that all of your hair will finish at the same time, that will be excellent begin to do a three strand, plat just pulling nice and tightly. I find that it makes a really nice neat plat. If you pull it tight, obviously I understand. If you have thinner hair, you might need to what they used to call it and if they still do pancake the braids so pull it out to make it wider and that's fine and do that before you put the band on the end of the of the Braid, but you want to continue to braid right the way down to the tips, and you can see now that my ends where my layers are finishing are sticking out. But you don't have to worry about this because the other plat is going to cover the bottom. Half of this plat, so any messy bits should be, it should be covered up and if they're, not you can just spray and bobby pin them. It'S not the end of the world so just again securing with a little elastic and those little clear ones are. So you selection, you know you get like five hundred in a packet, and so you could just do that if you wanted to, but and sometimes it can pull through when you pull up on one of the sections, it can pull Rati bit underneath up and under So you can't see it so sometimes it has its benefits and certainly if you've got a thin here, you might like to do it. So then you just bring it up and over and pin again you're putting your finger at the base of that platter. It meets your head as you pull the plat up, and that will stop the great big loop or bulge. I don't quite know what to call it and that pulling our plat up and over creates also keeping your plat nice and tight. So your head will will kind of control this issue too and you're just going to do it suckle over same on the other side, nice tight, three strand braid and you can see I'm going to bring that plat up and over the ends of the first plan. You'Ll see when I do it so right. The way down see how orange my hair goes at the ends. It'S just natural Sun bleaching, as my hair's got longer, does anyone else have this issue? I can never ever get away with it and unfortunately it looks like damaged hair, but I should take good care of my hair. It'S just the color makes it look fried okay, so you're gon na put yeah yeah cover that up just arrange the plats in the most suitable way for your head. Don'T worry about hiding the end. First, just get them to get the plat secured, and you want to use a couple of bobby pins to actually attach the Platts together as well as onto your head. You don't need too many, and then you want to work with kind of tucking in the end and hiding it as much as you can again doesn't have to be perfect, but considering that's just to plat. Still, it's quite good. Doesn'T it I really like it if you're having a frizzy hair day really helps or if you just need a quick updo, it's great for summer, keeps the hair off your neck yeah. I really like the old milkmaid braid Shea from behind, or could have done better on that Center. Pardon girl - I don't have a mirror, though so. The last of the three stars today is the standing, braids and again you're gon na want to go for a center part from the front to the back. I'M trying really hard this time with that. Come yeah. It'S really tricky! I'M just gon na secure one ponytail away, so it doesn't get caught up while I'm trying to get the ponytail in the other one done and see. Look that fringy bit! Oh, my gosh they're annoying, but it doesn't. You know. I bet you didn't notice that in the final look, so these tiny little imperfections. We don't need to worry about them because people just don't see them generally. Some people do haters gon na hate, but you know most people don't see it. That was really cringe. Okay, so what you're gon na do is take one side into a very high ponytail high and more towards the front than you would wear it. If you were going for bunches and so kind of directly over your ear, I'm gon na pull it nice and high, and you want it to be tight and you want it to be smooth as much as possible. It'S quite tricky use the rat tail comb to brush the hair smooth. If you want to hang upside down to do these ponytails, you might find that a little bit easier. It wants to be because it's an updo and the hair is up and off the side of your face. You'Re gon na see these bits of hair, so do what you can to make them nice and smooth and there's even as possible, and you can, to a certain extent, kind of pull the ponytails once they're done to kind of even them up once. You'Ve done that you're going to create a regular three strand, braid in each nice and tightly again. Can you see where I make the mistake? You can follow it from here that first section of braid is not tight enough and you can see the problem it causes in the end style. What you need to do is make sure the braid is tight from that hair and so straightaway, you're gon na pull nice and tight as soon as you've done that first crossover you pull tight, do not let that first section be loose and you will see why, In a moment, but again a motorbike going past, my house annoying and again imperfections are something that we notice more than others. So once you've done your braid you're going to bring it up either one doesn't matter up and across the front of your face and you're going to flip it under the other braid and pin at the back one or two bobby pins good bone matter. And then you go take your second braid and do it in the opposite direction. Can you see that first section of the braid it's now sticking up, because it wasn't tight enough? It makes the the hairdo asymmetrical and it's something that I then have to deal with later on with using bobby pins. I have to kind of pin that bulge down that bulge would not be there if my plant had been nice and tight so learn from my mistakes, not that it looks horrific. It looks fine and I still wore this hairstyle. You know it's fine, I'm just smoothing up the sides a bit, but I just see they annoyed me. I have to pin it down if that piece of the plat was tight. That wouldn't have happened so keep your place nice and tight, and then you can decorate it. How you wish one flower or two flowers. I can't think what that reminds me of some kind of cartoon character or computer game character or something, but I really liked it with this tropical hair flower just on one side, really nice for air. I deal with my top, my god yeah. That'S pretty standing braids lawfully. I just have a look close-up camera real earnest, ten pounds to anyone who spots a gray. I don't think I've got any couple, maybe thanks so much for watching. I really hope that you liked the video. Let me know down in the comments section how you feel about these stars. Do you wear the regularly? Do you not? Did you try them? How did you get on? Did you do the vintage challenge all of these things, which does do you like the best? Basically, anything, let's have a chat about it down below love you loads thanks, bye,


Comments
Fitfully Vintage: Check out some more great 40's nd 50's hairstyles here. https://www.youtube.com/playlist?list=PLt94X4EPKDiKaAavPrUI0Pq1ub4L7THBe
Devan Speakman: Absolutely love, love, love these braids!!! I have long hair like yours and these braids are so easy for me to do, unlike some other 40's hairstyles. Are there any other 40's hairstyles you could recommend for someone with long hair??
Sarah Martin: Lovely! I've been wearing milkmaid braids quite a bit recently and look forward to trying the other two styles. Honestly, it's nice to see the loose braid mistake and how to fix it. You've poined out a couple of other helpful solutuons to problems I've had with my braids as well, so thanks for that.
Michelle Tackett: Yes! The vintage homemaker queen of updos is back! You go girl! Saved this one and will share it.
Rebecca Sykes: YOU’RE BACK! I love these, milkmaid braids are my go to. Such an easy one but still vintage looking ♥️ your hair is stunning xoxo
TashaDoesKeto: Really loved the standing braids! Gonna have to try them. Has anyone ever told you, you look like Liv Tyler?
Gigi: Very lovely! Also, the process is easy, straightforward with such pretty results!!Thank so!
bad egg: you can make vintage hairstyles so easy to do. thank you. keep it up
truffleflowers: Yay!!! Really want to try that last one soon! Love seeing you back! ☺️
SMH107: I love the first braid. I’m going to try it right now xx
Birdie May: Great video...can't wait to try these when my hair gets longer!
tweetthang96: I love milkmaid braids! Cut my hair recently though and now it’s too short for them! Probably by next summer though lol
Анастасия Шадрина: Very nice hairstyles! Glad you are back with your great hairstyling inspiration Can’t wait for more videos from you Greetings from Russia BTW!
Tudy Cookings: My hair unfortunately is too short for any kind of braid (maybe just a little twisting action in my fringe) but I still love watching your videos. The first was my fave. It looks classy enough for an evening out but also casual for a day at the beach
Miss Toots: Could you please consider doing a 40s pin up on someone who hasnt got as much hair as you please? (Demo on a friend maybe?) most styles I find very difficult with finer hair. Thank you x
carboncookie: So lovely! Gave me a little bit of a Frida Kahlo vibe which is always a plus
Hera Blanche: Can't wait to try these out this summer!!! Thank you for the upload wonder where you got the inspiration and knack from
Emily Chapin: So glad your back on Youtube! Your videos helped me as an awkward 20 yr. old successfully do my hair in a Gibson girl style for a formal I had! Keep going!
alaksandra1979: So very lovely! Yes, my hair is sun colored it's funny. The top layers are golden-yellow brown, and inner layers are black.
Chris S.: Nice, simple ideas, thank you (simple but good is not always easy to come up with)! For the standing braids, I wonder if it would have been even simpler to have done one long braid high on your head and wrap that around? I believe that's the traditional way of doing that style, not that there's anything wrong with doing two braids for a different look. Just thought it might help prevent those annoying hair bumps through having one less base!
Eve Gasse: Definitely going to try those. I hope they work on slightly shorter hair.
Katie Jones: Love it! More please. Welcome back! :-)
Karen Godfrey: Loved watching your video, I wear mine in the milk braid style. I get lots of comments when doing this.
Claire Lefever: Wow, your hair was SO long! I think I’d need two packs of extensions to do most of these lol.
Peggysue Bodell: I loved the standing braids, gorgeous and the tropical flower was lush! Where did you get those please? I've only got collar length hair atm so not sure I could achieve it but I always wear flowers in my hair.
Harleygurl725: I love your videos and I miss seeing new ones!
blondyface14: So beautiful. You really remind me of Louisa Glasson from Doc Martin! Love that you're filming again. X
Melissa Martinez: How can you be so stunningly beautiful !!!
emilywhy: Going to try them all!!
Lucky Sweetheart Vintage: Thank you for posting! I will try!
Juju J: Love your videos!
Véronique LaChatte: My ends always end up 5 shades or so lighter because of the sun. There was a period when I worked outside a lot--I went from dark blonde to almost platinum within weeks, ugh.
JulieAnkha N.: 3rd ones the best on you. Very glamorous. Those ladies in the 40s knew glamor. Thanks for sharing.
Iris M: So glad you’re making videos again!
Valerie Robertson: I could listen to your voice all day long!
Amber Fester: Hi, thanks for another great video! I can't seem to find the link for the flax seed hair gel?
Mary Webb: You have are lucky to have thick hair. You make me miss my long hair now. I cut it to a shoulder length Bob. I used your l Hair videos for a long time. I remember when you dyed your hair pink or red. I am glad you are back
Anne Maki: Great to see you are back <3
Karen Spam: Helpful video!
Lisa Smith: Fantastic!!
San Har: My grandmother wore her hair in the milkmaid braids.
tomasmartelli: you're amazing!!!! :))))
TheWant2beperfect: Just lovvvve love your videos I’m so glad your back ..
Linda Mendel: Very nice!
Helen Wyles: Lovely to see you back miss you on YouTube .
Tzlil Shatz:
B B: Oh, to have this much hair!!!
hayleypoppet: Yay, you're back! ❤
Layla Elizabeth Chester: Will give this a go
Maureen Tuohy: The flowers on either side...Princesse Leah.
C C: Lovely bedsheets !! William Morris inspired ? ^^
Rachel Of Blue Ridge: I think my hair is long enough to try these.
Valeri Oliva: Nice to see you back !
Scrample: Epic style
dogvetusa: Last style with the double flowers reminds me of mortal combat character I think
Karen Wright: I remember you,glad to see you again!!
SpiritBear12: 13: 46 That reminds me of the Mexican artist Frida Kahlo. You just need a uni-brow.
Erika Diazzi: ❤️✨
Tanya Lynn Smith: The ends of my hair get more orange too.
Nandita Mukherjee: Suuuperb
karlie: I'm about to do my first show in a play based in the 1940s and I'm TERRIFIED.
Rebecca (eezepeeze): The last one reminds me of Frieda Kahlo
LaraD: But in the 40’s nobody had long hair really did they?
Ellyn Newman: Ooh I'm first