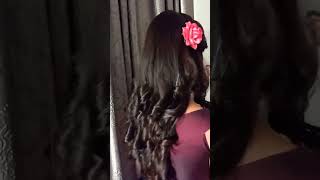
Simple Boho Updo/ Bridal Hair Styles
- Posted on 27 July, 2021
- Wedding
- By Anonymous
In this video I show you how to do this simple boho updo which is such a beautiful style for a bride or any special occasion.
Mannequin Head:
https://www.limage.de/manequin-head-el...
All Products Mentioned In Video:
Awapuhi Styling Treatment Oil: https://amzn.to/3lf8mVZ
Neuro Finish Hairspray: https://amzn.to/370CvzF
413 Sculpting Brush: https://amzn.to/3iWO7J
Paul Mitchell 1' Gold Curling Iron: https://amzn.to/3iVY7Tq
PURCHASE my Bridal Hair/Makeup CONTRACT: https://bridalbeautybiz.samcart.com/pr...
GET MY 11 TEMPLATE, CUSTOMIZABLE BRIDAL BOOKING GUIDE AND BOOK YOUR DREAM BRIDES! https://bridalbeautybiz.samcart.com/pr...-
My Accessories:
Gold Pendant Necklace: https://amzn.to/3iPmxhC
Hey it's megan larson and i'm back with another video for you today, so i'm going to be showing you how to do a twisted loose full boho updo. It'S really simple and i figured it's wedding season and i've been doing a lot of weddings lately. So i figured i'd, show you this quick, simple and easy boho updo and then my next couple videos are going to be on glam ways because i don't know about you, but i have been getting so many requests for glam waves, like literally half my rides for, Like over half my brides are literally asking for glam waves and they're all showing me the same inspiration pictures of glam waves, but there's a couple different kinds of glam waves and it's all about how you prep for them and so anyways. I'M going to be doing a full tutorial on soft glam waves and then i'm also going to be doing a tutorial on vintage glam waves, because there's a little bit of a difference so make sure you subscribe to my channel. So you don't miss those videos that are coming out and if you like, this video give it a thumbs up. So let's get right into it. I'M going to show you guys what it's going to look like when it's finished and then we're going to go through the whole thing step by step. So let's get started. Okay, real, quick! Before we get started. This is going to be a no heat style. I wanted to add that in because it's just going to be twisting manipulating the hair pulling it out using some product to get this look and when i started hair doing wedding hair. Like six years ago, i literally started out every single style by curling the whole entire head, and that took me over an hour just to do one single up to, whereas now it takes me about 30 45 minutes, if it's a really elaborate style. So you really can eliminate and cut your time in half by learning how to do updos and styles that don't involve heat. I still end up using heat in most of my styles for like front pieces or maybe smoothing the hair. But really products can do a lot for the hair and just learning how to braid and twist to do different things with the hair and create like a curled look without actually doing curls. So that's why i'm really excited to show you this style. So let's get started now, okay, so this is the style that i'm going to be teaching you today, it's very boho. You can see, there's some little detail on the side with some twisting and it's just a really full mess messy sort of bun. But polish, at the same time, so boho styles are really in right now, this year too, so i'm going to show you how to get this look. Okay, so first i'm just going to start out by brushing through her hair. We want to make sure that there's no tangles and that we get it nice and smooth and because she is a mannequin a lot of times. Our ends can look and feel really dry and frizzy. So i always like to prep the hair with some kind of oil, something not just super light. Nothing super heavy or, like that's, going to make the hair look too shiny. So i like to use the aopa styling treatment. Oil paul mitchell makes this it's a very lightweight oil. It'S actually it's a dry oil, so it's very lightweight and it just instantly softens the hair and adds a little bit of shine to it. So i'm going to just run that through especially on the ends and just so we can get it nice and polished. Now. The key to doing styles without heat is to make sure that the hair is free of any frizz. Before you get started with the style or as you're working with the style, you want to make sure that you keep it polished and frizz free. So if their hair is extra fizzy, you may need to use a little bit of heat on some areas. Sometimes i have to do on the top layer just using a little bit of heat here and there, but most of the time i can get the hair pretty smooth with products. So then, i'm just going to take the brush and brush that back through the hair and just make it nice and polish. Okay and then the first thing we're going to do is start with the sides and i'm going to go ahead and just leave a little bit of hair down just to soften her style. So we'll keep a little bit of that down and then we'll curl these pieces at the end, and then i'm just going to start up here and we're going to split the hair in half and again i just want to you want to comb your fingers through Make sure you're keeping the hair nice and smooth you don't want to be creating any friction or creating any frizz in the hair, and then we're going to divide this in half and we're going to start twisting it. So i'm going to twist it and grab a little bit more hair twist. It grab a little bit more hair twist and then grab a little bit more hair until we get just past the ear and then i'm going to twist that all the way down to the ends. And then i'm going to grab an elastic and we're just going to secure that twist with an elastic and it will untwist a little bit as we when i let go and that's totally fine and then what i'm going to do is just kind of pinch and Pull it out a little bit? Okay, now we're just going to let that twist lay right there and then i'm going to turn her around to the other side and we're going to do the same exact thing. On the other side, we're just gon na pull out a little bit of hair in the front and when i'm doing it on an actual person, i always let them see the amount of hair in front first and ask them if it's enough for them. If they want more, if they want less because, typically once you start pulling back all this and get it into the style, sometimes it can be too late or it can be a little tricky to pull out hair after so i always like to pull the hair Out in the front first, let them see it make sure that's enough for them and then continue with my style. Okay, so we've got the hair out in front and we're going to do the same thing. We'Re just going to take that little section right here and we're going to smooth it out a little bit and we're going to divide it in half and i'm going to have to turn her a little bit this way and then you're just going to twist. It - and it is important where you stand - you don't want to stand here and do a twist and then pull it back, because then you're going to have weird lumps and loops and all kinds of things. So you want to make sure that you're kind of standing back in the direction of where you're going to do it. So so you guys can see it. I'M going to stand on the side, but normally i'd stand probably like right over here. So we're gon na make sure the hair is pulled back and we're gon na start twisting it. I'M gon na grab a little bit of hair from her side twist. It over grab a little bit more hair twist it over and then we're going to grab one more section just so we get all that hair around the ear and twist it over, and then i'm just going to continue to twist that all the way to the End keeping it nice and polished smooth and then i'm just going to take a clear elastic and i'm going to secure that twist and then once i secure it, it's gon na twist and unravel just a little bit and that's okay. And then i'm just going to pull these out a little bit just loosen them up a little bit and you can pull them out as much as you want as little as you want, or you can even do less twist. If you just want a softer, um a softer side twist, okay, so we're just gon na leave those for now. Actually i got a piece of hair: that's not supposed to be in there. Okay, so we're just gon na leave those out to the side. Where'S. This hair, coming from, i think i just pulled this out - okay - hold on we're gon na redo this twist, because i think i just pulled the hair out, so i'm gon na show you guys one more time all right, so we're gon na start up here and Then we're gon na start on the back as soon as we finish this twist. So let me just retwist this grab a little bit of hair from here twist it over and we're going to grab a little bit more hair twist it over and then we're going to do one more under the ear and twist it over make sure i keep All this hair back here and then we're just going to twist it down all the way, not quite to the end. We'Re i'm going to keep this because we're actually going to do something with the rest of this hair. So it doesn't need to go all the way down to the ends so just to about here and then secure it really good with your elastic and then we'll come back to the side so i'll leave that there i'm not going to worry about pulling it out Too much yet just because we're going to work on that in just a minute, okay, so then i like to take my fingers and we're going to i'm just going to zigzag it a little bit that way. It'S not super um precise, because i do want everything to flow together really well and then i'm going to kind of just zigzag my finger up through the middle. So it's not like a perfect, even line. I feel like this just helps it blend better and there's no part in it, especially if you have somebody who has like a very defined part, sometimes taking more zigzag sections will be helpful for when you pull the hair back, then you don't see that part, quite As much and then i'm just going to do another twist back here and i'm just going to twist this down a little bit about right, there have the ends like this and then we're going to secure it with another elastic and i've got a little white elastic When i'm working with blonde hair, i usually always use white or clear elastics, it just blends a lot better in the hair and then, of course, when i'm working with darker hair, i always try to use like dark brown or black elastics, okay and then what we're Gon na do is just pinch and pull this right up here, so i we get the amount of volume that we want in her crown area, and sometimes i like to take a little bit of spray and i'm going to be using the palmature paul mitchell. Neurostyle finish spray. I like this spray because it's a good working spray. It'S not too stiff, it's not sticky, and that is the key when you are doing updos and styles like this, you don't want anything super stiff or sticky, because what happens is when you start spraying hairspray in the hair. That'S too sticky. It starts to create a lot of frizz in the hair, which is what we want to eliminate. So this is a good light working spray. It actually helps to keep the frizz down. Also helps me work with the hair a little bit. It'S nothing super heavy, okay and then i'm just going to go back in pinch and pull, and basically you just want to manipulate the hair and pull it out until you get the desired amount of volume that you or your client likes, and you can even come To the side and look at it and see if it's where you want it see, if you need to pull it more okay, i think that looks good. I'M going to spray a little bit more of the finish spray and then now we've got all of our twists. Okay! So now we're going to bring these twists back and we're going to secure them back here. So what i'm going to do is start pinching and pulling these out, and i want to pull them out quite a bit, so i'm just going to manipulate them and just play with them and expand them until i like how it looks - and you can see how Much detail that gives on the side and you can really manipulate them and really get the any look you want. I want to make sure that i've got enough volume up here, so i'm going to just pinch and pull a little bit and then, when i like it, i'm going to go ahead and going to put it through this twist right here. So it's just going to kind of lay back here and then make sure that this is where i like it and then i'm just going to take a bobby pin and i'm going to secure that in right. Here and then. Let me see i'm going to take one of, let me see if i can find one i'm going to take one of these little bobby pins right here. These are great for um securing places. So this is like a like a little loopy right here, so i can just slide this in and kind of tack it in place and then just pinch and pull until i get the desired amount of volume and then i'm going to come to the other side. Do the same thing: we're just going to pinch and pull expand this out a little bit until i like it and then - and i have it where i want it and i like it, then i'm going to come back here and put it through the back part And then i'm just going to take a bobby, pin and secure it right there in the middle i'm going to take another one and just pin it in there and criss-cross it over that one i just put in and then after i'm just gon na play with The twist a little bit make sure it looks how i want it to, and i'm gon na stick a couple bobby pins in the side to just hold it where i want it: okay and then spray a little bit of spray on this side. Okay and then i'm going to look at it from all angles, make sure it's where i want it and then i'm going to go ahead and just pin this back section down right here, i'm going to take a big bobby pin her hair is pretty thick, which Is nice for a mannequin okay? So then we have all these tails left. So what i'm going to do now is actually take off these little elastics and you can even cut them off. I usually cut them off when they're in a real person, but - and i don't have my scissors right here - so i'm just going to pull them out and then what i'm going to do is just since this is nice and secure. I'M actually going to put one more bobby, pin right here, because this should all be really secure up here. So then we can start working with the bottom okay. So i'm going to take my brush and just lightly comb, this out perfect and then we're going to divide this in two sections. So this first section right here, i'm just going to lightly comb. It out make sure it's nice and smooth, and then we're going to divide this in two sections and we're just going to twist it just like this and then i'm going to take an elastic and we're going to secure these ends. And i like to wrap it around quite a few times, especially if they're going to be dancing or anything. We just want as much security as possible in the hair and then what i'll do at the ends is. Let it loop up like that. That way, it just tucks in easier and hides better versus just leaving it a straight tail and then what we're gon na do is really just pull out this twist as big as we can get it without making it frizzy. And then what i'm going to do is just twist it around and we're going to just kind of play with it for a second just twist it, and then i'm going to just when i like how it looks. I'M going to pin that tail in and i like to pin the tail in first, because that really starts to help me get that shape and then i'll come up and pin the other parts and i'm just going to kind of hold it put a bobby pin In there, and then we use a little bit of hairspray again just to keep it from getting frizzy hold it in place and then we're going to do the same thing with this section, i'm going to just lightly comb it out. First and i'm holding this, you don't want to pull down on it, because if you pull down, it's going to start messing up your style up here. If you start brushing too much once i got it smooth we're going to divide this in half and i'm going to just twist it around a couple times and then leave those ends out a little bit and then we're going to take another elastic. And i'm just going to secure the ends and then right at the end, i'm going to loop it up like this and then i'm just going to pinch and pull the twist out and then once i do that, i'm just going to just fold it twist. It and place it where i feel like it looks the best and then you can kind of manipulate it after and then again i take a bobby, pin and secure those ends first and when i put it in, i do a little bit of a weaving action. So it really gets in there and locks it into place. Then, once i get it in place, i can come over here secure the middle of it again do like a little weeding action and then, as i'm doing it, you can pinch and pull the up here. Wherever you feel like, you need any places to be more volumized or anything like that, and then i'm just going to go around and put some bobby pins in it to secure it and i'm just using the little ones and i'm just weaving it a little bit Into the hair - and this then make it one more over here and then i'll show you guys the whole look and then again i just like to look at it from all angles. All sides make sure it's proportional make sure everything's how i want it, and then you can just pull these out a little bit more and just kind of look at your bun make sure it's how you want it all right, okay and then. Lastly, i'm just going to take the curling iron. This is a one inch curling iron and it is my paul mitchell. One inch gold, curling iron, i love it so much and then i'm just going to do the other side and then i will show you guys. The whole 360 view of what it looks like then after i curl the front. I usually just like to run my fingers through it and then even take a little bit of hairspray, which let me go grab my hairspray and i just like to fan them out spray them back away from the face until they're kind of where i want them. Perfect all right, let me show you guys the whole look. Okay here she is there's a little twist, the beautiful bun in the back and then let me turn her this way. Oh she's got a little bobby pin out there. Then here is the other side and then here is her front so beautiful. I love this style, it's so boho and effortless, and so cute and beautiful and elegant and all the things i just love it so much if you guys try this make sure you tag me on instagram at megan.org and i'd love to see your replications of this And i hope you enjoyed this tutorial and i will see you guys in the next video make sure you subscribe and like this video. Like i said my next video will be all about the soft glam waves and then i will be doing one on the vintage glam waves. So i will see you in the next one.
Comments
The_Bridal_Stylist: I Just came across your tutorial. Absolutely loved it! I'm a fellow hairstylist and these styles are my go to! x
queenb0102: Beautiful! Loving the videos your making! Keep up the great work
vanessa corona: Very helpful loved this video simple then yet beautiful
Lucy Clayton: Please make more of these! X
Gee Torrez: Wowww stunning! Can’t wait to try this out
Lisa Dinear future hairstylist!: ❤️I absolutely luv ur Yt channel & adore your hair! can u make a vid showing how u trim or color it? Oh and before I forget where do u get your capes from baby doll? mine just teared the other day! hopefully it comes before the video, otherwise you’ll be protected in a normal cape, meanwhile I’ll be in my ripped one getting hair all over and itchy. I better look fast, I loved my cape so much until the tear and would love a color refresh vid!!