Live With Pam - Half Up Half Down Bridal Hairstyle For Natural Curls & Securing Hair Accessories!
- Posted on 24 February, 2022
- Wedding
- By Anonymous
As requested, in this weeks live tutorial, Pam will be teaching us how to create this beautiful half up half down bridal hairstyle for naturally curly hair as well as demonstrating how to secure bridal hair accessories, including a glamorous DOUBLE VEIL!
This curly girl hairstyle is an essential, and so is ensuring you feel confident in styling natural hair textures so your clients curls remain SECURE and gorgeous throughout the day... Fear not, you're in the right place!
Links to the products used by Pam (where available):
Boots Essentials Curl Cream: https://www.boots.com/boots-essentials...
Subscribe and learn the latest wedding, bridal, prom & party hairstyles alongside timeless, classic hairstyles and vintage looks that never go out of fashion.
Visit https://www.createbeautifulhair.co.uk/... for more information on learning with Pam.
Want to master the art of bridal/wedding hair and learn with Create Beautiful Hair? There are many ways to learn with Pam: https://www.createbeautifulhair.co.uk
1. Join our Habia approved award-winning online bridal hair course, learn from home and submit work directly to Pam for assessment and feedback as you work through the models; receive as much support as you need! Complete the assessments and receive a Habia approved CPD certificate upon completion of your bridal hair training. Our SALE has begun! ***Use code SAVE200 to join this course with HALF PRICE OFF!*** Find out more at https://www.createbeautifulhair.co.uk/...
2. If you are in London or nearby, enquire into private Bridal Hair one-to-one tuition for yourself or for a salon! DM for more information on private courses!
3. Check out more of our YouTube channel for a selection of our freely available tutorials . . . like and subscribe for more information and updates, YouTube link: https://www.youtube.com/channel/UCDKUM...
4. Join us on Facebook for more tutorials and all things bridal and wedding hair!! https://www.facebook.com/createbeautif...
Whichever option you choose, please do get in touch and share your fabulous creations and suggestions on what you want to see next!
We've got it covered . . . we even have tutorials covering the curly girl technique!
Great for fans of natural unintentional ASMR!
Hairstyle tutorials include hair prep, hairstyling and hair up, blow-drying, curly girl techniques, working with different hair types, hair textures and hair lengths.
Create hair up & bridal hairstyles and become a bridal hairstylist with Pam Wrigley, UK Wedding Hairstylist of The Year!
Just SUBSCRIBE & LIKE!
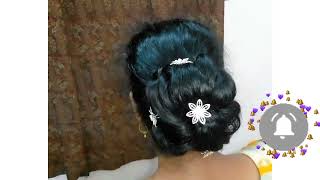
Particular bridal hairstyle that you you'd like to learn or a technique that you're not sure about a hair prep technique that perhaps you're not sure about. Please feel free to put your questions into the chat box, and i will get back to you. Hopefully, tonight i'll try and keep an eye on the chat box and kind of answer questions straight away, but sometimes i get a bit kind of carried away, working with the hair and but just bear with me. I will keep checking the chat box and tonight's style. We'Re going to be working tonight with naturally curly hair now uh. If you're working as a bridal hairstylist, you really have to be able to work with all different hair types, and sometimes it's not always easy to get hair to get practice working with natural curls. So what i've done? I'Ve cheated this a little bit here. I'Ve actually curled the hair on this practice head now. We'Ve done this on one of our previous live tutorials. If you want to have a check back into the into our catalogue of live tutorials, we've got a couple of tutorials there and one of them where i do a half up, half down style. I actually talk you through creating this natural curl effect on your practice. Head, it does take time and you have to do kind of one small section at a time, literally we're creating little kind of small individual curls in the hair, with our small kind of 13 or 15 millimeter tongs and using probably using a stronghold hairspray or a Setting lotion, so you get a nice kind of firm curl and it does take you a good hour to to create this look on your practice head. But it's definitely worth persevering because then you'll find you'll be able to kind of practice. Lots of styles in the curls, especially if you've got a couple of practice, heads because the curls stay in really well, once you've got them, so you can create a couple of you know you can create a style change. It create another style, all the time. Being careful to not spoil the curl and that in itself is really good practice, it's good practice not to kind of get into the habit of pulling your fingers through the curls through the hair. We can do that if we kind of got a soft beachy wave, but when you're working with natural curls. The last thing you want to do is start pulling your fingers through the hair, because you end up getting a kind of frizzy, flyaway fluffy, look and if your ladies want to use their natural curl, they want you to achieve a perfect gorgeous glossy curl and then To keep that curl, so what you can do, rather than pulling your fingers through it and trying to get lots of root, lift that way what you can do is what i ask my clients to do when i'm working with my collar hair clients is i get Them to tip their head upside down, put the fingers just in the root of the hair and give it a little kind of lift that way and on your practice head what you can do to get root. Lift is just give it a little tip it upside down. You can kind of almost do the same thing. Putting your fingers in there notice i'm just putting my fingers in giving a little shake and pulling my fingers out in and out you're not kind of pulling your fingers through the hair. Okay. So that's my top tip for today, for when it comes to working with natural, curls, okay, so look she's got a little bit extra um there already and the thing about natural curls is. If your lady wants a little bit of root, lift it's kind of going to be a natural curl tutorial today. Let me just check our questions. One second see who's joining me today. Oh good, i'm glad you're excited for today's uh lesson. Today'S tutorial. Okay, so also we're going to get. As i say, it's going to be like a curly girl concentrated tutorial today, but in such a way that you can go away and practice on your practice head rather than kind of trying to search and kind of one thing watching videos. And i also have a an online bridal hair course. So if you do want to find out lots more, you can join me on my online course, but it's once and we've got lots of tutorials on the online course just on well on all hair types. You know straight wavy, curly, girl, afro, but just on kind of curly girl. We'Ve got kind of four or five different uh different models. Who'Ve got all very different types of curly hair and weight, and you can watch the videos again and again and again and you can kind of get a feel for what you want to do. But there's nothing quite like practicing. So if you don't have a curly, haired friend that you can practice on, don't worry just curl the hair on your practice head and practice the styles. So, let's, first of all before we get into this we're going to be securing accessories and we're also going to be working with a veil, a double uh layered veil today, because one of our one of my my comments from my fabulous subscribers. So if you haven't subscribed yet don't wait any longer um and one of my uh subscribers uh, sent me a message this week asking me if i could show how to secure a kind of double layer veil in a soft relaxed style and there's nothing more soft And relaxed than a gorgeous curly girl hairstyle. So that's what we're going to do tonight as well. So, first of all, we've got this lovely root, lift from tipping her upside down. So now we want to keep it and we can't backcomb natural curls, because you just end up with fluff and frizz. You don't really want to use texturizing powder because to activate it, you kind of have to rub the hair a little bit and it does kind of work if you've tongued the hair, but if you've got product in the hair. So if i was to put that texturizing powder in my hair because i've got product in it uh it just goes kind of gloopy kind of gunky, not gloopy, just a bit gunky, and really you don't want that. You just want to have this gorgeous curl. So i'm going to show you how you keep this height without using backcombing texturizing powder or any of that kind of stuff. So basically what you're going to do you're going to just pick up the hair. Let me just check where she is, whether that's it so pick up the hair a little bit in a just a little section of hair. Let me turn around, so you can see i'm not picking up lots of hair and i'm going to gather those curls together. So try not to separate the curls when you're working with them, so you're not kind of pulling them apart. Just pick up curls. That kind of naturally tend to congregate together, give it a little nudge, a little push up and then stick a bobby pin in it. Hi sharika, thank you for joining me and that's we've got our little bit of uh, that's it, but can you see what i've done? That'S not very good here. You see that visible bobby pin there, so we don't want that. We are aiming just in case. She says she loves it, but she doesn't want to bring anything across and cover that. So then you got to work out right. Well, you don't want visible, you don't want bobby pins to be visible in the hair, so what you probably better to do. Let me turn her around and twist. It is try and get that bobby, pin underneath and underneath well, i've got it underneath my thumb now and push it up with a bit of pressure better. Now you can't see it now, it's not easy! So i'm sorry, if you can't see kind of close up and in detail here everything that i'm doing, because it's not easy on these live tutorials to kind of zoom in and get kind of close up. But i'll do my best and if you are learning how to become a bridal hair stylist, then i would recommend having a look at our online bridal hair course, where you can see all this kind of detail on lots, more close-up and personal, more personal. So, let's just secure this so you're, just gon na get a little collection of curls, give it a twist give it a pull pop, a grip in, and you know if she wants this kind of height to start even further forward. She could always kind of pop a grip here if you wanted to, but it's kind of just a case of kind of having a little play, seeing where the curls and notice i'm not pulling my fingers through the curls, i'm literally just kind of picking up the Curl, giving it a little twist giving it a little pull and popping a bobby pin in there so i'll say once you've got these it just. It is a bit of a labor of love, getting these curls into your practice head, but it's definitely worth it um, because you can try so many different styles once you've got them. If you need to separate the hair, just gently almost tenderly separate those curls. That'S it and if we were working with a person now i'd probably make sure so, i'm just making sure everything sits nicely together. That i think, needs a little prop in it, so it stays up there a little bit higher. If i was working with a person here and using her natural curl, i'd have a water spray handy so that if i do get any errant curls, i can just spritz it with the water spray. The thing about curly hair is when you work with natural curls. Is all you need is if it just goes a bit frizzy just put a bit of water on it and it'll get back to normal. If you're working with your practice heading, she gets a bit frizzy, you could use a little bit of your list. Control uh like a curl cream, smoothing styling cream or you could even use a little bit of uh spray wax. This is a big sexy, hair spray wax uh play dirty. It'S called or there's another one that i like and that's the gold. Well, they do another kind of spray, wax, that's lovely and you might find if your practice head is anything like mine. She has a few little dry. The ends are a little bit dry, so you could trim them or if you want to keep the length just pop a little bit of extra product on there. Let'S just check our questions: let's have a look uh. Oh, i love that the hair is talking to me and i am most definitely listening. Thank you. So that's actually stayed up there hasn't it, but you know what i just love working with hair and you know what it's such a lovely job to do. So if you're thinking about being a bridal hair stylist, i started off actually doing uh wanting really wanting to be a makeup artist. And i only did hair as a kind of uh, because i was told when i went to did my night to my makeup school. That really get much more work if you can do hair as well, so i reluctantly did hair and i was very unconfident. I didn't. I felt that i was rubbish at hair, styling and uh. Look at this. It'S gorgeous, but you know what hair is just. If somebody told me back then that i'll be you know, i'd fall in love with working with hair. I wouldn't have believed it, but i absolutely love working with hair and once you build your confidence and it does take time. But it's just practice and once you i think as well. What you kind of have to do is learn the basics, to learn about hair prep, learn how to secure the hair and also that what that lovely comment there about the hair talking to me and i'm listening is actually what i have discovered is that if you Try and force hair to do something it doesn't want to do you can always. You can always force the hair, but when you step back and look at it, it just doesn't look right. So what i've realized is he kind of? Sometimes, when my bride say to me, what are you going to do with my hair? So you know what i don't know: let's just wait and see see what your hair wants to do and your life, your job, becomes so much easier. So i say it's about listening to finding out what the hair wants to do and also critical actually is allowing yourself plenty of time on the wedding day and for the trial. So you don't feel stressed. I had a bride this week and look at this. It already looks gorgeous, i think she just could do with a few soft bits down. I think i had a lady this week actually, who i have had a couple of bags, but had a lady who specifically wanted to have extra time on her wedding day in the morning to have breakfast with all her bridesmaids, which would have meant and the photographers Their photographer's time is set, so the photographer was coming and she wanted everybody to read it, even though she wanted we needed to start an hour later. Everybody needs to be ready at still. At the same time - and you know i had to say i, if you can't really rush beautiful, hair and beautiful makeup, you can't rush it. You simply need the time you need. So i said to her. You know. I appreciate that she wants to start at a certain time, but you know it will mean that does it matter if a few people are late, does it matter if everybody's rushed on the morning, because i can't you can't squeeze hair perfection in that needs an hour Into 20 minutes, so you know you need to almost as when you're working as a hair stylist, if you just make sure that you allow that you let the bride know that you need the time. You know enough time and um yeah, so we've got, we've got enough time and uh, it's all going to be fabulous on the day, but you do need to sometimes people. Just the problem, is you don't know, and people don't know how long it takes to create beautiful hairstyles. So it's up to us to let them know so. I'M loving this little half up half down style and that will make your day once you've got enough time. You'Ll find oh loving, it look you just one bit visible hair grip there and i think we might leave those bits down. So you see, we've took the time i didn't take the time today, but in the you will take the time when you're working on your practice head to create the perfect curl which we have here and we've got a lovely kind of textured. Look here - and i might just loosen that just a little bit there, which swept back she's, got a little bit more down on this side, and again i mean i think this side looks lovely here. Let me lift her up a little bit, so you can see a bit better. That'S i like these little bits down near the face, but when you do a trial, don't worry too much if um, if one side's slightly different to the other, because you can just kind of find out, you know: does she like more hair down or oh and Look at this from the front see how different it is here. This is coming back from the kind of up and back and this one has come down and back so again you could actually purposefully do that on the trial. So you can just see what suits her best. Let'S keep going around and let's you could kind of lift these bits right sticking out a bit here. You could maybe lift this curl and create a bit more of a detail here at the back. That might be better and then let's get our accessories in and our veil, so yeah just make sure you allow yourself plenty of time on the wedding day. Practice makes perfect and i would say actually this is the wrong color bobby pin it's blonde. So that's going to be visible, it's going to be difficult to hide that one. I would say when you first start, don't worry about getting it wrong. I think sometimes, when we first start when we learn something, it's almost like you kind of want to watch something and then be able to do it. But you know what maybe just start off giving yourself a little bit of leeway and think you know what it's all right. If i do this badly just start off just doing it badly and practice makes perfect and you'll get better and better. Let'S just give that a bit more of a twist have to say i made my life a little bit hard here, because it is hard to hide the bobby pins when i'm working at it. From this angle, let me just see if i can do it here: better, better, okay, so let's get our little accessories in so we've got a half up. Half down that looks better. Now, it's kind of not sticking out too much. We'Ve got a little bit of height a little bit of hair down some little twists at the back. We'Ve still got our gorgeous curls. Now let me check this question when you work with natural curls. Ah, is it possible to arrange the curls whilst it's still wet? I would say you can do it whilst it's slightly damp. If it was going to be all up, you could possibly do it whilst it's damp, but i wouldn't do it once it's wet the thing about doing it. Whilst it's wet the hair is kind of flatter. So you're gon na be it's hard. It would be hard to get that root, lift and to judge it up like that and get it to look fuller and more gorgeous. If it's when it's wet, so it's almost, you almost have to get it. It could be slightly damp and if now we've done this and it was a bit fly away, we could spritz it with a little bit of water with a water spray, so it just the dampness just takes the frizz away, but i wouldn't style this hair. While it's wet, unless, if you did it would just it would just be flatter, that's all i would say it almost needs to dry uh just to get a bit of volume in there, because otherwise it can look a bit. It can look a bit flat and it doesn't look as full and as kind of voluminous if you're working with wet hair, some people put so you can put so much cold cream on that. It'S it doesn't dry. You don't want to do that either. You kind of want to get that fine balance where you've got enough curl cream to smooth each curl, but not enough to keep it kind of dripping. It needs to be able to dry spring back up a little bit, get a bit of volume and then you're ready. Then you'd be better to style. It then, as i say it can be damp, but i wouldn't do it from wet personally. I hope that helped now when it comes to accessories, it can be very difficult, not difficult getting them in the difficulty can be getting them out, because, if you're working with these little ones that have gotten little kind of sparkly bits on or anything like this, it Kind of catches on the hair - i mean not just with curly hair but with any hair, but particularly with curly hair, because it's all going in so many different directions. So it's harder to control it. So what you almost need to do is kind of what i try to do is that maybe hold the accessories in kind of certain positions. You could do it on the trial because it might not be. You know it doesn't matter if it gets a bit fluffy on the trial, but on the wedding day you really don't want to be spawning. The curls you've taken all that time to get in there. So um you could just kind of hold the accessories in various places and kind of take a quick picture and see uh where she likes them to be and then put them in. That'S probably the best way. Um and here we're working with our. These are little three little individual sparkly pins, but you could equally be working with something on a little comb like that. Hopefully you can see that. Let me just hold this up, so you can see. I don't know if you can see that it's on a little comb that one, i think that's better, so you can work with. You know the accessories that could be on a little clip um. So, let's, let's get these accessories and then we're going to do the veil quick question when you're working with natural ah done that one, let's see if i've missed anything, i don't think so. So, let's put these in, i think we'll do these little i've kind of bent these so that they kind of create a little shape, and i think i'm going to pop them just here behind those lovely bobby pins that i've got there. So i'm going to push them in behind the bobby, pin and one more on this side, but it's they're not easy to take out because they catch on the curls and then it kind of spoils everything. But the good thing about these is they are flexible. So you can kind of bend them once you've got them in. You can kind of play with them a little bit but be careful because they do catch on the hair. Okay, so we've got our accessories and they're nice and secure now. Should we do our veil? So we've got a couple of different choices here now i have got two different veils here that we can work with today. Now, at the moment, i can find the comb on this one at the moment, uh. Where is it? Ah, this is the long veil. This is the short veil. At the moment, long veils are very kind of uh fashionable. So this is a long i'd say this is kind of like a cathedral length veil, so it would go down past the dress, especially if she's got a nice train on the dress, it would go down past the dress and kind of just show at the back And they are beautiful, but you do have to make sure they're really secure and it has uh. Let me just see if i can show you here. So it's got the shorter level as well as the longer level, and it's exactly the same. The format is exactly the same as with a shorter veil, but it might be a bit easier today, not easy for me, but because they're, both the same to put in except, of course with the long value, got to be doubly sure that it's secure um. But i think it might be easier for you to see if we use the short veil today. Let me just move that, so i don't trip up over it, so, whichever size veil, this again has got a double layer, let me show you there, so, whichever size veil, you're using you'll, know uh, which way the the veil goes, because you just look at the Curve of the comb and the curved side of the comb sits next to the head, so it would never go kind of like that way in it all with the curve is underneath here. It always goes this way so the curve of the comb. Hopefully, you can see that a little bit there. The curve of the comb goes next to the curve of the head. So now we've got choices here with the veil. It could either go. I might show you a bit more from this side, so it could either go. I wouldn't put it here because you know your bride might ask for it here and if she's going to keep the veil in all day and into the evening, then you could put it there. But if you're going to put it on top of that lovely height that you've created it's going to spoil the height it'll flatten it to start off with, and it will um so when it takes when she takes it off. Remember you're going to put some bobby pins across this, so it's going to it won't look very nice whether she's having smooth height, pc, kind of textured, height or height with curls. So really it either needs to go in front of the height or behind so in front of the crown i should say, and the height or behind the height and at the back of the crown. So those are, i would say i would suggest those are your options with your bride because it might possibly just be able to go here, but especially, if they're having a very soft relaxed style, it's going to just flatten the hair, once you put it in so You'Re, probably better just kind of what i usually do is i'll just kind of show them i'll, just kind of say you know. Would you like to have the veil here and i just hold it by you - can see i'm just holding the comb upwards? Would she like to have the veil here and she can have a look at it, or would you prefer to have the veil here at the back and then she can decide and then what you can do if she wants to have the veil if she wants The veil here at the back, i think, we've done another style for soft relaxed, hair um of putting a veil in there. We'Ve got another tutorial for that and it's not it's not difficult. If the veil is going to go at the back here, it's actually quite easy, because you've got you've, got the hair accessories there, but you've also got those bobby pins that go across. You'Ve got something to slide it into, but when you're working with curly hair, we don't remember, we don't have any back combing. We don't have any texture here, but what you can do is - and i would show a bridesmaid here what i was doing see if you've not got back combing or anything here. What you can do is just use a bobby pin like that. Just one bobby pin just and once you know where the veil is going to go just pop a bobby pin, not on top of the curls. I don't want to flatten the curls, i'm kind of going underneath the curls against the scalp, with this bobby pin and this bobby pin is going to come out later on. So i'm putting one across in one direction and i'm going to put another bobby pin across in the other direction, so we've got a little crisscross on the head, so the pins underneath there are doing this, can you see? Hopefully i don't know if you can see, let me put it against her. Can you see if i put it against her face? I don't think so. Let me see if i can hold it somehow. Ah, i know what i'll do so. The pins underneath are going like this a little crisscross underneath the hair and then easy peasy lemon squeezy. What you're gon na do? If you have you know, sometimes it's you'll have the photographer here taking pictures. So you know you can maybe ask one of the bridesmaids or the bride's mom. It always makes a good picture if they could just hold the veil. So while you put an - and you know if she's already got a dress on and she doesn't want to sit down, then what you can do is just get a chair and stand behind her and pop the veil in that way. But you're going to get somebody to hold the veil out of the way or just flip it forwards, but she's had a makeup done just watch. It doesn't touch her lipstick and you're going to get your comb. Let me just check the questions. First, let's have a look, i think i missed quite a lot. Let'S have a look. Where do i get my veils from okay to make your own flower accessories, okay, um? So actually this veil was given to me by one of my brides. She bought three for the day, so both of these fails who were given to me by one of my brides. She bought three veils for the day. She didn't know which one to use so she said she wasn't gon na use them again. So she just gave me the spare ones and um, but you can buy veils from you know: um, ebay, amazon, you when you're just using them to practice with you, don't need to spend a lot of money on them. I don't buy veils to sell to my clients because everybody has so many different tastes. You'D have to buy so many different veils. So really you could just get a nice cheap one just to practice with and what's the next question any tips on how to make your own flower accessories. You know what you can buy: some fabulous um little flower accessories again from ebay and amazon um. I have in the past, made my own. You can get little uh little silk flowers and put and wire them a little bit. If you want to put wire on the end, um yeah, you know, i bet you, could google making your own flower accessories and find a little youtube video on making flower accessories? As i say, i have bought some really pretty ones that i got they're not expensive from um like amazon, so uh it's worth shopping around. Ah now i nearly put this in the wrong way. So this veil, the curve of the comb, is going upward. So i need to turn that around and do it so it goes and actually hold on a minute. Let me get this right, that's it so. The curve of the comb goes next to the head and the combs going to slide in backwards and we're going to go in here and we're going to find those bobby pins that we've got there and basically, what i'm going to do is nudge. The comb into the hair and nudge, the hair up between the little prongs of the comb so in we go find that that's it there are those bobby pins go underneath those bobby pins, perfect, and then this is something else, so you will show the bridesmaid where You'Re going to put the bobby pins, so i've got another bobby pin here that i'm going to just pop alongside the comb over the comb on each side and and i'm going to show you the veil another one. And then, if you show the bridesmaids, they know where to take which what they have to take out, and here we have a lovely veil look. She looks like she's gon na just go and get married, although this is a bit creased this veil. Ideally, i would have recommended that she kind of hang it in the bathroom run the shower a little bit with some hot water, because that will steam the veil, the creases, will all drop out. You don't need to uh. Let me lift her up. She looks like she should be walking down the aisle, so let's have a look from the front, yep there's the fail and then what we do with this bit is make sure. When, especially, i would do this, especially if you're going to go, have the veil quite far back make sure that if the veil is going to fall back when you bring it back sometimes, if this little blusher is too short, you know she doesn't want it to Kind of stop kind of midway halfway through her face, it's got to come all the way down and the further back you take the veil, the shorter this little blusher layer will be so just make sure it's long enough before you make your final decision, oh and You know what, if i get excited at this stage, everybody gets excited when the veil goes on, because it actually becomes real. It becomes really real once that veil goes on she's gon na get married. So here we have our gorgeous beautiful. It'S a short veil. This one curly girl hairstyle with our lovely sparkly accessories and a gorgeous veil. Now, if she wants to take the veil out i'll, just tell you very quickly how you would do it easy peasy you'd show the bridesmaids. What to do you would take? She takes all they need to do is carefully take the bobby pins out, so you don't actually take it out, but just explain to them what they need to do carefully. Take the bobby pins out it's nice and secure this fail. So that's it! Nice secure bobby pin in there and then they could use the bobby pin or sometimes what i do is i give them one of the responsible bridesmaids. I give them one of these strong hair pins and then they can hold the hair in place. Let me tip her forward: hold the hair in place with the hairpin. That'S it whoop, that's it whilst they're gently oops, i just covered her up there, so you're holding the hair in place, while you gently nudge, the veil forwards and out of the hair veil in veil out - and you know, if you can, those bobby pins are not Visible, but if she wanted to take them out, you could do, but otherwise there we go our gorge and the hair still looks gorgeous. The accessories are still in looking very pretty and the hair is divine, so i hope you've enjoyed. I hope you've enjoyed tonight's tutorial on working with natural curls, getting practice with natural curls working with your practice head and creating these lovely textured styles, putting our accessories in and working i've thrown it on the floor now and working with our veils. So, thank you for joining me. I hope i haven't forgotten, haven't missed any of your questions, but i will you know you can always if you think of anything after the tutorial i've, i haven't managed to answer your question. I think i've got back to all the questions tonight then you can just pop me another little comment in the uh chat box in the comment box and i'll get back to you asap, but thank you for joining me. If you have any styles that you particularly like to learn, please just get in touch. You can join me online. If you want to become a bridal hairstylist, you can have a look at my online bridal hair course um and don't forget. I am here to help so i'll see you soon take care thanks for joining me. Bye,
Comments
Kachi Gonzalez: Beautiful.. thanks for teaching all this . Love it Any ideas for long curly hair updo with flowers and the vail on and off .