How To: Easy Low Bridal Bun, Modern Low Bridal Bun
- Posted on 15 March, 2022
- Wedding
- By Anonymous
In this video I show you an easy, modern low bridal bun and all the products I used to achieve this look.
PURCHASE my Bridal Hair/Makeup CONTRACT: https://bridalbeautybiz.samcart.com/pr...
Get My Bridal Hairstylist Starter Kit Guide for ONLY $9.99. This guide will show you all the products and tools you need in your kit to get started as a bridal hairstylist! https://bridalbeautybiz.samcart.com/pr...-
GET MY 11 TEMPLATE, CUSTOMIZABLE BRIDAL BOOKING GUIDE AND BOOK YOUR DREAM BRIDES! https://bridalbeautybiz.samcart.com/pr...-
Instagram: @Megan.lorson
For collabs: [email protected]
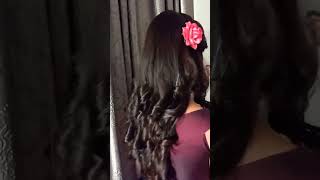
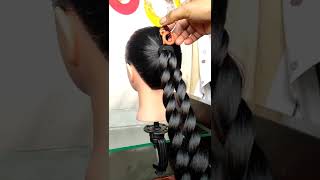
Hey friends, it's megan larson back with another video for you today, so i'm super excited to show you this really modern, twisted low bun, i'm sure you've seen so many different variations of it all over the internet. Instagram pinterest, it's a very popular style right now. So i'm going to show you one of the ways that you can achieve that today there are many different ways. This is just one way and i'm going to show you things like how to prep her hair. Everything like that. Also, if you're not following me over on instagram, make sure you follow me over there. It'S just megan.larson i'll, put it down in the description box below. So you can find me, but i'm going to be doing a huge giveaway coming very soon, and i don't want you to miss out on the giveaway it's going to be exciting. I'M planning it right. Now it's going to be a really big one. So make sure you follow me over there, so you don't miss that all right, let's get right into the tutorial. Okay, i'm going to be using my cassia doll. Today she is so pretty. I'Ve talked about her in other videos. She has so much hair she's gorgeous. I did color her because when uh you first get her. She comes with like this solid golden blonde hair, so i wanted to give her some dimension. So if you are curious about what color i did to what what i used on her to color her hair, i do have a whole entire video on the formulas i used and how i colored her hair. So you can go back several videos and find that one and if i remember i'll, link it in the description box below so check that out. So the first thing i want to do is prep her hair and then i just brush it out. Really quick and prepping the hair for an updo style or just any style, whether it's half up half down or all the way up, prepping the hair is going to be the most important part. The prep is what you do before you start putting it up, and every person's hair is going to be different depending on their hair, texture and also the style they want. The prep will be different based on those two factors, so mannequin hair, of course, is always dry. So i'm going to start by using a little bit of my kenra luxe shine oil. I love using this oil and pretty much almost any hair type because it doesn't. It'S very lightweight, and it just really goes onto the hair nice, but it's not super heavy and it's not going to look greasy and it's not going to weigh their hair down, which is what i love about this oil. So it just gives a beautiful shine. It helps to just nourish those ends a little bit so we're going to do that. First. Next, i'm going to be using this comb from pink pewter, and i love this comb. It'S so amazing. It makes it so easy to section the hair and then i can hold it while i'm working it's so great. So i'm going to start by sectioning off her hair, i'm going to take a zigzag parting turn it this way. So you can see a little bit better, i'm going to take a zigzag parting and it's going to be at a slight angle. Coming back behind the ear and the reason i like to take zigzag partings is because it helps the hair to blend a lot better. No matter what style you're doing if you're braiding sweeping all the hair back, it just creates a better flow and a better blend. You know when you see those updos that you can tell, and this is how i used to do updos. I would just do a straight line right behind the ear or in the middle of the ear or whatever. I would just do a straight parting. I would style the back and then i would incorporate the hair in the front in the back and then i could always tell there was like a distinct sectioning between the back and the front. So this is one way to elevate your style and take your styles to the next level, just by changing the way. You part the hair a little bit so we're going to do that. Zig zag section on this side and then i'm going to start combing. All this hair around the crown area straight back because right now it's parted kind of like separating in the back like this, and i want it to flow back nicely to start giving her some nice volume. So i'm just going to take my comb. I want everything coming straight back and you do want these to be. Even so. This side is a little bit heavier. I'M just going to place that in with the front front, sectioning, and then i'm just going to clean up this side. There'S a couple hairs that shouldn't be because you do want it to be. Even you don't want, like a random hair up here coming. You still want it to be even on both sides and then have it come back all right. So i'm just going to comb all that back, creating this crown section first, but i'm going to use a little bit of the kenra whipped taffy in her crown area. First, just to get a little bit of texture. That way, i can create the volume that i want and i'm just lightly coating my fingers with it and then what i do is just work it into my hands and you want to be able to not see any of the product like it's there. You can feel it, but you don't if it's still that bluish color when you put it on your hands and you can see globs of it it's too much, and you want to work that in because, if you don't it'll start to stick on the hair and Then you'll have too much product in one area, so i'm just going to take my fingers and run it through this crown area, and i'm just just through this top area right here, because i want to make sure that this has a little bit of texture in It okay, so once i've got the product worked through the crown area, i'm going to take my pointer fingers on the sides of where the sectioning starts and i'm going to do a gentle zigzag motion and i'm just going to grab this top layer of hair and Give it just one little twist and then i'm going to grab an elastic band and just secure this section right here and i want to keep it as clean as possible. So i want to make sure i don't grab any other hair and okay perfect and then the next thing i'm going to do is just gently pull out the volume that i want. I want to get a little bit of those ridges and that texture in the top crown area, so i'm just going to gently pinch and pull out and that product is really helping me. It'S holding the style a little bit, also giving it that little bit of texture helping me create those ridges perfect, and you really want to make sure that you get pretty close to the amount of volume that you want in the hair at this time, because once We start getting into creating the updo a lot of times. It gets harder to pull out the volume once you start, pinning things so make sure you pull the majority of the volume out that you want. I'M gon na check this side and then, when i, like the amount of volume, that's in the hair, i'm gon na grab a little bit of my moroccan oil luminous hairspray. This is also one of my favorites, a must-have in my bridal hair kit, i'm just gon na lightly spray that crown area and you can define these ridges a little bit more perfect. Now we're going to work on pinning the front pieces into the back, so i'm going to take a little bit of my schwarzkopf osis tame wild. This is also a must have in my kit. It is like literally one of my ride or die products. I love tame wild, i'm gon na work it into my hands and then just work it right into the hair. This helps to smooth the frizz, keep the hair, nice and clean and get it just nice and smooth, and i'm going to take my comb, make sure everything is nice and smooth, and then i'm going to get another elastic band and i'm going to put it about Halfway down the hair a little bit more than halfway down and then i'm going to twist the hair and i'm going to pull out a little bit of volume in the front. So it starts to flow and blend perfectly into the back and the sides. And i want to make sure that texture matches and then i'm going to just pinch and pull out a little bit of this twist. Okay and then i'm going to just pull it into the back center. I'M going to take a bobby pin and i'm going to secure this right in that elastic that we had for that. We put in the hair for the crown area and take another bobby pin and i'm just going to crisscross it and lock that in and i'm going to put one more over here through this elastic band, to secure it in place. And then i'm gon na go back through and take my comb and then i'm just going to pinch and pull and blend this side right here. I'M going to take a little pin and just push this down right here, because it's sticking out just a little too much and stick it down in there perfect and then i'm gon na pull this twist out a little bit more okay and we're gon na. Do the same thing on the other side? Okay, so i've just finished both sides. So this is what she looks like so far and then here is the other side and then the next part i'm going to section out. Let me put one more bobby: pin in here: i'm just going to lock them make sure it's nice and tight and locked in make sure i have the volume that i want perfect and i did go ahead and spray. Both sides too just to kind of hold everything in place, smooth any little frizzies, and then i'm going to section out these sides, i'm going to take this section up front and we're just going to leave this little middle section right here. I'M going to take my comb and just lightly very carefully, smooth and comb, the hair out to keep it nice and clean. Now this mannequin, when i tell you she has so much hair, she literally has so much hair. It is like so thick like thicker than most of your of your clients. Hair is ever going to be so. This is also what i'm about to show. You is a great hack for anybody who has super long, hair super thick hair, and you just need to hide some of it because you're like there's so much hair. I don't even know where, to put it all right here is a great little tip and hack for hiding some of the hair, and just just hiding some of it. If you don't know where to put it. So what i'm going to do is get a little bit more of that tame wild and i'm going to run it through this section. Just to smooth everything i like to think of tame wild. It adds like a slight bit of texture, but i also like to think of it as like glue and it just like seals and like glues, all those little crazy, frizzy pieces down. Okay and then what i'm going to do is take another elastic and i'm going to secure the ends this trick, what i'm doing also right now, so what i'm going to do is roll the hair up into a little bun, and then this is also going to Be like a base to where we pin the rest in and the rest of this hair is kind of going to come around it. Now, if you did this style on someone with finer, hair or shorter hair, what you could also do is do the same thing, but instead you would place a hair padding right here and pin the hair padding in and then roll this up or use the rest Of their hair to cover that padding and then finish the style, so there's two options when working with thick hair and as well as um, finer or thinner, hair. Okay, i'm gon na grab one more product. So one other thing i like to do is i love using soft dust to come right at the base and i'll just pump some in there, and that gives it some texture and that's also going to create a really strong, really nice base for pinning bobby pins Into and things like that, so i'm going to just roll this up, i'm going to grab some big bobby pins because her hair is so thick and i'm just going to take the edges and lock it right in and i'm going to do one more on each Side just to lock it in and we'll do one more on this side perfect and then i'm going to do one in the middle. I'M just going to take a small bobby pin, i'm actually going to go inside the bun and do a little weaving motion to lock in this top part right here and then i think she needs one more small one. On this same thing, i'm going to go inside and just do like a little weaving motion and work it in there now, the key to when you're weaving. You just want to make sure that you never take too much hair inside the bobby pin, because you don't want your bobby pins to start opening up, because that's when it slides out it starts to fall apart and it doesn't make the updo as secure i'm gon Na go ahead and take a little bit of hairspray, just spritz that on there - and you guys can probably tell her hair is just so thick. It'S crazy! Now we're going to take these side pieces, i'm going to take a little bit more tame wild and if you guys aren't subscribed to my channel, please hit the subscribe button, there's so much good content coming your way. I'Ve got so many different styles planned. I even have things videos planned to talk about growing your bridal business, how i started my bridal business, how i grew my bridal business: how to market and grow your business even if you're planning on becoming a bridal makeup artist as well. It will pertain to you and make sure you're following me on instagram megan.larson. I have so many quick, real videos showing you so many different techniques and tips and tricks for creating quick styles. Quick looks especially if you're someone trying to work on your speed. I would definitely go check those out and i'm also on tick tock as well. I'M getting ready to start growing, my tick tock channel i've decided. I need to pick that back up, so i'm going to be posting a lot over there as well. All right, i just put a little bit of tame wild on both sides. So what i'm going to do now make sure everything's, nice and smooth we're going to take an elastic band and if you guys notice how many elastic bands i've used so far, elastic bands are an awesome awesome way to really secure an updo in any types. Any type of hair, but especially for those who have super long thick and heavy hair. So i highly recommend using elastic bands for anyone who has long thick or heavy hair all right. So i put this elastic about a little more than midway down and i'm going to start twisting it and then i'm going to pull this out and just wrap it around and i'm going to take a bobby pin and i'm just going to lock it in place. Then the tails are just going to hide underneath, so you just want to pin them underneath make sure you're, locking them into the base make sure they're getting locked in, because if not, those tails will pop right back out okay and then we're gon na. Do the same thing: on the other side, let me tuck this under a little bit more and then, let's see, let me pin this right here a little bit more and then i just want to make sure everything stays nice and smooth i'll lock this in right. Here and then you can even spray a little bit, i'm going to spray a little bit of the moroccan oil hairspray and then we're going to do the same thing. On the other side, i'm gon na make sure it's nice and smooth, and then i'm gon na take an elastic band and put it about a little bit more than halfway down and then going to twist it and then just pull out some texture pull out the Twist to accentuate it and then i'm going to pull it around. To this other side, i'm going to take a small bobby pin and i'm just going to lock that in right there and then we're going to take another bobby pin and i'm just going to pin those tails underneath. Okay, here is the finished look. It is so gorgeous. I love how this turned out, and i just curled her front pieces a little bit and finished her off with a little bit more moroccan oil hairspray, but you could always customize this look for anybody. If you have someone who wants a more piecey or messier look, you could always leave some pieces down around the hairline to make it more whimsical, more boho messy whatever your bride is wanting or bridesmaid, but i hope you guys enjoyed this. Look please subscribe. If you like this video and make sure to give it a thumbs up, let me know what looks you would like to see. Next, you can dm me on instagram, i love hearing from you all and i will see you all in the next one.
Comments
andrea alvarez: Love it!!!
Madisyn Dorsett: This is beautiful!!!
MMC By Mimi Hayes: Beautiful
Jasmine Michelle Hair & Beauty: Hello, would you mind providing the link to where you purchased your mannequin?
teri kline: Beautiful
Asya Shakir: واو جميل
Laine Hababag: Where did you get your mannequin?
Beatriz Jiménez: Muy lenta
Tere Garcia: Hablas demaciado
Tina Di Stefano: Troppo lenta