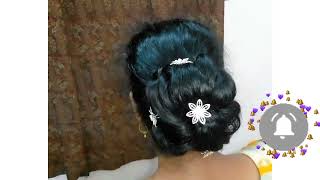
Gorgeous Low Bun Hairstyle For Short Shoulder Length Hair - Wedding/Bridal/Bridesmaid Quick Up-Do!
- Posted on 23 March, 2022
- Wedding
- By Anonymous
Join award winning bridal hairstylist Pam Wrigley for this fabulous tutorial on how to create a gorgeous low bun bridal hairstyle for short, fine hair! Learn how to make hair look thicker AND fuller, an essential skill for keen student hoping to go into the bridal hairstyling industry!
Subscribe & watch our wedding hair up and bridal hairstyle tutorials , teaching you how to create vintage, modern, up-do's, half up half down, or hair down styles.
Hair prep is key when it comes to creating beautiful bridal hairstyles, learn how to correctly use a rollerset, blow dry & curl with tongs so you can master hair prep techniques needed for perfect hairstyles!
Subscribe and learn the latest wedding, bridal, prom & party hairstyles alongside timeless, classic hairstyles and vintage looks that never go out of fashion.
Visit https://www.createbeautifulhair.co.uk/... for more information on learning with Pam.
Want to master the art of bridal/wedding hair and learn with Create Beautiful Hair? There are many ways to learn with Pam: https://www.createbeautifulhair.co.uk
1. Join our Habia approved award-winning online bridal hair course, learn from home and submit work directly to Pam for assessment and feedback as you work through the models; receive as much support as you need! Complete the assessments and receive a Habia approved CPD certificate upon completion of your bridal hair training. Our SALE has begun! ***Use code SAVE200 to join this course with HALF PRICE OFF!*** Find out more at https://www.createbeautifulhair.co.uk/...
2. If you are in London or nearby, enquire into private Bridal Hair one-to-one tuition for yourself or for a salon! DM for more information on private courses!
3. Check out more of our YouTube channel for a selection of our freely available tutorials . . . like and subscribe for more information and updates, YouTube link: https://www.youtube.com/channel/UCDKUM...
4. Join us on Facebook for more tutorials and all things bridal and wedding hair!! https://www.facebook.com/createbeautif...
Whichever option you choose, please do get in touch and share your fabulous creations and suggestions on what you want to see next!
We've got it covered . . . we even have tutorials covering the curly girl technique!
Great for fans of natural unintentional ASMR!
Hairstyle tutorials include hair prep, hairstyling and hair up, blow-drying, curly girl techniques, working with different hair types, hair textures and hair lengths.
Create hair up & bridal hairstyles and become a bridal hairstylist with Pam Wrigley, UK Wedding Hairstylist of The Year!
Just SUBSCRIBE & LIKE!
I'M going to show you how to create a beautiful textured, low bun on short hair. So my client today has just a short bob, so it's not even to shoulder length but we're going to create a beautiful textured. Bun! That'S going to look like she's got a lot more hair. I'Ve already done the hair prep. So when you're working with your client, you need to put some mousse in the hair and blow dry the hair and then get some texture in there and a nice strong curl. So this is the hairspray that i used. The uh l'oreal infinium hairspray we're looking more for texture rather than a definite curl for this style. So you don't need to worry about keeping the sections making the sections too small. So let's take these pin curls out. You can pull your fingers a little bit through these curls. That'S it so take everything out and you can see. We'Ve got some nice kind of volume and texture here using a little bit of the creative texture structure cream, depending on your client's hair you'll work out which product is best. So my practice head has got particularly dry hair. So i'm using a little bit of this structure cream just to help to create a bit of gloss there and secure this quite low down, and then you can come back and create a little bit more height if you want to now. Let'S look at our side sections, so we're going to do a let's. Do a dutch braid decide which little bits you're going to have down and when you do this braid split into three and i'm going to hold my hands over the part. First braid then add to this front section here and make sure it's nice and smooth add to the front section and bring it under. You can bring that section under now. I'M going to move my hands back a little bit so that over a little bit close to the section there add to the front section, bring it under add another one just to the front section and bring it under and then bring the this one. Under from the back add another section all the way from the front to the back and bring that under so you're, not adding to the back section you're, just adding to the front section of hair, then let's come back and loosen a little bit at a time. Take your time when you're doing this and you're loosening out the braid, and you can always put a little bit of texturizing powder onto the hair, if you feel you need to because remember it's quite short, hair we're working with and we don't want that. It just kind of start being too loose. It'S just so you can get a really kind of chunky, braid, even with reasonably short hair use, a bobby pin across the back just to hold it in position and bring it round to the back of the hair. Let me see if i can get a few little bits out just to the style might be able to do it. That'S enough just for now, but ideally you'd get them down, you'd hold them and you know have them down and held out of the way. So you don't include them in the braid like i just did, and here we're just going to use a little piece of padding secure the padding to the hair using your strong hair pins. I'Ve got all those nice bobby pins in the back there that hold it all in position for us, that's it and then we're going to cover the padding, but we're not going to put when we work with longer hair. We usually put this hair into a ponytail, but we're not doing that with short hair, because by pulling the hands of the ponytail, we lose. Even if it's just a little bit of the length. We need that length so we're just going to get the hair without the ponytail twist the hair, so i'm twisting away then i'm going to bring it over and loosen and a little bit of texturizing powder would really work. You know it would really be helpful here. Use a hairpin as a prop and really work to loosen these sections and at the end you can do your up and over use the hair pin to hold it in and then we're going to come back on the other side smooth out the hair twist loosen Pop it into position and grip, the hair to the padding you could always use your up and over. If you want to, you, can push those little pins in and then we've got our last bits here, a little bit of texturizing powder because they are quite short. These little bits here, but when you're working on your practice head, i would advise you not to use texturizing powder because you really won't be able to kind of it'll make it very difficult. So here we go prop that in place now, there's only a little bit of hair, so i suggest you can use a fine pin as these little props doing up and over at the bottom. If you want to - or you could use a bobby pin, the fine pins are great here, because this is a little bit delicate. This is the finishing touches and then i'm going to use a bob. Then i'm going to use a bobby pin and the end of that last section and pin it into place great then just keep on pulling just a little bit, because the hair is quite short, so you don't want to end up pulling any bits out and there We'Ve got our lovely kind of almost looks like it's knotted, because we've got four different sections here, but it's just our short hair twisted and pinned into place.
Comments
Glam 'N' Glo by Sherika: Beautiful