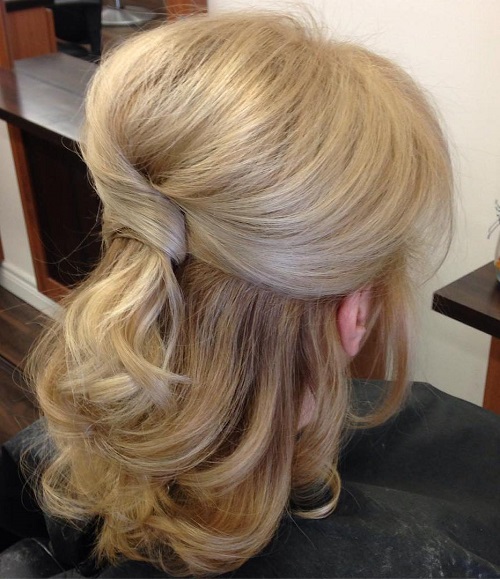
Wedding Hair Style-Braided Half-Up Half-Down
If you’re going back and forth between hair up or hair down for your wedding day, get the best of both worlds with a half-up, half down wedding hairstyle that includes an infinity braid.
For more BEAUTY content check out our playlist:
https://www.youtube.com/playlist?list=...
ABOUT OUR CHANNEL
Wed Mayhem is all about providing you with wedding tips from industry experts! We cover a wide range of topics, including wedding planning, wedding photography, hair and makeup, and much more!
FIND WED MAYHEM FOR MORE WEDDING TIPS FROM INDUSTRY EXPERTS
Website: https://wedmayhem.com/
NEW HERE? DON'T FORGET TO SUBCRIBE FOR MORE WEDDING PLANNING TIPS! https://www.youtube.com/channel/UCwiYJ...
FOLLOW US ON SOCIALS
Follow Wed Mayhem For More Wedding Tips From Industry Experts!
YouTube: https://www.youtube.com/c/wedmayhem
Instagram: https://www.instagram.com/wedmayhem/
Facebook: https://www.facebook.com/Wed-Mayhem/
Pinterest: https://www.pinterest.com/wedmayhem/
TikTok: http://www.tiktok.com/@wedmayhem
YOUR FREEBIE
Mention this video to The Bridal Goddess and get $50 off bridal hair with a party of 5 or more.
______________________________________________________________________
⬇️ VISIT THE WEDDING PLANNING PROFESSIONAL ⬇️
Website: https://www.thebridalgoddess.com/
Instagram: https://www.instagram.com/thebridalgod...
Pinterest: https://www.pinterest.com/bridalgoddes...
______________________________________________________________________
CHAPTERS:
0:00 - Introducing Our Wedding Hairstyle Professional
0:42 - Prepping The Hair
1:29 - How To Add Texture
2:15 - Planning Out The Hairstyle
3:03 - Adding Texture and Volume
3:26 - How To Add Volume, Hold, and Structure
5:11 - The Style So Far
5:33 - Putting It All Together
5:52 - The Infinity Braid
7:44 - Pinning Technique
8:44 - Tips For Pinning Hair
9:07 - Finishing Technique
10:26 - The Finishing Spray
10:40 - The Shine Spray
11:08 - Thanks For Watching!
______________________________________________________________________
☑️ CHECK OUT OUR MOST RECENT VIDEOS ☑️
Playlist: https://youtube.com/playlist?list=PLLR...
______________________________________________________________________
Want More From This Wedding Professional?
How To Fishtail Braid an Easy Wedding Hairstyle: https://youtu.be/UWfcDGpHBi8
How To Do a Classic Wedding Updo Hairstyle: https://youtu.be/gsuxgFW5bh0
______________________________________________________________________
Looking For More Wedding Hairstyle Videos
PLAYLIST: https://youtube.com/playlist?list=PLLR...
______________________________________________________________________
Music Provided by
Timothy Infinite - Creamer
https://www.epidemicsound.com/track/t0...
______________________________________________________________________
New Here? Don’t Forget To Subscribe For More Wedding Content!
https://www.youtube.com/channel/UCwiYJ...
______________________________________________________________________
✨ Follow Wed Mayhem For More Wedding Advice From Professionals ✨
Instagram: https://www.instagram.com/wedmayhem/
Facebook: https://www.facebook.com/Wed-Mayhem/
Pinterest: https://www.pinterest.com/wedmayhem/
TikTok: http://www.tiktok.com/@wedmayhem
______________________________________________________________________
TAGS:
Wedding Hairstyles, Bridal Hair, Wed Mayhem, Bridal Hairstyle
If you're still trying to decide on hair up or hair down for your big day get the best of both with a romantic half up half down our wedding wing, man will share her pro techniques to turn this everyday style into one that is wedding worthy. Getting you ready for your day. Your way is teresa of the bridal goddess hi everyone, and thank you so much vanessa for the introduction. I'M theresa bullock, the owner of the bridal goddess and i'm here with the lovely charlene and we're gon na, be showing you a tutorial of a half up, half down style. That is romantic and it's for somebody who wants their hair down to show off the lovely length, but up and away off the face. So let's jump right in alright, so we're going to get started on our half up half down. So one of the most important things that actually gets skipped quite often is prepping the hair appropriately for hold texture and also thermal protection. So these are really important aspects of your style because when you have really beautiful silky, smooth hair straight hair for the most part, even sometimes wavy and curly hair, you still need to add in more texture. So i'm going to use this awaken aerosol hairspray from surface. It has a really nice low voc, so you can feel a little bit better about using it, and so basically i'm going to go in - and this is just like a rough kind of go through hit. The hair, it doesn't have to be perfect, you don't have to section it all perfectly, either just enough to get something on the hair. So it's not super slick and slippery all right. So i've got a nice little base of just a little bit of texture in the hair. It'S nothing crazy! It doesn't. You know it's not a lot of holding hairspray, it's more of a working hairspray and then, if anybody has ever used a texture powder, it's actually anybody's best friend for hair. It will give you volume, it will give you hold and it just makes everything fantastic. So i'm going to mainly focus on her crown area, not really putting it on mid length to end, because we just want to have it as like that nice textured foundation in through the crown so that we can get a little push and we're not going to Be fighting the hair so much so this one in particular, is literally just like a powder, and you might see a little bit of it on the hair, give it a little judge and it disappears. So, even with her dark hair, you don't see it once you just rub it in a little. So now we're going to plan out the style. So this is another really important step. So with charlene we had a little conversation already about what kind of look she wants to go for. So i know that we're going to do a middle part and then she also wants some pieces kind of swooping down and then i'm just going to plan out what kind of sections i'm going to be working with it's a little bit more daunting to look at All the hair and figure out what you're going to do with it, so i am going to take a middle section around the crown, so it's basically going to be kind of just like a circle section, and then we have these side sections. This is just going to be so you can work with it easier. It'S not going to be anything that we're going to actually part off later. So i did the same thing on the other side. Just you know from the center part down to the ear, and then this is all just going to be gorgeous curls. Now that we've got this all sectioned off and planned out. We know where we're going this section, i'm going to start off with giving a really nice curl, so i'm going to use medium to large sections and a medium-sized curling iron, starting in the middle when you curl the hair works really best. When you have long hair, you can use the handle to work the hair through and twist and kind of pump that little handle as you're going okay, so i've just curled charlene's hair with all this beautiful texture and curl. So i'm just going to re-section this crown piece and then i'm going to show you a really fun technique for adding volume, hold and structure for the whole style. Some people like to call it teasing some people call it backcombing or the very fancy french lacing. I just call it backcombing and so i'm going to actually do backcombing through the whole crown area. So it's pretty simple. I already have some of this lovely texture powder in there, and that is what's going to give us some of that grit so that when we do the backcombing, it really stays and it's not going to slide out through the day. So with my backcombing, depending on how much volume i want, i can either hold the hair up, so it's above the base on the base or below the base in this instance on this part of her head, i'm just going to keep it on the base, because I don't want too much volume, so i'm just going to give it a little bit of structure and it's holding the hair out getting a fine-tooth comb and you're just putting it right in and pushing it towards. The scalp can really just do that a couple times and you can see it looks kind of tangled and snarly in there, and that gives it a nice little bit of volume now that i've got some nice back combing in through the back of the head here. I'M gon na go into my first two sections by the face, and so this is when you're going to want to hold the hair straight up. Usually it's best to have some nice volume around the front of the face, so holding this straight up. Put your comb in push it down. You can see right there. That gives a really nice bounce, i'm not going to focus too much around these pieces right around the face, so those are just going to be the nice little romantic pieces to frame when i drop this, it looks kind of silly right. This is when you're going to go in and just smooth it down and i'm going to do the same on the other side and then we'll move into the crown section. Okay, so i've got all the back sections, the two side: sections all curled and we've got that nice back combing to give a nice lift and volume and our foundation and our structure i'm going to go through and start doing. Some of this back combing technique on her crown area. This is a nice area. To give you know, if someone really wants to do a lot of volume, this is the area you're going to do it in all right. We have some amazing volume in there. A lot of this comes down to personal preference, on how much volume you want. I think it's really good to to start it off big. You can always go smaller and also keep in mind that the hair will fall and kind of settle in a little bit as the day goes on. So if it seems a little bit too full at first, it might be perfect in about two hours and so from here i'm going to keep my sections apart, like i had them kind of recreate that middle section again and just going to smooth things out a Little bit and in this middle section i'm going to be showing you a really fun infinity braid. So you have your whole middle section. That was that circle section that we took off in the beginning and your brain break it off into two equal parts. You might see a little bit of that back combing poking through, which is totally fine. We can go through and smooth that out as needed. So you have your two sections: you're not going to be touching any of this you're just working with these two and we're going to be working from the outside of each section. So i'm going to start on the left here and take a very small little section here, and i guess i find it easiest to hold this. In my right hand, scissor this piece in between my two fingers here grab this section over this piece and then under this piece. So it's come from the outside gone over and now under and then this piece is now gon na switch over to this hand and go over this piece. So basically, what it's doing is going over under and then we're going to go under again and it's going to keep making an infinity sign. So if you can wrap your head around that, it's actually pretty easy. Okay! So i'm coming down to about where i want to stop. I still have my two sections: i'm holding this left one in my left hand and i'm gon na take a bobby pin and let's see if i can show this well for you, so i'm just holding the bobby pin putting that right in there and i'm gon Na wrap it around the bobby pin just a couple times, and then this is going to get pinned up into the back side of the braid so that you can hide the bobby, pin and it'll hold. It really nicely i'll, probably give it a nice spray and maybe even just sneak in one more little pin, but that's our infinity braid, it's so pretty. I just love you guys, and now we get to start pinning in the rest of the style. So, basically, i'm going to take the front pieces and swoop them back into this in just like a really pretty natural romantic way. So i'm going to take this front section, leaving out some hair around the face to play with, since we've got this lovely curl already in there we're just going to give it a little twist, giving it a little structure, a little pull where it looks pretty and Seeing where it lays well, it's not a science, it's art! So i really like how that just kind of filled things in and it just looks really pretty with her color. So i'm going to tuck that right in through here and i'll show you guys a really nice pinning technique called tunnel pinning. So it's kind of easy to even see because i have a little bit of you know a twisted piece of hair. That'S almost like a tunnel getting a standard, bobby pin and the bobby pin is going to go into the tunnel. So then you can't even see the bobby pin and don't worry about getting it perfectly pinned in there right now, because i'm going to go in afterwards and really get it secured. When i know i have everything exactly where i want it so now you get to get a little bit more specific about where you want everything to be and pinning it in place as a general rule you're going to pin against the grain of the hair. If you think of the grain of the hair as wood and it's generally going down so a lot of times, it's really good to pin across and into the hair like that, there are the times when you go up like when we went up into this braid. But for the most part you're going to go against the grain all right, i've got all my pieces pinned in that where i want them and i'm going to go through some finishing techniques with you. One of my favorites is just using the tail of a cone. Like this and just laying down any of the flyaways, i work simultaneously with this in my left, and this is my right just that just works out good for me and depending on what kind of style you're doing if you're doing something a little bit more natural. A little bohemian you actually want some flyaways. You want it to look a little bit more natural, a little bit more lived-in, so this style goes really well with a little bit of that kind of live-in texture. If we were doing something a little bit more formal and smooth, then we'd be a little bit more meticulous about it. Now we can revisit these beautiful front tendrils that we have here. I think it looks really pretty with these all down, but just to kind of give her a little bit more face, showing i'm just going to sweep part of these back. One thing i really like to do in this finishing portion is get really eye level with the hair, so i'll actually sit down. So i can see the hair really really well and just make everything look perfect. You know whatever that might be kind of putting your fingers through it. You might want to group the curls together a little bit more using your hairspray as a tool to kind of help, smooth things and also just giving it a really nice hold spray. These front pieces well because those are the ones that might loosen up the most, so i'm going to move into my finishing spray. This is the spray you're going to use when you're finished. Imagine that so this is a heavier spray. It'S not as easy to work with it when you have everything together where you want it just give it a nice spritz, and the very last is a shine spray. I feel like this works good on everybody's hair. It just gives it for a wedding that extra sheen - it's not shimmery by any means, but it just gives it that extra, like lustrous shine and there you have it. This is a very beautiful half up half down style on our bride charlene. She is looking gorgeous. I hope you enjoyed all this texture and the infinity braid. I hope you've enjoyed this half up and half down wedding style check the description below for more about me and the bridal goddess and don't forget to click the like button share this with anyone who would find this useful and subscribe to wed mayhem for more wedding Advice from myself and other industry insiders again, i'm theresa bullock of the bridal goddess with wed mayhem and we are bowed to your vision. You
Comments
Gebanganom Channel: Nice video
Airyn Kusina: Ang ganda Ng vedio