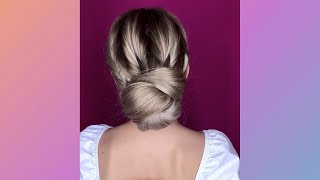
Live With Pam! Gorgeous Half Up Bridal Hairstyle With Beautiful Curls! Hairstyles For Fine Hair.
Join Pam this evening for our regular live tutorial , this week we're doing another gorgeous half up half down bridal hairstyle.
Learn how to work with shoulder length, fine hair and create beautiful bridal hairstyles with Pam. Find out how to curl the hair - but keep the length - and how to add volume to fine hair without using hair extensions.
This style is all about the beautiful voluminous curls. For those of you that follow our techniques, we'll be using the traditional wind curling technique which can either be achieved with tongs or even a hot roller set or alternatively straightener curls. Master the prep and you'll be on your way to creating this gorgeous half up hairstyle! Enjoy - and say hi in the comments section, we love to hear from you!
Visit https://www.createbeautifulhair.co.uk/... for more information on learning with Pam.
Links to the products used by Pam (where available):
Big Sexy Hair Play Dirty Spray Wax: https://amzn.to/3g7oVwA
L'Oreal Infinium Extra Strong Hair Spray: https://amzn.to/2wQ5b08
Goldwell Style Superego Structure Styling Cream: https://amzn.to/31IoFiq
L'Oreal Elnett Hairspray professional: https://amzn.to/3dfXoZV
Silhouette by Schwarzkopf Super Hold Pump Spray: https://amzn.to/3eS2s7J
Want to master the art of bridal/wedding hair and learn with Create Beautiful Hair? There are many ways to learn with Pam:
1. Join our Habia approved award-winning online bridal hair course, learn from home and submit work directly to Pam for assessment and feedback as you work through the models; receive as much support as you need! Complete the assessments and receive a Habia approved CPD certificate upon completion of your bridal hair training. We have a 50% off offer on the full subscription (use code HOMESTUDY at checkout), or join from 9.99 per month on a view-only basis. Click for more information: https://www.createbeautifulhair.co.uk...
2. If you are in London or nearby, enquire into private Bridal Hair 121 tuition for yourself or for a salon! DM for more information on private courses!
3. Check out more of our YouTube channel for a selection of our freely available tutorial...like and subscribe for more information and updates, YouTube link: https://www.youtube.com/channel/UCDKU...
4. Join us on Facebook for more tutorials and all things bridal and wedding hair!! https://www.facebook.com/createbeautif...
Whichever option you choose, please do get in touch and share your fabulous creations and suggestions on what you want to see next!
We've got it covered . . . we even have tutorials covering the curly girl technique!
Great for fans of natural unintentional ASMR!
We've got it covered . . . we even have tutorials covering the curly girl technique!
Hairstyle tutorials include: hair prep, hairstyling and hair up, braids, blow drying, curly girl techniques, working with different hair types, hair textures and hair lengths.
Create hair up & bridal hairstyles and become a bridal hairstylist, with Pam Wrigley, UK Wedding Hair styles of the Year
Just SUBSCRIBE & LIKE!
We'll also teach you how to blow-dry with videos on curly blow dry, Victoria secrets blow-dry, short hair and smooth & sleek blow drys.
We've got it covered . . . we even have tutorials covering the curly girl technique!
Great for fans of natural unintentional ASMR!
Hairstyle tutorials include hair prep, hairstyling and hair up, blow-drying, curly girl techniques, working with different hair types, hair textures and hair lengths.
Um so again welcome to tonight's tutorial. Thanks for joining me, i'm going to show you how to create a gorgeous soft half up, half down style on reasonably short hair and i'm going to i'm working with the hair tonight, so that the hair is just past. The shoulder and it's quite fine, so the what we're trying to do. The aim of tonight's tutorial is to show you how to work with shorter hair, but keep it looking long, even though you're going to curl the hair and also how to make fine hair look. Thicker so, first of all the hair prep, i have been working with my um urban sea salt spray. Today i haven't done any crimping in the hair today, but i have done. I'Ve really used a lot of product. First of all. So if i were working on a client, i would have put a little bit of mousse at the root or quite a lot of mousse at the root and sprayed the salt spray through the mid lengths and the ends and blow dried that into the hair. So you get that lovely volume and texture right at the very beginning, so it doesn't really matter when your client washes her hair as but the head does need to be clean. So you don't it kind of a couple of days old if the hair is remotely greasy. So it's a lot better to have the hair really kind of squeaky clean and put lots of product in it than to try and work with greasy hair when you're creating any kind of bridal hairstyle. I know it used to be said that you know you need to have kind of almost dirty hair in order to get it to stay stay up. But really, i would say it's much better to have it's very difficult to work with greasy hair so make sure the hair is clean. You don't want lots of leave-in products, serums or oils, or anything like that. We almost want a little bit of dryness and kind of uh well texture to the hair, which is what we get from the salt spray there's also another great product called a by l'oreal called french girl spray and french girl hair, and this again is like a Texturizing product that gives that lovely kind of saltiness to the hair and that nice texture to the hair, so you can use a little bit of that with your mousse or your salt spray and blow dry, the hair really well, so you get lots of kind of Texture in there, and then i have done some hair prep already on the head and we are going to. We do have an online training course and i am actually going to be filming tomorrow, uh to create this style for the online course. Where we'll go step by step from the beginning of the style right through to the end, and so if any of you are bridal, hairstylist or looking or you'd like to be a bridal hair stylist, then you can join. Our online course have a look at our online course and see what you think, because on the course we show everything in detail and close-up which isn't really. It'S not that easy to do when we're doing our live videos on youtube, and so, if you do want more information, please join me on my online training course, which is a paid membership, and but you get so much on there. So, as i say, if you want to find out step by step from right from the beginning how to create this style, then please join me on my: have a look at our online bridal hair course, but let's get back to this style, so i've used uh. We'Ve got different curling techniques that we that we can kind of draw draw upon when we're creating when we're working with different hair types, and here i've used the traditional wine. So i've done a very soft curl just at the ends of the hair. So when you're working with short hair, when you curl the hair, it always goes so much shorter. So if you're working, if you're already working with somebody who's got short hair, then you need to try and keep the length of the hair. We'Re not working with any extensions in tonight's style, so if you just manage to keep the curl, especially from the nape of the neck, if you just manage to keep the curl just at the ends of the hair, then you'll find you'll maintain the length. But you will still get that curl and, of course, when you get a curl, you get extra volume, so it makes the hair it helps to make the hair look thicker, so kind of we're kind of working with the hair to make to help short hair. To give short hair a nice bit of bounce and a bit of curl, but to also work with fine hair to make it look, thicker and fuller, so you'll notice, we've got quite a few and i've curled the hair. I'Ve separated it into quite a few kind of uh, smaller curls, so it gives the impression of volume and fullness and then on the crown. I'Ve worked a section at a time, no just tiny little bit of back coming, but no crimping a little bit of back combing. I curled those sections and just started to create kind of a slice at a time, just kind of started to create these little pc sections here now we have done that in previous tutorials here on youtube on a couple of tutorials, i think, but as i say, We have all this footage on our online training course. So if you want to learn at home, then please join me on there. Now, i'm going to do. I'Ve got a few little bits down at the side here, and i've done a little twist already on the side there and i'm going to twist this section of hair because you can kind of play around and really it depends how much hair your client wants to Have down so maybe she's a little bit sensitive about her ears, so she might not want to pull all the hair back if she's anxious about her the tips of her ears showing. So there are lots of things you need to think about when you're working with your bride. So on this side, i'm going to do two little twists, i'm going to bring this hair down and then on the other side, i'm going to do one twist because it will give a different look. It'S not a big change, but it's a slightly different look to the hair and usually i think it's a good idea. If you do something like this, maybe if you're doing a trial run because then your client can get um can have kind of a couple of different ideas as to how she could have her hair, just while you're creating the one style. So i've already created one twist in the hair here and you might be able to see. We'Ve got a couple of pins in the hair kind of dotted around here, and essentially i've used these little pins just to help me maintain a little bit of separation in these sections here, because i don't want it to look too smooth okay. So, with this little bit, i might use as well a little bit of my creative uh, texture cream. So um this is a goldwell product and it is it's a structure cream. So it's kind of like it's like a curl cream, but with a lot more hold. So i'll pop a link to the products into the box for you, so i'm going to create a little twist here now i want this twist. You can see with this hair here above the twist starts quite far forward, so in order to, if i bring the hair back and twist it you can see, we don't get any twist here so in order to make sure we get a twist at the front. I need to kind of bring the hair forwards a little bit and twist, so this twist starts a little bit earlier and then i can pull as i go along just lift out those little twists in the hair and then sometimes what i find helpful is, as We go along if you hold the hair out all the way and twist it you're kind of just guessing it's a bit of a guesstimate as to exactly where you want the hair to be pulled out. Whereas i find, if you pull the hair back a little bit and twist, then you can kind of get an idea, that's better where the hair needs pulling out, because you'll be able to see where it's going to sit. That'S it so i'm kind of holding the hair with a little bit of tension here, but also with a little bit of softness so that the hair can actually be pulled loose and then, before you get to the end. What you can do is, let's just make sure, i'm happy with this. I might just prop using a little pin just pop the hair in position as we go along just so. I know where it's going to sit, so i know that i'm happy where it's going to sit and you can also see i have already that's better lovely i've already curled a few little bits at the front here. So she's got a little bit of softness around her face. So, as i say, if you have any questions as we go through the tutorial, please just let me know, and it also, if you have any styles, that you'd like to learn and just let me in again just send us out oops dropping dropping my hairpins. So if you have any sounds that you'd like to learn that you'd like me to show you, then please send us some pictures, i'm just using a bobby pin there to secure that in position at the back here. So it looks lovely and soft and gorgeous kind of coming back. So that would be one idea. You could, of course, do some little um, a braid if you liked, if your client wanted a kind of braid at the front here - and i might just curl these just a little bit more so you know you can uh, that's it. Let'S just curl this side. Just so sometimes i'll leave these bits till the end, but just so we've got whilst i'm working on this side of the head, whilst we're filming, that's better lovely and then we'll turn around and come round to the other side. That'S it so now on this side. So this style is actually it's quite a quick style once you've got the once you've done the hair prep, which doesn't take too long for this particular style either, because it is literally, you know, you can blow dry the product into the hair and smooth out the Cuticle, as you blow dry, i'm just going to smooth the hair a little bit, my tangle teaser and then, instead of starting the pleat too far forwards, i'm going to kind of start the pleats a little bit further back for this one. That'S it and we'll just do this in one big twist. I think and let's see what we think, whether we like prefer it with one twist or two. Sometimes i find that if you do two lots of small little sections when you're doing these creating these kind of pc styles, sometimes i find that it can look a bit too kind of messy and you lose the direction of the hair so trying to be tempted To go for too many pieces now i am working with a mirror just off camera. So if you can see me looking over the side, it's just because i'm just checking the style in the mirror. That'S better and you'll find that once you start working with the mirror, it kind of gives you an extra kind of dimension. So you can see the hair from different angles without actually having to step away from the hair, and it's definitely worth getting a mouth that you can take with you. If you're a mobile hair stylist because quite often you'll find, if you're working in hotels like quite often the mirrors, are in the wrong place or they're at the wrong height, that's it and i'm just going to continue with this twist around the back here. So actually, i think i quite like the uh single twist coming back and i'm continuing around the back here. Keep it taking my twist all the way, so i've still got hold of the hair and i'm still loosening at the back here and i might just prop pop a little pin in there to prop it into place. That'S it! You have a question great. Have you used crimpers for this style? I haven't crimped the hair for this style no, and i think you know sometimes maybe, if you're working with a bridesmaid, you know if you're short of time, perhaps you might not have time to go through and crimp everybody's hair. So and it it, i mean it can help if you crimp the hair, but it's by no means essential, but what it is essential are the products that you put into the hair. So if you're not going to be crimping the hair, i would suggest working very generously with your products. So with your mousse at the root and usually i find it better to get a mousse that has a little spray on it. So, rather than putting a big kind of clump in your hand, if you get the spray mousse, so you can direct it at the root of the hair section by section and as you're working section by section, you can spray in your salt spray generously through the Mid-Lengths and ends, and then you can blow-dry the hair. So it's up to you, you can put the product in and blow-dry it a section at a time or sometimes what i do is. I will do like i'll. Do the back section get the product in and blow dry it do the crown section get the product in and blow dry it the sides and the front, and sometimes when i'm working on the front, if you do want to get root, lift and volume, if you're, Not working with crimpers, but you are getting the texture into the hair, but you need to remember - and we do have some blow-dry tutorials available, but you want to get into the habit of over-directing the hair as you blow-dry. So you don't want to kind of blow dry the hair kind of backwards, but you almost want to blow over direct it. So you're pushing the hair forward, and sometimes i even stand in front of my client. So i can blow dry the hair, bring it over direct it in this direction here so that you're blow drying the hair and getting root, lift and volume at the root. So you don't need to crimp if, as long as you get that product in there and you get lots of kind of texture and you can get as i say, you can get the root, lift and the volume without crimping. So it's by no means essential. Now, once we're at the end here, we haven't finished at the back here, because you can see this little bit of kind of dry. Looking hair, this practice head. The ends are a little bit split and i think some of this hair she could do with a little trim. Maybe so, if you do have any of those ends, if they look a little bit longer, i would curl them so that they blend in with the curls that are tumbling down, but on this particular practice head for this particular client has a little bit too short To do that, so i'm going to smooth out the hair, i could use the tongs to smooth out those that hair if i wanted to, but i'm just going to literally twist it up and pin it underneath we have another question um. If your client has short hair, would you allow less time for the style yeah? You probably wouldn't need as much time curling the hair and blow drying the hair? If she's got short, fine hair, then the time is spent getting the texture in the hair and blow drying. So you've got lots of root, lift and lots of volume. So you might need a little bit of extra time to get that root lift in there, but it would still be quicker than working with somebody. That'S got long, thick heavy hair, so certainly it would save you time for sure. So now we've kind of got our gorgeous style and it does look like she's got lots of thick luscious hair, but she's got quite fine hair and it's quite short um, but the way we've worked it without any backcombing is a tiny little bit at the root On the crown, the tiniest bit um, but really it's not kind of solid, it's just kind of airy and light and gorgeous, but we do have lots of pins sticking out of the head. So what do we do with our pins? Well, these sections on top here. I'M just going to literally take them out, they've done their job and the sections at the side. If you're working with little fine pins, you might need them again. This is a strong heavy pin and this one was used to prop this side up. So if i take it out, i can see if it's going to drop, it's not dropped, but if it had dropped a little bit. What i would do is come back in with a fine pin, put it in the same place and lift up that hair. A little bit and then slide the pin down into the hair, but you need to make sure when you put this in that the pin kind of runs kind of. Let me just see if i can turn this head around, no she's not going to move. It needs to kind of run up parallel to the way the direction the hair is running. So you don't want to put the pin across the hair. Let me just to show you with the dark one, because i know it's not easy to see. We will be doing this close up for our online students, but you don't want to kind of put it across the hair. You need to make sure you put it kind of running parallel to the hair, so when it goes in, let me make sure i get it so i'm showing you properly, that's it! So it's running parallel to the each strand of hair. So when it goes in, it gets hidden in the hair. So let's come around to the back now and see. If we can push some of these in, what would you do if your client has a fringe but shows you pictures of styles that she likes without fringing? That is a really good start, a really good question, because quite often you'll get people showing your styles and their hair is kind of nothing like you know: it'll have a big sweeping fringe and she might have a short choppy fringe or she's got a short choppy Fringe - and you know she she's got a sweeping fringe and it shows a short choppy fringe. So really, what you have to do is part of our job is managing people's expectations, so she could as long you know if she's got a if she's got long hair and she shows you a picture with a fringe, then she could always get a fringe cut Into the hair, but if she hasn't really what we're doing when we're working with hair when we're creating bridal hairstyles - and this is a really good tip, i think - is you're not necessarily trying to exactly recreate the style in the picture, because you can be setting yourself A really difficult task, if you do that, what you're, what we're aiming to do as bridal hairstylist, is recreate that style, the idea of that style, but recreate it. So it works on that particular client, and that means that the front of the hair may well be different to the picture, not just because her hair's cut differently, because she's got a fringe or she hasn't got a fringe. But because her face shape is likely to be different to the person in the picture. Her parting might be different. You know if somebody show if it shows a lovely sweeping fringe with a deep part, if somebody's got a very strong direction of hair growth. When you try and move the part, then you get this instead of it lying flat here it will lift up and you'll get this root lift here, so you can't get that same sweeping fringe depending on the person's direction of the hair growth, and you know, depending On it also, you know depends on whether she's got very fine hair at the temple. It might not might just you might end up creating a side part, and then it creates a very kind of you can see all this fine hair here, so it doesn't suit her. So usually, what i do is i try and when i'm working with the front sections, i try and pull them away from the images that they've been looking at and that's where the mirror comes in handy. So i pull them away from them from the in from their phone, and i get them to look in the mirror and kind of say to them. You know at this stage what what we're trying to do is is create it. Get the front of the style create something that works perfectly for them rather than for the person in the photograph, so um yeah don't be afraid to say to them. Actually, you know, i think we need to do something slightly different at the front, and this will suit your face better. That'S usually a diplomatic way of saying you know you don't need to your ears, are too big so that won't look good on you. Don'T say that so just or your face is too fat, so um yeah. So don't say that just say you know what we're gon na find a style that this i'm gon na work. Let'S work together, we'll look in the mirror and we will find a style. Will create us out the front that looks perfect on you, so we're going to adapt it to the style at the front. So that is basically what we would do. If somebody shows you a style, that's um that their hair, you know that doesn't match their hair. Tight or their hair cut, so let's keep going. I can dress myself, that's a bit better. Okay, so i think we might be nearly there except our accessories just popping these pins in yeah. So we've got two different kind of um. We'Ve got a soft sweeping kind of one big chunky twist on this side and on the other side, it's a bit more kind of detailed we've got. I could just created two twists, but you can see how different it looks. So it's always good to try different things when you do the trial and then i'd make a note on my little wedding planner once i know exactly what how she likes the hair and some people might like it a little bit differently might not. They might not necessarily want total symmetry, so sometimes you might want one side twisted with two twists and one with one, probably not, but you never know, let's pop a few accessories in with some great questions today, though guys so, oh that looks pretty, and the good Thing about these accessories, i'm using these little accessories on a hair pin here when i created the height here, i secured it with some bobby pins at the back, so you can literally slide these little accessories behind those bobby pins. If we need another one, maybe here actually would look pretty and then they're really secure, but i think maybe here you can see - i can see here just a little dip in the hair. It'S almost like she needs something, an extra curl, maybe that one would be better there, but so, if you find get any little dips in the hair, sometimes it's good to uh use your accessories, and i'm just going to come in here kind of wind it around A little bit, that's it to pick up some hair and then slide it in. If she wants to go in, that's it don't know quite what it's hit that that's better. Sometimes it's just hitting another pin and it doesn't want to go in yeah and there we've got a lovely little half up, half down style for short hair, soft relaxed, gorgeous effortless, looking soft bits down at the front. But again you can adapt the front to suit your client and let me show you this side again, which is really pretty, but thank you for joining me tonight. Don'T forget to like and subscribe and hit the notification bell. So you'll find out you'll get a notification when our next live tutorial is which will be next week, but i hope you've enjoyed the style. If you have any. I hope you've enjoyed the tutorial. If you have any other questions, please just let me know, and we will you know, send me a little message and i'll get back to you after the tutorial um and let me know if you've got any styles, that you'd like to learn for future lessons. But take care stay safe out there and i look forward to seeing you soon take care bye. You
Comments
Natalie Sully: Pam. Love your outfit ! Wish I could have my hair like this every weekend when we can go out again!
surf1ncybersis: Wonderful tips!
bedoesiara2115: hey, beautiful hairstyle! I have a question, your training head is made of synthetic or natural hair? thank you in advance for your answer:)