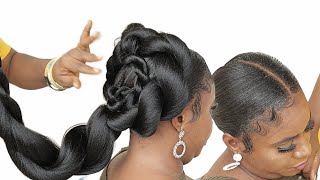
Live With Pam - Glossy Half Up Half Down Bridal Hairstyle For Long, Stubborn, Frizzy & Flyaway Hair!
Transitioning from our live up do tutorial last week, Pam will be demonstrating how "problem" hair - A.K.A long, stubborn, frizzy and flyaway hair - is not actually a problem when you know the correct skills and techniques for handling all hair types, including all of the above, in this weeks live tutorial!
This gorgeously classic half up half down bridal hairstyle is perfect for weddings of all seasons and for "problem" hair types - P.S. we don't really think there is a such thing as "problem hair" !
Subscribe and learn the latest wedding, bridal, prom & party hairstyles alongside timeless, classic hairstyles and vintage looks that never go out of fashion.
Links to the products used by Pam (where available):
Goldwell Style Sign Superego Structure Styling Cream: https://amzn.to/31IoFiq
L'Oreal Infinium Extra Strong Hair Spray: https://amzn.to/2wQ5b08
Visit https://www.createbeautifulhair.co.uk/... for more information on learning with Pam.
Want to master the art of bridal/wedding hair and learn with Create Beautiful Hair? There are many ways to learn with Pam: https://www.createbeautifulhair.co.uk
1. Join our Habia approved award-winning online bridal hair course, learn from home and submit work directly to Pam for assessment and feedback as you work through the models; receive as much support as you need! Complete the assessments and receive a Habia approved CPD certificate upon completion of your bridal hair training. Our SALE has begun! ***Use code SAVE200 to join this course with HALF PRICE OFF!*** Find out more at https://www.createbeautifulhair.co.uk/...
2. If you are in London or nearby, enquire into private Bridal Hair one-to-one tuition for yourself or for a salon! DM for more information on private courses!
3. Check out more of our YouTube channel for a selection of our freely available tutorials . . . like and subscribe for more information and updates, YouTube link: https://www.youtube.com/channel/UCDKUM...
4. Join us on Facebook for more tutorials and all things bridal and wedding hair!! https://www.facebook.com/createbeautif...
Whichever option you choose, please do get in touch and share your fabulous creations and suggestions on what you want to see next!
We've got it covered . . . we even have tutorials covering the curly girl technique!
Great for fans of natural unintentional ASMR!
Hairstyle tutorials include hair prep, hairstyling and hair up, blow-drying, curly girl techniques, working with different hair types, hair textures and hair lengths.
Create hair up & bridal hairstyles and become a bridal hairstylist with Pam Wrigley, UK Wedding Hairstylist of the Year
Just SUBSCRIBE & LIKE!
And welcome to tonight's tutorial, i'm pam wrigley and i am a bridal hairstylist, sorry for that technical glitch. If you were watching me a second ago, but it just didn't want to go live, but now we're actually live. So thank you for joining me. If you have any questions, please just pop them into the chat box and i'll do my best to get back to you straight away. If you think of anything you know over the next few days, you can just send me a comment on youtube or get in touch with me by email. Uh info create beautiful, hair dot code at uk. So please just drop me a line. It could be to do with tonight's bridal hairstyle, or it could really be anything to do with bridal hair. So i love working with my bride. I love working with all my clients, whether they're getting ready for a big party or um. You know it might be the mother of the bride or might be the bride herself, but it's it's a it's just a great job to do so. If you're training, if you're learning how to be a bridal hair, stylist, then please subscribe. We'Ve got lots and lots of tutorials. We also have our online bridal hair course um. Where we've got. I think we've probably got about 200 tutorials on there now, so lots of different hair, prep tutorials braids blow drying everything in detail and close up so uh any problems you have with styling hair learning how to become a bridal hairstylist you're in the right place. So today's style, this is a style i actually created with one of my clients on sunday she came to see me she's getting married in the summer and she had uh a lot. She had long thick, heavy hair you've seen the i think. You'Ll have seen the thumbnail with the style, but this lady had long thick, heavy hair and she actually had a natural curl, but she didn't want to use her natural curl. The hair was quite stubborn. She couldn't rely on the curl and really she just wasn't too keen. It wasn't quite curly enough, and it wasn't quite straight enough, so she wanted me to recreate that curl, but the hair was quite when i brushed it through and when you're working with somebody who doesn't want to use their natural curl. The first thing you need to do work with the hair dry without any product on and brush it through, and it might get really kind of frizzy and fluffy and look crazy. But don't worry, that's what you need to do before you actually start the prep and then, unlike when we're working with natural curls, you need to have the hair dry. So what i did first was: i worked through the hair, a section at a time straightening the hair, so it was perfectly straight and glossy showing you the back then, and we i used the silhouette style and care lotion to prep the hair, so spritzed, each section Of hair before i straightened it, and then i straightened the hair and you can even use a little bit of this after you straighten the hair because it doesn't kind of revert, it's a great heat protector and it gives the hair a lovely gloss and shine. And then each section was curled was re-curled using the my 25 millimeter tongs and i used uh my l'oreal infinium hairspray on each section, not a lot, because you don't really want a crispy curl, but you want the curl to hold. You don't want it to kind of be tempted to revert back to that kind of flyaway frizz that sometimes you get with natural curls with strong kind of it's quite dry. Her hair natural curler hair can be quite dry, so we needed it quite strong. So it doesn't go, fluffy she'd had her hair curled before and the curls were lovely, but they went fluffy very quickly. So we have. We have a couple of things that we can do to prevent that happening. First, one get the hair, smooth and sleek. First of all, with your straighteners and your styling care lotion. Secondly, get the hair curly, so i've used the tongs and created a lovely kind of gorgeous smooth bouncy curl using the inf l'oreal, infinium, stronghold, hairspray and then last but not least, and you'll know. If you've seen some of my tutorials before creating beautiful hairstyles is really it's worth taking time on the hair, prep, so don't kind of rush through the hair prep, and then wonder why your styles are looking a little bit kind of fly away. The hair looks a bit dull and lifeless it's all about getting the prep right and once you've got the prep right. The styling bit is easy. Let me just check our questions. Okay, so, as i take the hair out of each of these kind of pin curls i'm going to use a little bit of the creative texture structure cream - and this is a really it's by well and it's a fabulous product. I wouldn't use this if your person's got very fine, thin, hair and you're not struggling to get the hair smooth and sleek. You probably wouldn't need something this strong, but if, as i say, you're working with someone who's got natural curls she's got a lot of hair and it's quite thick and it doesn't want to kind of tame or be tamed. I should say, then: this structure cream is a fabulous product, so you're going to put a little bit on the back of your hand and as you take out each of these curls you can. I mean you could just have it as one big curl, but i'm going to kind of separate them, because i've done quite big curls here and i'm just going to smooth out the surface of the hair. I'Ve kind of got a little smear of the product. On my fingers and just smear that smooth it over the curl - and you get this fabulous glossy finish now, if, like me, if you're working on a practice head, maybe you're just kind of you know practicing all these different techniques. Well, the practice heads usually the hair is quite dry. So it's even though they're not naturally curly the hair isn't curly on these heads. It is dry and it is brittle. So it's perfect to practice your kind of smoothing techniques. So if you can get the hair on your practice head to look smooth and glossy well you're halfway there already now, you might find you know if you are working on a practice head, you don't especially if you've used it for a few different styles before then You probably on the practice head it's hard to uh, smooth over the hair with the straighteners. So just go straight to the curling stage. Now you could i mean what i did hi sharika good evening thanks for joining me tonight. You could uh while you're doing a trial, you mean you, could you could curl the hair, try curling the hair with the straighteners instead of um, you know as you as you. If you're short of time, you could just go straight to curling the hair with the straighteners as you straighten it, so you could smooth it so with the straighteners and curl. But and then you could maybe put a little bit of this structure cream on each curl. As you create it, if you're short of time, so if you don't have time to kind of do all you know, do the straightening and the smoothing and then do the um re-curling and pin curl everything and take it all out. Maybe you know you're doing somebody's hair for a party. Then you could smooth out the hair with your style and care lotion, i'm just going to create some nice height here you could smooth out the hair with some styling care lotion and then um and the straighteners and curl, with the straighteners rather than straightening, and then Re-Curling with the tongs, so you know there are choices if you don't have a lot of time, but if you're working with the bride, i'm just you gon na use a bit of this lovely texture that we've already got here in the hair. If you're working with a bride, then i would recommend allowing plenty of time to do her hair and i'm just a tiny bit of backcombing there. Um so may you know make sure you've got enough time to do the hair prep properly, but sometimes you're doing hair. For a special occasion you know you, don't necessarily you know you don't necessarily have time to uh. We might be just working with a bridesmaid. You might not want to spend an hour on hair prep, but, as i say, if you're working with the bride, it's definitely worth it and she'll have a long, lasting style. The hair will look glossy and gorgeous, and i'm just pinning creating this height here, just pinning that these lovely sections a little bit gap there. That'S it just creating these lovely sections and creating a little bit of height here. So it's quite a simple style once you've done the hair prep a couple of bobby pins across the back there on each side and then we'll start with our. So she's got a nice little bit of hair height there. Sorry, let's lift her up a little bit. So you can see there lovely bit of height and then we'll do our front sections. Now i have um, you know i have pin curled the hair at the back. I'Ve just taken it straight back here, but maybe because i wasn't sure you know. I wasn't sure where this lady wanted to have her hair parted so and usually that's quite a good idea. If you're doing a trial, now ask your client first of all. Does she want to use her natural part, so she might have a definite parting that she definitely that she wants to use and she doesn't want to move around. But if they say they're not sure where they want to part their hair, then i usually find that by curling this section back while you're doing the hair prep. It just gives you flexibility, so you can move, have a little play around and decide where, where you want the hair to part for this particular style a little bit of cream there. So it just gives you a little bit of flexibility and it gives them options. So they can, you know, have their uh parting in different places somewhere different. Possibly you know they might say. Actually, no, you know what i like to have my parts in its usual place and then what you would need to do on your little wedding planner, where you write everything down, make a note that you're going to use her natural parting for the style. So i, when i do a trial run, i always write everything down so that i know ex in detail and take photographs as well. I do take pictures like the ones we put on our thumbnail that you saw today for this particular style. That was the style that she's going to have, and so i do take photographs, but but i find sometimes, let's have a look at where this lady would like to have her hair parted. Sometimes i find, i think, we'll do it over here today. Sometimes i find so actually if this section is going to go over here, what should we do with this section? We could have a little bit more height. That'S another thing. You can always do ask them if they want a little bit extra height if they want it coming from a little bit further forward, rather than kind of just on the crown so bringing the hair back in this way just gives you more options. You might just have half of that section back, so it's it's got a little bit more height rather than a lot of height just a little bit, and then let's bring a couple of these sections here back from the side so that it that's better. So it just you know what, when you do the trial you want to have as many kind of options as you can, so just by kind of playing around and moving where you have the part and where the height is going to start. It just means you've got kind of. Oh, of course, you've got to get feedback from your client as you're doing it, but it just means so i always have a mirror, but it just means that you know you're more likely. The idea of the trial is so that your client gets a hairstyle that she loves and you get the job for the wedding day. So by giving her as many options as possible, bring those little sections back. You'Ve got more chance of having a happy satisfied, client and that's what this job is all about, so give her plenty of options. Quite often, you know i'm just going to pop a bobby, pin i'm using a blonde bobby pin, but we're going to cover that in a minute. Quite often, people will show you styles, that they've seen on pinterest or instagram and really our job that can go over there. I think our job is not just to recreate those styles, it's to recreate that style in such a way that it looks gorgeous on your client, so we have to adapt the style to suit her face shape. Let'S just bring this back, could have a few little bits down. You know you want to adapt the style to suit her face, shape her hair type. You know whether she's got kind of big ears or little ears or whatever it is. So my client, that's that's. Having this style, she was a bit where she thought her face was a little bit round, so she wanted quite a bit of hair down around her face. She didn't want it to kind of all, be pulled back and look rounder, so she wanted to have some a bit more hair down around the face, so i think she probably had it was something like this, i think, but be led. You know be led by your clients and let them see it's kind of a little bit more like that with this hair down and what you can do if this is sticking out a little bit, because you can just as a temporary measure pop a little clip On it just so, it trains it to go flat and then bring these bits down. But by giving your clients, you know, ask her. Just you know suggest get her to look in the mirror, whilst you're creating the style and get her to uh a little twist and pull get her to give you feedback and give you direction as you create your style. A nice lovely chunky twist here loosen that out, so we've got the hair prep really, then everything else is quite easy and straightforward, because the hair kind of does what you want it to do, just a little twist and pull, and when you secure the hair, make Sure you secure in such a way that the bobby pins are hidden, so we want a bit of hair down which will be this bit of hair here. That'S it! I might pop a little clip. I mean you could go over it with the straightness to smooth it at the side. If it's sticking out too much, if it's not quite the shape, you want it to be, but the other alternative is to. If you don't want to lose. You know that kind of movement in the hair just pop a clip on it, just a temporary measure - and here let me see so that bits coming down and back lovely and leave a few bits down the hair on this practice head is a little bit long. So i'm not going to leave bits down, but it would be, would be nice if we had a couple of kind of tendrils down. Let'S turn around, so you can see what i'm doing i'll see. If i can do this backwards, a little twist and a little pull and we're almost there and as i say it's all about the hair prep and it makes your job much easier, hair, prep and product remember to secure the pin. So the bobby pin is hidden. Now we do have tutorials on our e-learning site. That shows you exactly how to make sure your bobby pins are all hidden and secure, and we do have a 50 off offer on at the moment on our e-learning site. So please have a look at that at create beautiful, hair and start your or continue your bridal hair training with us. But of course we're here on youtube. I'M just going to twizzle pin that little bit of hair in a little bit. I think - and you can join me every week - live here on youtube if you've got any styles that you particularly want to learn, please send them in and that's it. We'Ve got our gorgeous style and you've learned how to work with stubborn kind of flyaway hair and how to get a smooth glossy gorgeous long-lasting curl, so i hope you've enjoyed tonight's tutorial. Let'S take these little clips out now hope you've enjoyed tonight's tutorial. As i say, if you've got any styles, you want to learn, please just send them in to me, and i hope you can join me next time so have a good week, and i will see you soon. Thanks for joining me, take care bye. You


Comments
bharat Wadhwani: Mam plz how did curls
bharat Wadhwani: Plz explain