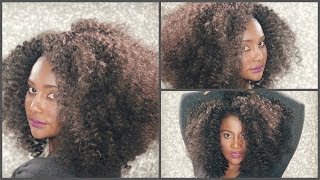
The Most Natural Looking Kinky Curly Crochet Braid Hairstyle.
The most natural kinky curly crochet braid hairstyle.
Hair: 4 Packs Freetress Boho Kinky Jr
Hope you find this video helpful.
#TheMostNaturalLookingKinkyCurlyCrochetHairstyle #KinkyCurlyCrochet #AfroCrochet #FreetressBohoKinky #FreetressBohoKinkyJr #NaturalCrochetHairstyles
Follow my Instagrams:
@CandieHairCreations
@OneTrueNatural
Business Email: [email protected]
Hey guys, it's candy coming back to you with another video and yes, of course, it's another crochet braid video, because you already know how we do over here, all right. So for today's video i'm going ahead, like you already see me doing, i'm going ahead to just start the braiding process and i'm braiding her hair in a very basic, simple braid pattern. For today's look. We are not going to go ahead and use that versatile, braid pattern that i usually use and that you guys are familiar with if you've been following my channel and by the way, if it's your first time watching. Thank you guys so so much for watching, and i am so grateful for the overwhelming um support. In recent times the videos have been doing great. Viewerships have been going up so shout out to you guys and for my oldest book goodies. You already know what it is team natural here in amex over here, all right, so yeah, i'm going ahead and braiding it and curving the braid all the way over to the other side and then once i get that done and that out of the way, what I'M gon na do with the rest of the hair is basically basically braid all the way back, but there is one variation or one special um thing that i want you guys to pay attention to, and that will be your game changer for making the hair look. Nice and full and providing the coverage that you will need for this style. Yes, all right, so just going ahead like i mentioned braiding all the way back - and i will you know - draw your attention to the part of the process that i want. You guys to take. No special notes of all right. So now we're at that part - and this is where um i'll be doing her nautilus, parting or her invisible parting and, of course, for a parting you're separating the hair into two sections, one on the left of the part and one on the right of the part. No, i'm just clipping off the one on the left of the part and working with the portion on the right to the towards the right of the parting. However, i'm not gon na be going straight back with the braid, i'm just going to be braiding that first portion, oh yeah, about a quarter way down and what i'm gon na be doing. Is i'm going to be switching it curving that braid and creating like a criss cross or a bypass over to the the row previous to it, so that row that you already see sectioned off to the left of the one that i'm braiding? I'M just going to you know, curve this one and join it with that other row. So it's going to going to be um, creating somewhat of a a overlap or a crisscross you'll see what i mean, and another thing to note guys is that at the end of each braid, what you're going to be doing is just joining the previous braid with The one that you're braiding at the time so that you end up with only one braid once you get to the end of the process, so everything is interlocked into the other. And then you are good to go knee top braiding process and you don't have to worry about it being too bulky alright. So now i'm doing that other row and of course you have to you, know cross that one over to the row on the right to create the effect that i was explaining to you guys and first for this style. You want to make sure that your part is not too wide. If the part is too wide, then you will have this big wide gaping. Looking part, you want your part to look nice and natural, so this is basically the last um braid that we're doing, and you will see once i get to the end of it - that um all of the remaining hair, that is hanging from other braids um to The right and the left of it i will join with this one, so, as i mentioned before, it will create one ending braid for for a neater outlook or anita outcome. Sorry and guys, some people may think that it's not important to make your braid pattern neat. Some people just throw some braids in maybe six or so braids, but i personally believe that the neater, the foundation of the style, the better the style, will turn out. That'S just me, i mean correct me if i'm wrong and once that is braided, then i just take my crochet tool and just weave that one braid underneath the rest of the cornrows just to disguise it and secure it. Some people go ahead and use a needle and thread just to sew it down. But to be honest, it's not necessary because you're here, your braiding here will actually secure it once you're doing that process all right. So this is how it looks and - and these are the um, the crisscrosses - that i was explaining to you guys about on top um. I did six of them three rows of crisscrosses. Yes, so that's how they turn out - and this is our hair of choice. For today, our boho kinky junior by free dress and i believe it's 12 inches and it feels and looks amazing and guys. We'Re gon na go ahead and start off the process by just inserting the crochet tool and attaching the hair pulling it through and then creating a multiple loops. But what i quickly realized is that i didn't need to make half as many loops that i did, because this hair actually secures quite easily some crochet hair doesn't. But thankfully this one does, but i will show you guys up close and personal how it is done. So you know don't mind me going fast at this beginning stage. I will actually show you um closer, how it's done all right guys. So i went ahead and installed quite a few rows. I know i'm almost at the middle and what i'm trying to do is to install the hair closely together, because you do not want for when you are wearing your um hairstyles for you to have any feelings of insecurity or vulnerability, because it's not a comfortable feeling. You want for when you're wearing a hairstyle, you can feel confident that what's going on in the back is something that will not be an embarrassment to you. So do not be very um, sparse with how you install the hair and then, when the wind blows then you're seeing nothing but cornrows and you're not seeing enough hair to fold them in. So, i'm being very careful to do so, and especially when i'm doing a client's hair, i do not play guys when i will skip around you know doing my hair perfectly. I always try to put all day the effort to make sure that i do my very best with installing for a client all right, so now we're actually getting closer to the front. I'M on this very side and again, like i said, like i always say, i'm like a broken record. Crusher installation is a matter of repetition. So if you get the process, if you understand the whole um step or the process that it takes for you to install one, then you're pretty much well on your way now. One thing that i want to point out is that for the very front ones i went ahead and did somewhat of a knot, less method for that installation just for the very front ones, and so the knot legs method just involves you pulling through one piece of The hair, instead of both i just go ahead and pull through only one strand of the hair leaving the other one loose. So when i'm creating my knot, i'm pulling the hair through i'm just pulling through one piece, then go ahead and tighten it and then what should happen is that once you release the hair, it will give the hair more coverage and give it more of an invisible Or not, less, look in the front, so that's what i did now in order to ensure that the hair does not slip. I just take tiny pieces from each side and just make um two tiny knots just to secure them in place, because i'm not doing multiple knots like i would if i was doing um a regular install. I'M doing you know just one knot when i'm doing it with the invisible method, i'm confusing myself just listening to that, but i hope you understand all right guys so now for the moment of truth, i am at that point where i'm going to actually be creating That knotless part, this is where she has opted to wear her her parting um on the left side. So again, the same thing that i mentioned before what you're gon na do is insert the crochet tool upward. It makes a huge difference if you do it downward. You will not get the effect that you're looking for so you insert it upward and once you pull the hair through remember um. I mentioned that you only knot one piece of the hair so when you create that loop and you pull the hair through you're, only pulling through one piece of the hair and then the other piece will just fall over and give it that that knotless look so You'Re not going to be seeing the knots at all the knot is created underneath that piece of hair that falls over. So you can see me trying to separate one piece from the next and creating that knot with one piece while pulling the other piece to fall over that knot that you created and then remember, don't forget to pick off those two tiny pieces to create two knots. Just to give you that peace of mind that your hair will not be slipping out and guys by now, you might have um realized that i am a jamaican and as such, sometimes my jamaican um patwa, my language. My jamaican vernacular becomes more dominant than i would want it, because i want everybody to be understanding what i am saying, but sometimes we already know yeah, don't know oy girl when a jamaican, your avatar, the things, oh god hot mess anyway, so we're gon na go Ahead now with the process yes fall over and you already start to see what i'm talking about you're, not seeing a bunch of knots as you would, if you did a regular, install all right so yeah, almost at the finish line again, just for reinforcement, class insert Upwards attach close the latch hook, pull it through hold the loop pull one side of the hair through the loop. Get that other part all the way double knot, it tighten it, and the one on top will fall over the knot below, of course, you're going to pinch off a tiny piece of the hair and a tiny piece from the other side tie them together twice, and You have that peace of mind: okay, okay, all right guys, and there you have it. We are all done and, as i said before, i love the texture of the hair and it's giving me a braid out. Vibe. The whole texture of the hair is just you know, giving me that twist out slash braid all bad now, i'm kind of going in and trimming off any you know frizzes that might be at the end. It didn't need much at all. This here is just, i think, freetress got this one down. Pack yeah. They scored big with this one, because this um freetress boho king is junior. Is everything everything if you're look going for a curly kinky afro look yeah, so thank you guys so so much for watching. Thank you for sticking and staying with my channel and watching my videos and commenting and liking and more importantly, subscribing yes continue to do so. Remember guys we post on wednesdays and on saturday so be sure to keep it locked and stay tuned for many more videos to come all right until next time stay safe, stay blessed. What good natural aeronautics says you

Comments
BBY GELLE: Love how detailed this is
Korie Patterson: I really appreciate you taking the time to show how you braid up to do this hairstyle. It's the part I struggle with the most. Thank you. Very good job!
Shuksy: Great video! Loved your attention to detail and how you took care and did her hair so meticulously - I like the style, Hope I can find a Hairdresser who will take as much care, have a blessed weekend
Gill Perry: ♀️This is a beautiful curl pattern. I'll look out for this. My favourite is Freetress beach curl but I can see this challenging it now
T & K Square: It looks amazing
Deborah Francis: Absolutely beautiful!
Melanie Draughon: This is exactly the kind of hair that I'm looking for. It came out so pretty. But I'm afraid that the back will look bulky. This is definitely my next crochet. Thanks again
SimpleNClassy1: I have this hair in now. I love it. I’m glad I found your video as I plan to do my braid pattern like this. I don’t know why, but sometimes when I braid my hair, I feel like it starts pulling up on its own. Which makes my braids feel tight. I’m not sure if you know what I am talking about but if you do any suggestions would be appreciated
Hazel Webster: Good morning, I love this style. Tfs. How would you maintain this style like for sleeping or daily routine to keep the fresh look?
Ronell Davis-Richardson: Thank you this is very nice
CeCe: It seems like every one who I find that does hair well is down south. It’s very hard to find talented BLACK hairstylist in Massachusetts
Candace Johnson Peguero: Udon this hair tomorrow for a new install
Areya Clowe: Very nice
Felicia Alexader: Apart from mouse what else can someone put in the hair
jummai etuhu: Where do you reside please?
Q Crook-Hull: Where are you located?
Lucky star: We're can you be found