How To Change Hair Color In Photoshop 2021 - [ Easy Photoshop Tutorial ]
In this video tutorial, I will show you how to Change Hair Color in Photoshop 2021
Download Image: https://unsplash.com/photos/tLKOj6cNwe...
Subscribe to access 600+ video tutorials: https://www.youtube.com/dcpwebdesigner...
*******************************************************************************************************
Need an awesome website for your business? - Simply contact DCP Web Designers for a free quote today - https://www.dcpweb.co.uk/business-webs...
*******************************************************************************************************
Contact me on:
Instagram: https://www.instagram.com/dcpwebdesign...
Facebook: https://www.facebook.com/dcpwebdesigne...
Pinterest: https://www.pinterest.co.uk/dcpwebdesi...
LinkedIn: https://www.linkedin.com/in/dcpwebdesi...
#PhotoShop2021 #Tutorial #dcpweb
Free tutorials, infographics, articles: https://www.dcpweb.co.uk/blog
how to change hair color in photoshop 2021, how to change hair color in photoshop 2020, change hair color in Photoshop 2021, change hair color in photoshop 2020, how to change hair color in photoshop cc 2020, how to change hair color in photoshop cc 2021, how to change hair color in photoshop, change hair color in photoshop, change hair color in photoshop tutorial, photoshop change hair color tutorial, photoshop tutorial hair color change, photoshop tutorial hair colour change
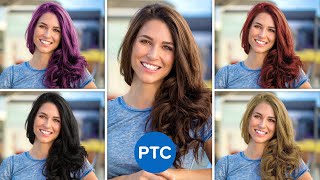
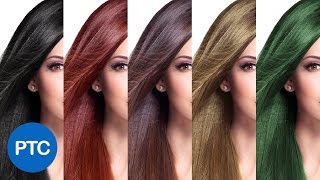
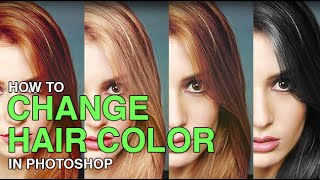
Hi and welcome to this dcp web tutorial in today's tutorial, i'm going to show you how to change hair color using adobe photoshop. So, let's open up our web browser and we're going to download one image i'll put a link to this same image in the youtube description. Let'S click download, free and we'll open up this folder on my desktop and we just drag and drop the picture in here and then we'll go ahead and open up photoshop and we just drag and drop this picture into here so to change the hair color. We need to isolate that hair color first, so we're going to isolate the hair and then use that isolation to create a layer mask because then later, if we want to adjust that layer mask in any way or adjust what we selected with the hair, we're able To do that quite easily, so the first thing we'll do is go to select and color range and we'll click on this tool here make sure sample. Colors is selected in the drop down here and the fuzziness will select that afterwards, we'll play around with that. But for now let's select this eyedropper tool and this will be our first selection. So when we click here, we can see anything with that particular shade of hair color that we just selected will be selected in the image, but we want to select more than one shade. So, let's click on the plus or the add to sample, and we can start to click and add more shades of this purple, but don't click on the black areas. We just want to focus on the lighter and darker shades of this sort of purple color. This will help us and we can see it's over selected down the side here, but we're going to fix that afterwards. So this should be pretty good. Let'S go ahead and click ok, so here we can see the selection and we want to copy this selection and paste it into a new layer. So let's just go to edit copy or control c and we'll create a new layer. So click down here for a new layer and then go to edit paste or ctrl v. So now we've got the hair kind of separated right and we need to tidy up down the slide. It might be a little bit hard to see so, just as an example i'll create a new layer. You don't need to do this, i'm just going to drag this layer below and we'll go to the bucket tool. I just want to fill it a color so that you can see where it's been over selected. Let'S just make this uh doesn't really matter what color it is. Let'S make it let's make it black will be good and we'll just hit the bucket tool. Here now you can see the over selection down the side yeah, so we create that new layer and just fill it with a black color. You can see down the side here. We need to erase that so let's go ahead and select the eraser tool and we'll click on the top layer here and just get rid of this. So we're just going to remove this here. We don't really want this. Just be a little bit careful do like the. What i normally do is just do the bulk of it here and then just remember to let go of the mouse button every so often so, let's just uh zoom in here, and we just get tidy this up. A little bit down the side here this should be pretty good. This should be fine, and what we'll do now is um. Let'S we don't really need this layer anymore, so we can delete it. That was just to see the over selection there and we want to convert this into a this hair into a white color. Only so to do that, let's go to image adjustment and we'll go to um. Let'S use we can just a few different ways, but let's use curves so we'll select, curves and just drag this top handle all the way over to the top here. So just drag it straight all the way across to the very fire end and that will make the hair all white and click. Ok, so we're going to use this part of our layer mask. So, let's unlock this background and let's duplicate it. So, let's make a copy, let's right: click, duplicate, layer and click. Okay, so now we've got two copies and this layer, this middle one we're gon na, go to uh, let's go to layer, let's go to mask and reveal all so now you can see. There'S a white section here: this is the layer mask we're going to click on that and turn it into black. So, let's select it go to image, adjustment and invert. Now you can see it's black and we want to click on the top layer, which is where we got the white hair selection and we'll go to select all so. We select all of that press, ctrl c to copy and then click on the layer mask here. The black layer mask and then hold down the alt key and click on it. One more time left, click and you'll, see black in here then press ctrl v and we're going to paste in a layer mask this allows us to isolate just the hair and we need to tidy this up just a little bit because uh. What we do is just go to select and um deselect here, so that unselects everything and all we want to do is where the eyes are just these little bits eyes and the sort of the nose i think is around here with the mouth we just want To get rid of the white here, so let's go back to our paintbrush tool. We'Ve got black selected at the top to make sure black is selected here if it's not click and then just drag to the bottom left hand corner and just draw over the eyes here. It'S really probably the eyelashes and just down here. So everything else is fine. I'M going to show you how you can slightly improve the selection later, but for now all we want to do is um. We can hide this top layer. We don't need it anymore, we'll click on this layer here, click on the picture of the woman right here and then go to layer, go to new adjustment layer and we'll select hue and saturation and then we'll select use previous layer to create clipping, mask and click. Ok now i think we did that wrong. So, let's uh just right, click and delete this. Actually we did it right. We didn't actually hide the top layer. We need to hide this top layer, so make sure it's hidden and then click on the picture of the woman. Pretty sure that was right. So let's go to the new adjustment layer, human saturation, use previous to create click. Ok and now we can change the hair color. So that's pretty much. You can like adjust the saturation here as well, and you can change the color quite easily. You can pick a different color quite easily. Now you can improve that layer more slightly. You can see at the top of the hair here. There is some purple shades in there, but they're very dark. So what you can do is left click on the layer mask here and switch over to white and then use the paint brush tool. You can just paint, although you don't see it you're, basically adding to the layer mask and wherever you see hair here, you can just like paint over it and you can improve the layer mask that way and you'll be adding white to this. If i left click, if i hold down alt alt key and click in here, you can see where we're painting over the image here and then left click and select again and then, when we go back to our image here or go back to the adjustment layer. Here we can see the hair being changed color here inside the darker shades as well. It'S up to you! If you want to do that, you don't have to do that. Um saturation, you got ta be a bit sensible right uh, but the shoe you can change it to pretty much any sort of color. So i think we'll go for like a green, small color. Let'S compare that to the previous image we downloaded in here and here you can see the difference between those images, so sometimes it's worth having the reference image. So when you're changing color, you can really pick something a bit different. You may just want to keep the purple but increase its color like this as well. Right just give it more sort of vibrancy, but it's a similar sort of shade - or this is more like a blue and purple sort of mix um, and you can do that as well. So you don't have to make quite a big change. It can be a subtle change, so i'm gon na go for like um like this purple sort of blue shades. Here i think that looks pretty cool. Let'S go to file save as first and save it as a photoshop file. So if you want to come back and edit this, we can always open up the file and adjust it quite quickly. Let'S go to file export as and we'll select jpeg from here, we'll set it to around 90 compression click export all. We need to rename this file, let's call it uh dash, color and save it. We can close this and we've got one image here and we should have a color change here. So now you can see the difference between them. So that's how you go about color. Changing hair or changing hair color using adobe photoshop, we used a certain technique here. There are other ways to do this. This is not the only way to do this, but i find this is quite an easy way and you can use the same approach to change. Other elements of colors or like eye colors or we could have isolated the lips here, for example, and only changed those. This is a good technique to learn. It'S all about the layer mask really, that's that's the key and to create you can see. This hair is quite complex so to create the layer mask, we use the color select tool right. The color range tool to just isolate those particular hair colors, quite quickly, okay. So, let's close this down, that's the end of this tutorial. I look forward to seeing you on the next dcp work tutorial. You
Comments
May Fint: super pretty and easy . can i ask? how to put screenname in videos? i have magix movie edit pro premium. thanks for responce
YourCodeTutor: Nice tutorial
LuxViaU: it does not work bro