How To Do A Quickweave Curly Beach Wave Bob | No Leave Out On A Protective Cap| Detailed Tutorial
Watch as I demonstrate how to do a Invisible part curly beach curl Bob on my client using Outre Velvet Brazilian Remy! 3 bags were use in lengths 12in!
Social sites:
Dallas Appointment bookings :
www.hairbymeekah.acuityscheduling.com
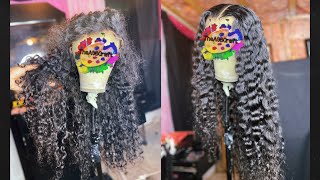
Welcome back you guys so today we're going to do a beach curl bob using the velvet brazilian remy hair by outre and is in beach wave and we'll be using three bags of twelve inch, so she's getting an invisible part. None of her hair will be out. So we're going to start the parting for that and they were going to mold and slick her hair, all the way to the back. Now you can use whatever multi agent you'd like to use, I like to use and pro gel. So once you slick her hair, all the way back, you're gon na put it upon you, don't and sleek it up as flat as possible and then she's gon na turn it to dry for forty five minutes, that's including the liquid cap, taking the hair at the Pecs - and this is what they look like fresh out - the pack cute little wave pattern. Now we're going to cut off the extra cap that we're not going to be using next, I cut the rubber band on the back of the ponytail just so I can leech flat, even though her ponytail is like already kind of flat and the hair is curly. It really doesn't require cutting I just like for it to be nice and flat I'd. Do it on all my cookies, so I'm gon na calm down her baby hair or her edges support this now and I want to use those later where I kind of s wave it into the pattern of the hair so that it'll look more natural. So, let's get started on the part, we're going to go ahead and measure off a piece and then I'm going to cut each piece using that first piece to the same measurement so that the part will be nice and even okay, so we're gon na place. This first track, maybe half an inch away from the tip of the protective cap and then we're going to live the rest of the tracks parallel to the first one and the second one and the third one and so on and so on and so on. So you get to the end of her part. So when laying the tracks, you guys make sure not to stack them right. On top of each other, give yourself some space. You don't need much just a little bit so that it'll lay flat. Now it is important that you make sure that they are nice and neat and land exactly parallel to each other, because you want your part to be apart, you don't want it to look jagged, you don't want to see any track showing so make sure you land Them perfectly in a parallel position right on top of each other after you do that side, you're going to do the same thing on the other side. So once you finish there we're going to begin to do our circle closure and I always cut off a piece and make like a round circle piece where I'm going to insert my closure piece, and you don't want to make this circle piece too big. You want to make it just about that big or smaller. If you possibly can next, we want to measure off how much hair I will believe that will fit into that circle. I'Ve done this a million times, so I can pretty much I ball and measure it out, but you can always go back and cut off the pieces that you need to cut off. I think I'll probably end up cutting off a little piece, because I had a little bit too much, but you want to make sure that that circle closure fits perfectly in the middle of that opening. You don't want it to be too fat, because then it'll sit up on top of her head. Okay, so we're gon na roll. This all the way towards the end of the track. You'Ll start from the beginning and start small and roll it all the way up and nice and tight, and the shoe looks something like this once you're done with it, then you'll take your flutters and then you just smash it work is nice and flat. You get your glue and then you're applied into that circular, opening now that we got that done we're going to pin it up after way. I always do this part first, so I don't have to do it later, because it's hard trying to cut those little pieces at the end - and this is just nerve-racking so now we're going to go ahead and apply her tracks in the back. I do double track because it does make the install go by faster and you can get all the hair in that you need, if you like, to use a lot of hair like me, so we're going to apply that first set of tracks, as you can see Here, like you, don't need a lot of glue you guys so don't pour the whole bottle of glue in one person's head. A little goes a long way anyways. So we're going to apply the first two tracks right at the bottom of the ponytail. You do not want to start at the very bottom of the protective cap or at her hairline. You want to start right below her ponytail and her ponytail should be that I'm sick little bone in the back. Your hair, if you touch the back of your head mostly, I got that knot back there, but you want to start @ midnight, but the second row of tracks will still be ear to ear. Now that we're we're going to go across the ponytail. So when you're applying the tracks make sure you apply it nice and tight when you're going over their ponytail, so that it'll flatten it out, and you also want her a quick way to feel nice and snug and like it feels secure. You don't want her walking out with loose track, because I'm telling you they'll call you back the next day. So with that being said, we're going to start on the next row, which is from Temple to Temple and with again just like. We did the last row we'll apply this on the same way: nice and tight from Temple to Temple. Okay, so I'm at the end of their first bundle and it was like a short piece left. So what I'm going to do is fly it in the middle of her head and I'm going to connect the ends of those to the the previous track. So we're still going to keep this in a u-shape. You want to make sure that your track plate placement sari is uniform. Okay, now that we've completed the u-shaped pattern, we're going to go to the top of her hair and we're going to do semis see patterns. If that makes sense to you guys. So you kind of want to put a slight curve to these next couple of tracks that will be placed at the top of her head. So you guys so when creating that seed shape, it kind of helps to form the bank area. This is what it should. Look like and you're just going to fill in that remaining area. So now that we are done trekking we're going to comb all the curls out into a nice body wave pattern so that the curls are uniform so that we can begin cutting. Look how pretty that comes out. I love these heads. The best hairs are used when doing this Bob, so I use the Tinkerbell. Come you guys? You can find it at any beauty supply we're going to use the shorter side of this razor comb, you're gon na start off by sectioning off the middle section. First, we're gon na start from the middle and work our way out. So when doing this, you do not want to pull on it, because when you let it go, it's going to be extremely short, so you want to kind of let it fall in this natural fall position and then decide where you want to start cutting that next. We'Re going to take out your next piece and we're going to cut going down, and you want to kind of lay it on the back of her head and start to cut down. Because then, it kind of creates a stack like a low stack and it creates the softness around her neck. So I like to bounce it back and forth from side to side when I'm cutting. I don't know why just do it pink, so we're gon na cut this side and we're gon na cut down in an angle. Now the best thing with this curly hair is like you can't really see like the define cut. It'S like you can do on straight hair, so you really can't miss this cut up, because you can't really see the layers, so you can kind of just kind of cut to your eyesight. But when you over direct back you guys that makes the hair fall longer forward. So that's why you see me over the raking. The hair back and cutting sort of create a nice bow angle, make sure to continuously calm your hair out to make sure that the curls are defined in uniform and then start cutting from there. I place my comb on the back of her head. I feel I lay it flat on the back of her head and then I glide the comb down. That'S gon na shave off hair. It'S gon na make it more flatter more softer back there, and it's also going to create that stack. So you can use this method going all the way up her head and determining how high you want her stack to be so we're gon na hold her head up. Cuz she's been looking down the whole time and then I'm gon na pull some from the other side and we're going to I wrecked it to the middle of her head and I'm gon na click down. So now I want to create the layers on her left side yeah. I know my love for my right eye heard me: hesitate but you're gon na over direct the hair back to the middle again over directing back, creates length in the front and because I'm over directing back and I'm cutting downward. It'S gon na create layers around the side of her head. Also, you once we finish that side. We'Re gon na do the same thing on the other side. Now look how pretty that is. I love doing these Bob. This is most simplest. Asses quickest easiest Bob to do so. I hope that you guys watch this video. I actually like pick up on it. I would love to see if some of you guys do it I'd love to see it. So I don't know if you can email me at agnya video, but if you try it, please tack a girlie and I would love to see it okay. Now, let's do the bank area so you're, just gon na calm it all back. I could date the rest of the hair just coming all the way back as far as you can get it, and you want to cut down. You should see your guy from the UM from cutting from the back the shortest piece in the back at the top of her head. You should pull it all back to that and start cutting there and cut down from there. Look at that yes body art, so I use the 24-hour edge tamer favorite extra control. Ever it really does hold 24 hours. Someone applied to the hair that we lift up. It'S a big in another video and I'm just going to make some cute little baby hairs and kind of wave it in so it'll. Look like it's hurt. Doesn'T it kind of look natural now, I'm not the baby hair expert. So please do not scold me with these baby hairs, but I think I did pretty good she liked it. So the most important part is this: it's a black spray and a metal rat tail comb you're, going to place that Kong right in the center of her part make sure is directly in the middle of the part and then you're gon na spray it this spray Is called Jerome, rustlers and jet-black? You can use the high beams in jet black or any black guys, hair spray, so just watch the magic of this part after you finish spraying. You definitely want to put some sebastian on that part because that black guy will come off on her hands if it's not all the way dry. So you sebastian to help it dry, but this is what you look like when it's done. Okay, sorry yeah! Oh, my thinking side out your ears, but this is what it looks like when it's done so she comes to get this hair style a lot you guys, so i threw in a picture of her rent one that she got. Isn'T it bum? Yes, thanks for watching, you guys don't forget to subscribe.


Comments
Mzdrakefordable: This was done so effortlessly, and explained so well. I had a moment where I believed I can do this too.
Renisha Hooks: Coming across so many tutorials today that actually made me feel confident in trying the full quick weave I usually do a leave out which I hate because I'm natural. You slayed that sis like where have been this whole time
j Gacha: I love how you explained the installation of the unit step by step. Also emphasizing that you don’t have to use the whole bottle of glue ‼️You’re the BOMB❣️
Teauna Ramey: Super Cute !! Loved this video from the beginning to the end ! I’ve always loved doing a good invisible part hairstyle and this video has me ready to start back doing them !! Good job !!!! ♥️♥️♥️
William Nuels: The Process The Skill the HAIR THIS WAS EVERYTHING. LOVED THIS BEAUTIFUL JOB
Melissa Rushing: What a beautiful job! Very well explained & executed. I cut my own hair in this same style once, it was straight though. I love it w/the wave texture, too. You are the type of stylist I think we all hope to find when we want our "do did". Lol
Loretha Clark Ministries: I have watched this tutorial so MANY times and I love it.
Yanique McDonald: This is so well explained! Straight to the point I love it
TLC Right Now: Oh my goodness I ABSOLUTELY LOVE THIS! I told my mom I have to get a head and practice so I can do this for her in the winter lol...No wigs this Winter!!
M B: I'm usually not a fan of the invisible part, but this looks really good! You did a great job. Brilliant idea with the spray and comb at the end!!!
Ebony Porter: Yasss...this is my favorite go to hairstyle when I want something quick, easy & fun..
Melissa Catoe: I love this video! Easy to follow and I must say I can now slay an invisible part quick weave because of you! Thanks for a good quality video.
F. SPENCER: Hunny, hunny...that was thee cutest bob ever! I would love to try this on myself, but I don't have skills like you do girl. Marvelous Job!!! Skills for real.
R: Beautiful! Im going to share this with a wonderful sis who does my hair. She's gonna love this! You sound so calm and relaxed and work effortlessly. I can tell you are a master of your trade. Stay lovely and thank you so much for this tutorial. You are a Godsend.❤
Caramel Kisses: This is one of the best tutorials I have ever seen! I adore this bob! I think I’m going to start to make a wig because I love this look❤️❤️❤️❤️
Ms Darlene Ray: Queen! You definitely slayed; the bob ! It’s was “” thanks for sharing your talent
yolanda busch: I love this!! And it seems so simple! Never had a weave in all my 58 years! But, this looks like I could deal! My hair is thinning and this looks like it’s easy enough to care for! I may have to do this! ♀️♀️♀️
Ansonia King-Richardson: Awesome work and thank you for being very detailed at explaining what you’re doing and reason why. So very helpful!! It was beautiful!!❤️❤️ Keep your gift sharpened ⚔️ (iron sharpens iron)
CatTay: This Bob is Beautiful! The wave pattern that you created is ! Love this style!
Ashlei Michael: I have never liked invisible part method ever until I saw this. That last little trick at the end with the hairspray was a game changer. Keep slaying queen and thanks for that little tidbit
Tanya Parker: Exactly what I was looking for!!! Thank you!!
Barbara Pope: Wow this was fascinating to watch and a lot of work! Very pretty
Yolanda Wynn: You do make it look so easy and I have to try this myself....thanks so much for the tutorial, the easiest and neatest I've seen!
Brenda Randall: This is by far the best tutorial I have seen,. You took your time and shared every detail.your tips were on point and you went slow enough for me to get every step. Excellent job. Thank you
pinkroses912: This was so satisfying to watch. You did a phenomenal job. I actually like the part better before you sprayed it! It looked really natural. The after looked professionally "done", but the before looked like a real part in her hair. Loved this video and the tip about not pulling the hair down when razoring it! #Genius
Inspired by Queen TLC: ❤️❤️❤️ this will be my summer look thanks for sharing!
Renea Moultrie: I love that style and you explain so very well I will be trying that style and follow your instructions. Beautiful style thanks
LaTonya Clark: I Absolutely Love Your Technique And want to try it on myself ... but I need to watch it a few times to get the track placement for (my part ) a few times so I get it right!!! SUPER CUTE STYLE & CUT❤️♀️
Keisha Hardy: You done an excellent job explaining how to do everything step by step… Thank you …!
Richard Brooks: This was a great video!!! WOW! Thank you! It was explained so well.
UniInflux: This is beautiful! I love the details along the way.
Youlanda Moore: I love this hairdo, you did a beautiful job
Catara Buckner: Awesome job in explaining how and why you did things. Love the outcome!
Simone Bell: The first 4 minuets of this video, I felt I can do this quick weave. Great,awesome tutorial! Just need to see the closure and how you opened it after flat pressure. I’m not a hairdresser, but I feel like one today
Honee Dew2: Still slaying w these tutorials! With my daughters help, I'm going to try this when I go on staycation. Luv the waves on this!
TruScorpio1988: I LOVE LOVE LOVE LOVE LOOOOOVVVVEE this. I'm in beauty school now and I am dying to try this after seeing your video. This style is beautiful. Keep slaying hun!!!
Beverly Myers: This style is so pretty. It looks like her natural hair. Great Job!❤
Eunice Mungai: Perfectly done, effortless gal you are on top of this hair game love it n learnt alot thank you sister...
lovingmynaturalhair: Beautiful!! I’ve added this to my favorites so I can try this on a mannequin head. I’d jack up trying to do this ON my head. Great tutorial
LaShawna Blanton: I would love to try this. It does look like a much easier style and so cute! Your tutorials are the best you make it easy to understand . Thank you for sharing. God bless you!
Sharon Jones: This is really beautiful. I’m amazed at how simple “you “made it look. Great job
Sylvia Oduah: This was so easy to watch. So glad I found you!
Denesha Hill: Awesome and thank you for making it easy to follow ✌
MillieAwna: Thank you so much for this tutorial!!!! My client sent me this exact picture of the style now I see how to achieve that look I’ll be tagging you on Instagram with the outcome ❤️
SIMIPLY MYA: Omg I’m doing this now and it’s working!!! Thank you so much
edith Thrower: The way you talked through the process was great, detailed, and easy to follow. I may try it.
Tasha Watson: nice. Thank you for walking us straight thru it. Im going to try this, awesome job
Sammi Jay: Great job! Thanks for sharing with us!
Della Dabner: I LOVE this!!! I've learned a few things watching you. I always thought you had to lay the tracks on top of each other when doing an invisible part. This way looks so much better. Also using the black spray I didn't know using hairspray will keep it from rubbing off. Thank you for sharing you knowledge! Oh and I'm not that good at baby hairs either. You're way better than I am. Lol
Sandra Melvin: I love that bob it’s simply beautiful I use to wear one my self and always enjoyed it all I can say is beautiful
DeDe Dawson: The stylist did a great job explaining the style step my step. Love it!!!
Kallme Karma: I love how you work smart and get all the tedious work out the way first Wish I would have thought of this back in the day when I was doing hair
TheVerbalAssassin: I LOVE how you narrowed that part! I was thinking "That's pretty but the part is too big for me" and then. . .MAGIC!
Humble Paradise: Thank you. You taught me something new today “It’s going to go a long way.”
Nyece Chaney: How long does a style like that lasts? Beautiful love it! ❤
Mz. L3Gina Jam3z: Very detailed.... thank you for this tutorial
robbin smith: This is amazing!!! I want this style so bad on my hair I want to try and do it myself
SHY: This is one of the best quick weave tutorials I have seen ❤️ Great job
Shaniece Hamilton: Girl this is bomb, I want to do my hair like this but I have no patience cutting my own hair lol I want to do a full weave with invisible part. Thank you for this video it's super cute I love it
Brenda B: Girrrll, that was the best quick weave tutorial I have seen. Your step by step on how to place the hair on her head and how to cut curly hair has been a best kept secret lol. That wavy hair is the bomb , I love it last but not least the invisible part with the rattail comb and hair spray! WHAT!!!! Girl that was Genious!!! Love this video! You are a sculptor!! Thank you for this video!
Scorpio_Prince84: You did an amazing job hair looks beautiful
Cinnamon Life Ministryinthecity: Great job. Can’t wait to try this hairstyle
Evelyn Rogers: You did an amazing job and I was able to do my own! Thank you Queen!
Jolie by Jennifer: This was cute! My mom likes styles like this but is currently on a latch-hook wave. This is much softer and still low maintenance. I'm going to suggest this style to her. Thanks!
Brittany T: Def trying this I’ve done bobs in the past w a closure so now I’m ready to try the illusion part
Nikki Smith: YAAASSSSSS! You DID THAT!! I love it and I’m going to try it❤️ So BOMB!!!!
MsSugar7: I love this hairstyle..excellent job
April Dorsey: This looks so nice. I'm gonna try these invisible parts on someone then on myself!!! Great job.
Phelicia Marshall: Absolutely beautiful!! It looks so natural
Gabrielle Barnes: I love how you started with the closure first then the rest of the head. I enjoy watching your videos
Just Browsing: Absolutely beautiful...you did that
Kisa Thomas: Beautiful! The tutorial was Awesome! Nice, slow, easy to follow. #NewSubscriber!
TRICIA BROWN: Love how detailed and informative you are. Great job
Angela Calloway: Yes I love the way she went step by step and detailed everything thing she did!!! The outcome was awesome,I want this hairstyle now!!!
Rae Tae: Thank you for sharing this technique with us
Drea Brown: The BOMB DOT COM girl! I do my own quick weaves all the time but I never use any textured hair, I always use straight. And that spray sealed the deal! My parts look clean, but I want it that much more natural looking. This tutorial taught me so much that I’m about to try this! Now the only problem is the cutting. Not sure how that will turn out but hey, it’s only weave right,
tinika thomas: I'm not a hairstylist but I'm going to try this on my sister today because I love the style and you explained and showed your technic so well that I believe I can do it too lol. Wish me luck I wish I could upload the finished product
Texbeflowin: Omggg...i love this...i need this hair style right now. I swear she did a bomb job n made it look so dang easy. Great tutorial
Tieasha Ellis-Davis: You did a great job on her hair I wish I could get this style
Healthoverlength: I love it! I’m not a weave wearer but I’d wear this! ❤️
Shahmeela Carmichael: I don't understand how anyone could put a "thumbs down" on this!! This is freaking gorgeous!!!!
Jessika Newman: This was so beautiful I think I want to get my hair done like this so great
Lonnett Johnson: Thanks so much for the step by step details and doing it slowly for people like me.. T he camera was on point also. Fantastic job
Meshine C: I have to say this is the best demo I've seen on YouTube todate. Thanks Sis great job!❤
Kathy Lezcano: Did a beautiful job you explain this step-by-step I enjoyed watching your videos and I see no other work that you've done your awesome
Rena Leakes: Gurl you are so talented. I'm going to try this part tomorrow morning. Wish me luck. I am officially a subscriber.
Keishawna Gilliam: Beautiful work! Love the one with the color too. And love the voice over. Very informative
Martha Urbina: I’m trying this thank you, it was the part for me. ❤️
S. Tenise Reynolds: Excellent tutorial honest sis. Easy to understand and work with on a simple styling method that it helps to see and learn these little tricks/method
Walda Jacobs: EXCELLENT job!! Great tutorial!!
Ninarae Johnson: Love how you explained so well
Very KinkyCurl: This by far is my fav. I love bobs and her beach curls gives the style a different flava.
Octavia Shane': Loved the way you layed the tracks and the spray is def a gem!
LaDonna Horne: What hair pattern did your client use for this install? It is beautiful, and you did a fantastic job.
TheIrishOne7💚: I would love to rock something like this! So cute!
T Ray: Gorgeous! Great job!!!!!
paul cordingley: Thank you so much for sharing that I live in England and I’ve never seen it done like this before I think it’s amazing thank you
Michelle: Love it, definitely going to try it!
Ladosia Landry: Beautiful!!! Love it
Exie Harrison: You just made this so easy for me I do quick weaves every other month and you helped with the part .. that's my struggle lol