3 Easy School Picture Day Hairstyles
I'm often asked if I have ideas for easy school picture day hairstyles. I decided to compile 3 ideas that are fast, easy and look cute. I prefer half up hairstyles for photo day at school because they are much more flattering. These hairstyles are great for babies, toddlers and girls that are older.
First hairstyle is inspired by Brown Haired Bliss: http://www.youtube.com/brownhairedblis...
Buy our favorite products here, including the spray gel, spray bottle, flat iron, it's a 10, topsy tail and other products mentioned in my video:
amazon.com/shop/easytoddlerhairstyles (affiliate link)
Please give us a thumbs up and subscribe!
Instagram: http://www.instagram.com/easytoddlerha...
Facebook: http://www.facebook.com/easytoddlerhai...
http://www.easytoddlerhairstyles.com
Arrival by MBB https://soundcloud.com/mbbofficial
Creative Commons — Attribution-ShareAlike 3.0 Unported — CC BY-SA 3.0
http://creativecommons.org/licenses/b...
Music promoted by Audio Library https://youtu.be/qZHipfdE4s8
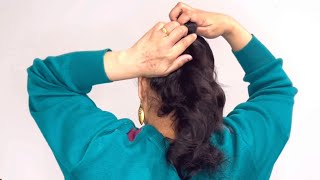
Ichikawa himself, my new baby sister made with roses. So this is Rosie our new baby. She is about seven weeks old. She doesn't have quite as much hair as no but yet, but we wanted to introduce you guys. Do you love having a baby sister yeah? Are you a prop big sister? She is. She loves her very much so today we are gon na, be showing you some school hairstyles. I love half-up styles because I love how they look from the front. So we are gon na stick with some very simple styles that you can do for school pictures and we are going to be using a Topsy tail tool in one of our styles and then you're also going to need some elastics water bottle. Our favorite spray gel, which I will link down below to give him a close up, look and she's, so sweet Rosie says hi everyone, okay, we're gon na go ahead and get started with our style, I'm just going to wet the root of the hair down. For this style, these are half up styles and I really only need control over the top of the hair, so I'm spraying it down a little bit and then I'm using my favorite leave-in conditioner, it's a ten. This is a leave-in conditioner. It strengthens the hair. It also acts as a heat protectant, and it's really good at getting rid of tangles. Then I'm gon na take my wet dry brush and just brush through the hair. As you can see, the roots are the only wet part. I leave the bottom of the hair dry so from here I'm going to make a deep right side, part above her eyebrow and then just comb it out. The next part that I'm going to make is, by her ear, I'm going to leave a little bit of hair down by the ear and then make a part also at the back of the crown. So this will just be this little left section that I'm working with for now, I'm going to clip it out of the way and then I just want to put this back section into a ponytail. I'M not going to be working with it, but it's important to get it out of the way. So I don't accidentally incorporate some of that hair into my style from here. I'M going to bring this section down spray it down with some water and spray gel, and then I will comb that all the way through the hair. It will just help you give the hold that you need and tame those flyaways. So I'm going to take about a one-inch section and come all the way down from the top to the bottom, and then I'm going to comb it out and place an elastic right next to that left sided part line. The next thing that I will do is create take another section directly behind that that is about an another inch part it out, and then this front ponytail I'm actually going to split it. In half add the back half of the ponytail to the second ponytail and leave half of that first ponytail down. Then I will add it to that. Second, ponytail create a third part and just repeat what I did before so I'm taking this second ponytail, I'm splitting it in half dropping the front half and the back half I'm going to add to my third ponytail directly behind it. It'S important to keep these elastics over by that side, partly to get this particular look, and then I have one more one-inch section to go: just gon na comb. It out again split this third ponytail in half drop the front, half and add the second back. Half to the fourth ponytail, so I like her hair to either be smooth or curled for school pictures, so I don't use heat on our hair very often, but I'm actually gon na take my flat iron through her hair. I don't set it to the hottest setting. I'Ve actually got it at about 350 and I'm just gon na smooth out the front of the hair. You could also use a curling iron and put some curls in it. It adds a cute effect as well. I will link a couple of hot irons that I really like down below, as well as the curling iron that we use. Our next style is a simple diagonal. Braid we're going to be using the same part lines that we did from the last style. So I've got a deep right side, part at the back of the crown and then one half way down by the ear from here. I am going to comb out this section and take a small triangular section parting it out at a diagonal, and this is about one and a half to two inches or about 1/4 of this section. This entire section up front from here I'm going to add an elastic to this front area that I just parted out and then the rest of the hair. I am going to come out and add a pony tail at the back left from here. We'Re just going to spray down and comb out this front section. You can also add a little spit of spray gel to help give it some control, I'm just going to do a regular three strand braid. Until I get back to this second pony tail, once it's long enough, you're going to take the front pony tail and add it to the second one, and that is it for style number two, our final style is just triple flips. I'M going to take a section right in the middle of her head, that is about two inches across and then I'm going to come back about two to three inches and part it across adding water. As I go, I like to add water to this back section to come it out. That way, I don't accidentally incorporate hair like you'll. See me doing here, see how it actually accidentally incorporates into that front front ponytail. If you keep that section wet back behind it and comb it out, it's less likely to happen. So I'm going to create another ponytail on the left and in order to part this out, I have a little trick for you I'll show you how I do it again on the right side. So after I've sprayed it down, I'm going to part to the side and then make kind of a u-shape and then you've got it all parted in one easy step, and I just kind of eyeball it to see side to side to make sure that it is About the same, if it's not, you can take it out and do it again. Next, I'm going to use my Topsy tail tool which I've linked in the description down below I'm going to put it right down the middle of this ponytail pull the hair through it and then pull it all the way back through now. This is where it's really important to have clean, ponytails you'll get a much better flip with your Topsy tail tool, and it will actually stay a lot longer. In fact, we took this style and we used it a second day hair. I left it in overnight and we just added all of this to a high ponytail and it was really great for her tumbling class. So I'm just going to do a third flip on this other side and then comb out all the hair behind it. So it's nice and smooth! Thank you so much for watching. I can a see you next week.

Comments
Strange Encounters & True Crime: Thank you! This is my first year sending my daughters to school for picture day! I am so excited to try these !
Desenia Gonzalez: Thank you for sharing the hair styles. They are all lovely.
First Name: At first I thought Rosie was a doll! lol she's so precious! ❤
MomOf2BeautifulGirls: I thought she was a doll! How precious ! All 3 of you are beautiful !
Nachole: I thought the baby was a doll at first! Both so adorable
Klyn♡: Its so funny, my 6 year old daughter and i clicked on this video for some picture day ideas and then we heard you say your new babies name is Rosie and thats our new babies name is aswell!!! Our Rosie posie is 7 WEEKS old too!!!! I had her August 31 2019 and today is oct 22 2019! Lol that was a wonderful coincidence ^_^ and it made us laugh. Also great video! Super cute hairstyles!
Renata Lima: Que bebê linda
Becky Huddleston: So pretty! Congrats!
Jenn Mowery: Awe baby Rosie (if that's how you spell her name) is so adorable. Congrats on the new baby
Nadia Chet: Such a preshes little Angel beautiful girls.❤️❤️...thank you for all your hair styling vids love them all
Basat Imtiaz: Most beautiful hair style ❤️❤️❤️
Ashlee Thomas: She’s a doll! Congrats!
Sharon S1: Aww! Congrats! She is soo beautiful
Dunia Salez: Eres genial muchas felicidades por tu bebita
rîtêdj āššîã: So beautiful
Laura Hooper: So thought that was a baby doll!!! Gorgeous babies!!!
90sBaebee: I'm gonna try these with my daughter
Rebecca Benson: What beautiful names for beautiful girls!
Gaspard K: So beautiful Rosie is. I love that name ! ❤️
Ash Hussain: I love your channels you are so good how did you know all that hairstley
Basat Imtiaz: Very nice hair style
Rebeca Martinez: Congrats!
SLM: Thank you so much for speeding up the video
Priti Mishra: Cute cute daughters nd smile very cute
𝖺𝗐𝖺𝗂𝗍 .: حمدالله عله سلامتج الطفل يجنننن
Basat Imtiaz: So cute baby
Indya Keyssecker: She is so cute
Ma.C: Awwww you baby is so cute
Chicas Glamorosas: La plancha no me parece muy niña para usarlo
Joey R.: Thank you
Gülare Novruzova: Harika
Super Vlogger: Rosie is. Cute ❤️
Basat Imtiaz: Nice
MAYA NOURA: مبروك عليكم
lekha prakash: what a beautiful girl is that I like that girl
Madhuri Kshirsagar: I love you child mom
Sonia Vlzqz: It looks like the little girl is sleeping
Basat Imtiaz: What is your name??
Angela 505: First!!!
Basat Imtiaz: Hello where do you live
Basat Imtiaz: No reply ☹️☹️
Sofia Lopez: No