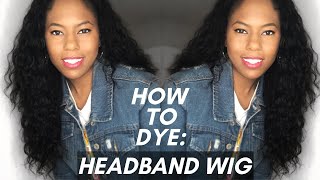
Start To Finish| Lace Closure Wig Custom Color & Install ❤️| Latto Inspired| Alipearl Wig ❤️
HAIR DETAILS :
Shop Now➤https://bit.ly/3JbHMXj
Hair Info: 24inch straight 5*5 HD lace closure wig 180% density
❤#AlipearlHair Official Store:➤https://bit.ly/3FGttb7
1.Join FB Group, Win FREE HAIR➤https://bit.ly/3pnMb1c
2.Lace Front Wigs for Sale!➤https://bit.ly/3pnM6uq
3.Invisible HD Swiss Lace Wigs:➤https://bit.ly/3FqGVQf
#alipearlhairwig #alipearlbodywavehair #alipearlhdlacewig
Instagram @alipearl_hair: https://bit.ly/34I3Oyd
Youtube @Ali Pearl Hair: http://bit.ly/2H0Gmmc
Facebook @Ali Pearl Hair: https://bit.ly/3aKwxX3
WhatsApp: +86 15890076489 E-mail: [email protected]
Welcome to IAmBeautifulHustlerTV .
Be sure to SUBSCRIBE & TURN ON YOUR ALERTS
——————————————————
MY PERSONAL YOUTUBE CHANNEL : In The Life Of A BeautifulHustler https://www.youtube.com/channel/UCB9xX...
——————————————————
Follow My Socials:
Instagram:_Beautifulhustler
@thebhslay
@iambeautifulhustler
Twitter:_Beautifulhustl
YouTube :IAmBeautifulHustlerTV
✨For Sponsorships ,Reviews,& Questions
Email:[email protected]
786-571-1313
To Purchase Hair & Products Www.ibhslays.com
Allow 3-14 Business Days For All Orders
——————————————————o
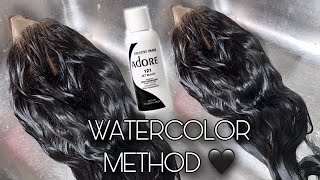
Do hey beauties and welcome back to? I am beautiful, hustler tv guys it's a whole new year and i'm so excited so happy new year to all my beauties out there um. I know i've been kind of ghost, but you know i'm just trying to get my mind right and get my focus back on my beauties, my channel and all my other goals i have to reach for this year, but nevertheless i hope all of my beauties out There you know, enjoyed your christmas enjoy your new years and you are ready and got your mindset and your goal set for the year, because we are crushing goals all 2022, okay y'all. So with that being said, let's jump right into this video, as you guys see from the beginning of this video. This is a 5x5 pre-plucked lace, closure, wig from um ally, pearl hair and, as you know, guys, i work with this company plenty plenty of times on. My channel and today i decided to recreate this look that i seen from the rapper um mulatto, but i guess you know she switched her name to lotto now due to controversy. But, however, i got this inspired look from um lotto and when i tell y'all i executed this look. Okay and it just the wonders that you can. You know like the wonders that you can do without using um a lace closure wig like it's, not even a full lace, and i was able to execute the look um that i've seen her wear for one of her shows and basically the style is a you Know, chinese bang look but the front part of the bang is like that. Nice, bright, crimson, red and the rest of the hair is jack black and of course she did the even ends, and i thought the look was just so freaking bomb and i wanted to recreate the look for you guys on my channel and when i tell y'all I killed it honey, i killed it and i will be attaching um the pictures where i got the whole idea from and it's also in the thumbnail. If you guys pay attention to the thumbnail um, i have the pictures side by side to show you like it was not a game. Okay, like i killed it, i love this whole look and i hope you guys enjoyed this video as well, so bear with me beauties um. This video will be. You know pretty lengthy, because i want to show you guys exactly how i created this color and also the installation process which the color process takes longer than the installation process, because it's only a closure wig and it doesn't take that long to install a closure. Wig, and especially when i'm just doing a bang, so i hope you beauties enjoy this video happy new year once again to you all. If you're new to my channel make sure you take this time out to go ahead and click the like button, you know give this video a thumbs up, drop a comment down below and, most importantly, click that subscribe button show some love to me on my channel. I have so many videos - and i need y'all to keep me in this algorithm because we will have some uploads coming back to back. More colored looks i'm so over the plain, browns and jet blast, like i'm, trying to bring you guys, some more colors, more styles, and everything like that. So to keep the beauty slant all across the world, make sure you guys share this video subscribe and you know tag other beauties, because you know we need to grow this channel some more but nevertheless um. I hope you guys enjoyed this video. Thank you guys for watching and stay tuned for more okay. So, just to give you guys, like a quick little summary of what i'm doing here. All i'm doing is just taking my a quick blue bleaching powder and i'm also using a 50 volume developer, and i just mix that you know all together in my die bowl and i'm just applying that bleaching powder all over this section. And you do want to do this section first, because you want the hair to start turning blonde like the jet black in the back is going to take longer because i'm pretty much bleaching we're not bleaching but dying the whole back of the wig black. So i have to really take my time and get that color in there. So it's best that you do the uh bleaching portion first, that way as you're doing that jet black in the back. The hair is just turning blonde and just processing as you color. The rest of the wigs, so that is why i'm using such a high volume so one it could bleach faster and you know, get their hair nice and blonde that way that um, that crimson, that i put on there once i you know wash that um bleaching Powder out it will really be very bright and vibrant. So once i finish applying all that bleach here um, i will go ahead and begin to color the back of the wig with that jet black. So now that all of that bleaching powder is applied to their front area, what i'm going to do now is part off the rest of their um hair. That'S in that closure part where you can kind of see right there as i'm separating the rest of their hair from the closure from the wig. There'S that you know little separation there so um. The reason why i'm doing this is because, once i go to dye the rest of that with jet black, when it gets to that lace part, i have to actually take my time and um apply that dye on that area, because i do not want to stain The lace jet black by just you know slapping that color on there very messy. I would literally have to do small little party sections and apply of that jet black dye. So i do not destroy um the actual roots and the closure itself, but other than that to be honest, y'all when you go to dyeing the rest of that wet jet black, you can just really slap that color on there, but i am going to kind of Like start off making sure the front you know the top area in the front is the jet black. If i miss a few spaces in the bottom, it's like okay, who cares nobody's to see that? But my goal was to really make sure that i got that front and that top part as jet black as possible. But honestly the whole thing turned jet black regardless because i really went in there and worked that jet black color onto that wig. Now i got this. Just five um die information from jordan, shout out to my boots played by jordan um. He told me about this. Um jet black dye, this box dye, which literally dyes the hair jet black in five minutes, and that's why it's called just five okay, like it turns that hair jet black super super super fast, and that way you don't have to worry about sitting there wait in Minutes and minutes and minutes for your wig to be jet black, like it really takes so quickly. So what i did was just went ahead and opened up like. I think i used about three boxes of that. Just five die, and this is a 24 inch wig. So um, you probably could use two, but me you know i get a little messy and you know i'll be sometimes i focus on one spot more than others. So if you do run out of color just make sure for your just in case. Of course, if you have a longer length, you probably want to get maybe four or five boxes, but to me i rather have you know too much than not enough. So just get. However, many boxes you think you need and then once you um go ahead and you know mix up that um permanent color. With that developer, you can go ahead and begin to paint that jet black on the wig, but as you can see guys, i started from the perimeter of that closure first and apply that color and then i'm gon na work my way down and then go in Sections and then eventually i'm just going with my hands. You know with the gloves and just do what i do but make sure you do take your time in a way and get all that color on there. But, like i said you don't have to do. Super super small or knee sections. You can just really work that color in and you know comb it through and all of that, okay guys. So now that i went ahead and applied all of that color on the back end of that wig. Now it's time to focus on that closure area and, as you can see as time gone by that front part that i put that bleach on is getting nice and blonde just like. I need it to be to get that really nice, bright and crimson red. So, in the meantime, i'm just going to go ahead by taking that same permanent jet black dye and i'm going to apply it on the ends first and work my way up and what i'm going to do is take like the the small you know, like a Small rat tail tooth comb and instead of using the brush to do like the root area, i'm just going to take the comb and i kind of like dip the comb inside of that jet black uh dye and i kind of combed it in that way. I do not get any jet black on the roots of the wig, so i just did that and you want to take your time. I know it looks like i may be a little rough, but you know this. Video is sped up, but you just really want to take your time and part those sections and get that jet black color into those roots, making sure you do not touch the lace when you're combing on that color in as well. So i'm just going to go ahead and do that until i finish that little section of that jet black and then of course i will go ahead and um wash out that uh bleaching powder and also that jet black dye, which i didn't show because it's pretty You know self-explanatory, but what i can say guys. What i can say is that i did not let that uh jet black hair touch that blonde like whatsoever. So when i did rinse it out, i kind of kept my i took i put on some other gloves because i didn't want to um. You know obviously there's jet black dye on the gloves, so i ended up switching my gloves and i just kind of held um, the wig by the blonde part, and i rinsed the jet black part out first, and you know i rinsed it out - really really really Good and then i you know, held the jet black part and then risked the blonde part out. So just rinse out one section at a time, and i started with the jet black, because i really did not want that color to bleed over into the blonde. And then just mess up the whole idea that i had, but once you go ahead and rinse that once i go ahead and rinse that out, then i will show you what the wig looks like and then i will show you the crimson red and i'm not Gon na show me putting the color on like the red color on the wig, because what i did was i water dyed the red part, but i would you know, explain that a little more into detail, but for now um i'm gon na show you guys what The wig looks like after letting the wig sit for, like you know, 10 minutes after applying all the color and then rinsing it out. So bear with me. Okay, guys - and this is what the wig looked like after i rinsed out the jet black and the blonde, and i went ahead and water dyed the red part. I mean the blonde part with the crimson red and how i did that basically was. I just poured you know, i did the water method with the the warm water and i poured the red in and of course, because the rest of the wig is jet black. It'S not going to turn the way you know the wig red, so i focus on just dipping that blonde part in the water, mostly and then i really went in and just dipped the whole wig in there, maybe like two or three times, and because it's blonde And red takes so easily, i didn't have to do it for too long. I probably dipped it no more than like two minutes and it was done and after blow drying and shampooing the wig. This is how the color came out, that nice, bright, crimson red in the front and, of course, the very nice jet black in the back and just jumping straight into this install. I already have my little closure ball cap, because you know when i do my closures. I don't do the whole ear-to-ear ball cap. I just do like that centerpiece or depending on how i'm you know laying the closure. I do the ball cap in that area, where i'm gon na lay the wig and for today guys. Oh, let me say this: i did not bleach no knots and i did not do no plucking and, to be honest, it just wasn't necessary, especially for the look that i was doing so bleaching. The knots really would have made no difference in the outcome of this wig or plucking it, especially because i'm covering it up with a chinese bang but nevertheless um. I went ahead and applied two layers of my laceman adhesive, i'm only two um, i'm only using sorry guys, two layers today and i'm using the little mini um. You know glue tube or whatever. So once i get those two layers on there, i will go ahead and begin to tack down the wig. I also did not use any holding spray in this video as well. I just use um my glue only and my milk band to melt my wig down and secure it so um. This is a very quick and simple install. Like i mentioned in the beginning, the process that took the longest was the actual coloring process, but installing was really like 15-20 minutes like no lie: y'all so um. Now that i'm adding that second layer once it turns clear um, i will go ahead and place that wig right into that glue, also key factors. I did cut off the thick sides of that lace closure before i laid it down that way. The wig lays nice and seamlessly um if i was to switch it because you know at first i was thinking to just do the little part down the middle, with the little baby hairs or whatever, whatever that was me being lazy and not sticking to what i Said i was going to do, but i was like you know what, even though we was going out this night, this is actually um, not christmas eve, new year's eve night. This is actually new year's eve night. So you know time was ticking. It was probably about nine o'clock, so i'm like. Ah, let me hurry up and do something cute and simple and quick and get out the dough, because we had us a good time y'all, but that's another story for another day um i would drop, actually drop a video of how it looked um. When i took my little video at the club, but yes so i went ahead and i pulled that wig down, i'm tying my melt belt, i'm gon na. Let that sit for about five minutes and then once i um matter of fact, while that mail bed is sitting, i totally forgot, i'm just going to take a little heat protectant and apply it to both sides of the wig and just go in really quickly and Kind of like fat uh fast, i did it kind of quick. I ain't gon na lie y'all. It wasn't like still pressed to the teeth, i'm not even going to sit here in line be like. I pressed my wig down to the tee. I just kind of flat ironed. It really really fast because, like i said y'all i was in a rush, so um i'm just going to fly on it, real, quick, i'm using my babyliss flat iron. I love this app um. You know i love this iron. I did get it from my local beauty. Supply store, they're, not in every beauty supply store, but if you cannot find it try checking um amazon um because they usually pretty much have all the little babyliss. You know hot tools on there, but i'm just taking my little iron and just flat on this wig. The wig is super super super soft y'all super soft love, love love this wig. I always work with this company like i said, and i love their hair. Every time so i just took that flat iron and just pressed out both sides of the wig and then once i'm doing that. I'M done with that! That'S when i go ahead and remove that melt belt, cut that extra lace and begin to um. You know style the hair, so, like i said y'all, the install part is quick, so just keep watching, and this is what the wig looks like. After cutting off that lace, it's still super melted, super blended and still giving scalp, even though i did not bleach the knot so yeah period part. So what i'm doing now is taking my glam wax stick and guess what y'all my goddamn hot comb broke on me. I'M so mad about that, so i had to go back to the bases with my marcel iron in the stove i was so upset because i just preferred a hot cone to just stay hot, like i hate that i have to put it back in the stove. Let it heat up, then it cools down like it's just real aggravating, so i just got so accustomed to my hot tools staying hot, but i'm gon na give i'm gon na. Give me another hot comb for sure, though, but for tonight i just had to go in. You know back to the basics with my marcel iron, and you have to be very, very careful with these, because if you let it sit in that stove too hot y'all will burn your off and once it's gone baby you can't come back. It cannot come back. Okay, so be very, very careful, be very, very careful when doing this step one! You don't want to skin up your goddamn forehead with no real, real, real hot comb, and you do not want to burn your hair off. So if you are a big, a beginner and you're using a marcel, make sure you testing out the heat temperature on a piece of paper or a towel, if it's black, when you put it on there, it will burn your off. If it's like, a dark brown will burn your off. The goal is to have it a very light light brown. You know i'm saying like a light brown little. I don't know what you want to call it a print or stain, make sure it's very, very light. That means it's nice and hot enough, but it ain't going to burn your stuff off okay. So you want to make sure it's nice and hot, and especially with this closure, you really have to hot comb that hair in a direction that you wanted to lay. So, that's why you see me uh hot combing, the roots of the wig forward, like straight forward, because you know it is a closure and i kind of had like a middle part and printed in it. So to get that uh parting out. I have to really really hot comb, their hair down to the tee going forward, and you know the direction that i wanted to lay in and then i just went in with my lace. Glider and i razor cut my bang, because i don't really do the straight. Scissor cut no more, i mean i can't if requested, but you know, to be honest: everybody pretty much razor cuts their bangs nowadays. So i just went ahead and raised a cut. My bang and i just went in with my fabulous iron and you know um slightly bump the ends not too harsh. Ladies, we ain't trying to do no goddamn, grandma, bang. You know no grandma, bang like real. You know hard and curl underneath, like you, just wanted to be like curl, but not curl. You know what i'm saying, so you just want to give it a light bump and, if needed, just go back in with your razor and razor off any little flyaways and just get your fringe down to the tee if you're a fringe kind of girl. But, like i said, if you're a straight cut type of person, you know cut your bag straight. It'S all on use whatever works best for you and, however, you, like your hair, but usually with this type of look um, it's more of a razor cut fringe type of look, and also because it is a closure and even with like, if you're, using a lace Front tool most of the wigs, the bangs we kind of like see through regardless, so like kind of like that peekaboo i could see your full hair, but i really can't just you know that kind of way like it'd, be kind of you know like that. So this is also how mulatto had her a bang as well and, like i said i attached a picture for y'all to see so y'all. Let me know if i killed this look or not. I feel like i executed it to the t, but i want to know what my beauties is thinking check in and let me know down below um. The last thing that i'm going to do before i finish up. Is i'm going to step back and cut this hair even on the ends so um, i'm just trying to make sure my bang is together and i hot comb everything make sure it's nice and flat. Please make sure the top of the chinese bangs is flat that whole cone hair look is not it beauties, it is not, it start, being lazy, make sure your braids is nice and flat if you're gon na do a chinese bang and make sure you go in With your hot comb and you press the heck out of that top part of that wig, because that hump head we're not bringing that to 20 22, okay and y'all know i keep it real, my beauties. We is not bringing that into 2022 dude on braids flat and press that thing out until you can't press it, no more at the top of your head to get that nice flat. Look! So yes beauties pay attention. Now we ain't doing that not this year. So once you get your bang, how you want it almost, you know you step back if you want to cut those ends, even if you don't want to leave them, how they are is up to you, but um. I'M just take a little holding spray as well and spread it on top and kind of like comb everything down into place, because i really hate flyaways. You know them flyaways being all over the place, and i really like my vein to just kind of like sit while i want it, i don't like it splitting down the middle when going left and right like i wanted to stay still. But, however, now that that part is done, i'm adjusting the camera, so you guys can see me um, i'm taking i'm just spreading my hair down the middle y'all know it's a little harder to do this on yourself, especially when you're cutting, so i'm just gon na Um take muscles and just cut the ends even and just go in with the flat iron and just give it like a little slight little bump and, like i said, i will show you what it looks like y'all when i was at the club in in the Um flashing, oh, it was just giving period, so i will show y'all what that looks like, but um. Let me know what y'all think about this look overall. Like i said, y'all was rushing, so it wasn't like perfect to the tea like pressed to the t, but it was good enough to give off the look that i needed to give so um. I hope you guys enjoyed this video. Let me know what you guys. Think down below in the comments um yeah, i just hope, y'all ready, because we're gon na do a lot of little colored looks this season and i'm just adding a little more heat protecting spray. You know to um, not spray, but the oil to just give it a little shine and catch some of the flyaways, but yeah i'm feeling it i'm feeling it it was cute or whatever it was cute or whatever yeah yeah yeah did y'all see my little ted Talk in the beginning, yeah i had to catch on to that trend. I was meant to do that that little tick tock transition for a while, but i was just like you know what i'm gon na just wait a little bit, but um here is what it's looking like. I hope you guys enjoyed this look. Let me know how you feel down below and yeah show some love in the comments. Y'All


Comments
SlayedBy Jordan: Definitely KILLLED this look ❤️❤️❤️❤️❤️❤️❤️❤️
Ali Pearl Hair: Came out bomb!!! You killed this wig! Thanks for your sharing~
DollFaceDeluxe: COME ON!! MISS MAMAS!❤✨✨ This Is PERFECTION!❤✨✨ You did this SPOT ON and I can't wait to see what else you'll be doing this year!!✨✨ Blessings Babe!
Mi'Zhane Cypress: My girl kill it everytime! Your hair came out amazing & look way better than Latto
lneal2800: Hey! Sis yes this Thumbnail is servin everything! You did that!❤
Kahdijah Allen: Girl you hooked this wig up!!!! I learned a lot
Jarso Koffi: This look is GIVVVVING EVERYTHING ❤️❤️❤️❤️
Tameka Bryan: So different and bomb as usual!!
Lizzie Xo: Girl! I CANNOT wait to see this one omg
SurnameHogan: A very beautiful looking lady. Latto is good looking but you're many many levels above that. The long hair and bangs really suit your beautiful face. You're like a Goddess with the bangs!
Michelle Junior: Yessss!!! Came out
Michelle Junior: Yessss!!! Came out
Lovely Lei: When you was talking bout that hot comb I was dying but you killed this sis
Jarso Koffi: This is soooooo cute ❤️❤️❤️
tenice0526: This look was everything
Katlina: Your hair is BOMB and I love your lashes
BeautifulDisaster: Okay new brand logo in the intro!! Honestly looked better than the original, so perfect!
Sammy Da Goat: You Slayed This Unit You Look Soooo Fine
Linda Brooks: Beautiful
MrsQueen LadyRed: Yessssss mamacita you definitely did that damn thang
Destiny Green: baby its the intro for me I haven't even finished the video
LaGotThe JUICE: Happy New Yearrrrrrrr GOAT!!!!! I’m manifesting working with you this year!!!!
Moodahh King: Yesss you did that girl
Valerie Naylor: Beautiful
Elexus’ H: How you do this so quick? she just posted this style Looks good tho
Nusface HAIR Wholesaler Nyya : never disapointed !!!!!!!!
Kemo Bennett: You killed it Shae......
Donna Scott smith: You always kill it
Graite Itule: you always Slay. is there a specific place you buy your razors ?
Shandell kute: Yours even looked better too❤❤
Key'Ahna Mercier: I’m deaaaad! Cause why my hot comb JUST broke too! Talkin bout “Er 01”. I was too disgusted! Love this look !
stephine brown: Love the new logo !!!
_Vanntastic: I hella forgot you colored your hair. Lol. I think your hair turned out better than Latto
Unique Nene: Okay Miss Mama’s I Love Your Intro❤️‼️ Happy New Year Babe
Christine Zapata: Straight fire you here me!!!!!!
stephine brown: Happy New Year!!!❤️❤️❤️
Ja'Lysa Daniels: ❤️❤️❤️
Lynnazia Davis: New intro
Monica Delk: ❤
Lillian Powell: On point periodt
deseraymiles87:
ADoseOfKiyaa: Yes new intro !
UniqueBeauty333:
stephine brown: ❤️❤️❤️
Selena Davis: Slayedhunny.
Brandie Riggins: You kilt that
SexySensi: Yours looked better tbh
Micheala Opoku: Ate
Destany W.: Sorry BIG Latto... but tell ya stylist that my gurlllll shae did it better ♀️
BoringLifeOfKennedy: ok intro!!!!