Bye Frontals, Back To U-Part Wigs | Ft. Nadula Hair | How To Create A U-Part + Install + Styling
Welcome back to my channel!
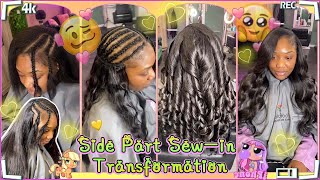
Here is a mini tutorial on how I create my u-parts. This style use to be my signature and I was influenced to bring it back.
I’m not going to hold you, with all the girls getting tape ins and mircolinks I fell in love with the natural look again. Majority of my hair is 4c and dealing with all my hair would be time consuming and potentially damaging to my hair growth.
I trusted past experiences with Nadula Hair and purchased:
Nadula Brazilian Hair Loose Deep Virgin Hair 3 Bundles Soft Human Hair
18” 20” 22”
https://m.nadula.com/nadula-loose-deep...
What you need to create:
Wig Head
Wig Stand
Wig Cap
Neddle
Thread
Flat Iron
Flexi Rods
Chapters
0:16 Unboxing
1:20 Mini U-part Tutorial
3:44 Install
4:20 Styling
5:37 Versatility of Install
7:35 Conclusion
9:16: Blooper + Tell Me your thoughts
Thank you for watching!
Like. Comment. Subscribe. ♡
x,
Kileigh Nichelle
♡
Fashion Brand
kibykn.com
♡
Connect with me:
IG: ki.nichelle
twitter: kinggkii
Welcome back to my channel, it's kindly in the show, or you can call me kai, like hiya, and today i want to share my medulla hair with you guys. I got the loose deep wave in 18, 20 and 22.. The hair is very thick and healthy, and also the ends are full and the wefts are thick as well. The hair also came with some free goodies, which was perfect for the holiday. It was a stocking, some hair accessories in the goody bag and some lashes and this nice little holiday card, which was very thoughtful for them. To give me - and i purchased this hair through a christmas gift and the doula is my girl - they never ever film me and i really wanted to get back into doing u parts, because i wanted to give my edges a break, because those frontals was really throwing Me for a burger - and i don't i don't play about my edges - so um as you guys can see like right here. I need that to grow back baby because uh, so what you guys will see in the video is that i created a: u part unit out of this hair so to create a? U part you're going to need a wig cap and you want to mark where your leave out is going to be, as you guys seen in the intro of this clip, and then you seen that the hair was wet and it was still thick and then basically What you want to do is sew it on, like you would sew in a sew-in. It is basically a removable sew-in. So that is why i like u-parts, just because it gives me more functionality to remove the unit when i want to - and just it's just easier for me, so i prefer to do it. So basically, what you want to do is line up your track. You want to use your longest length and line up your track at the nape of the wig cap, so for this one i'm not going to do it on the flap, because i'm going to cut that flap off because i know i want this to be a Versatile unit - and i don't want that - flap there so that will be removed. So i'm going to start right in the area above or like on the lace part, and then what you want to do is continue to hand to each weft, like you would, as you were, sewing in just be sure you are pulling the thread very tight and Making sure your webs are secure just to increase the longevity of your unit and, as you guys can see, i sped through this. I didn't want to record the whole process because i don't have enough space on my devices to do so. So if you want a more in-depth tutorial, i would highly recommend just searching you poor, wigs and how to make them on youtube. There'S plenty of videos that you can find, and yes i did this until i got to the outline that i created for my leave out and then i securely closed it, and then i was done. Lastly, you don't have to hand sew your wefts. You can always use hair glue or hot glue or even use a sewing machine. I just choose to do hand sewing because i'm more comfortable with that way. I can definitely use my sewing machine, but i just choose not to so. I did dye this hair. I dyed it um jet black, of course, and i did the watercolor method because i just got my nails done in the time, but right now, they're looking real racing, because i was playing in my hair and putting that oil. But as you can see it blends very well, i got the loose deep wave because i wanted something that was curlier and thicker, because my hair is curly like very curly and thick. So i wanted something that would seamlessly blend. I think it did the job pretty. Well so since it's been a few years since i've done a - u part unit installed, the braid pattern wasn't to my liking, so i ended up taking it all out like taking this all down and doing it over, as you can see like, on the right hand, Side, this side that i'm doing right now it was just too bulky right there and the curvature of that anchor braid was just not giving me the vibe. So i ended up taking this whole like install out, but i'm just trying to show you right now what my hair looks like blended or it's not even blended what it looks like against the hair extensions. So after i re-installed i went in and i straightened the whole unit actually, i think this is the same, install yeah. This is actually the same, install but either way i straightened the whole unit and it straightened very easily - and i was very surprised - i didn't use the kind of method i used one of my hard bristle brushes and that that was just more efficient for me. So i did that for my natural hair, i used a combination of hot comb for the perimeter and for the leave out at the top. I just simply used the flat iron to make sure my hair was silky straight to match the hair extensions. This is what the unit looked like. Semi blended and i just was not feeling the vibe, so i took it all out like i said and redid it, and then you guys want to see me put some curls in it. With this install, you guys can see that it is a lot flatter on that side and it is blending better which i enjoyed. So basically, what i'm going to do is continue to flat iron curl this unit and then i'm going to throw some flexi rods in it as well. So this is how the hair came out and i can flip it. I didn't really put edge control on this side because i don't want to cake it because you're not really going to see it so not really put anything over there um. So that's what that side looks like, and then this is what this side looks like. The edge booster is not trying to. Let me be gray, i put some oil right there, but and then i can put it up in a ponytail. If i wanted to, it doesn't look too bad um. This is what it will look like from the back. If you see some like um some curl back there, it's a little dry, i'm gon na be honest, so yeah, but i left out the back. So i was able to put my hair up on one of my clippy clips. If i went if i wanted to so let me show you what that would look like. So i can do this really cute and classy little. Look. I'M not a fan about how poofy that is over there. I don't like that. Let'S see if we bring this down yeah for the stop, i would like to bring this down and puff this out a little bit here that look a little better, but from the side from this side is hidden from the front they look like. I got the old 60s wigs one or something, but from the side the side is skipping. The hair is super bouncy and super soft um. I wanted to go for like a pin, curl type vibe, but i ended up putting flexi rods in my hair and i had them in for like a week. So that's why they're like it's super curly right now. I would give this hair either 10 a 10, because the doula never fails the girl uh. If you guys want to go back and watch one of my first youtube videos, i've ever posted on youtube, it'll, be in the doodle hair review, and i was back when i was in college. So i was praying and hoping that their quality would still be. The same when i purchased these bundles for christmas, and thankfully they were i'm very much in love with the quality of the hair. It'S just good quality and they're. Also um. The bundles are also very thick, which is great. I only use like why they use. I use three bundles. I only use like um 25, not even 25 of the 18 inch, and then i did cut it in layers. So that's how i achieved this. Like look um. I think it's very cute. It'S just very my moon, but also it's very classy and very sleek. So i like that vibe um and yeah. If you're looking to get back into sew-ins or you parts, then i would highly recommend purchasing this hair and also make sure you like comment and subscribe. I should have said that in the beginning i have to get better at doing that. But yes, thank you guys so much for watching and if you do want hair reviews, please let me know, and if you have any questions about this hair before you order, just put a comment below and i'll get right back to you girl. It may take me a couple days, but i'ma get back to you and yeah. I hope everybody's having a great start to the new year and i'll talk to you soon, peace easier to blend with my natural hair, like you, can see here where it's thicker, but i think it blends really well considering that is really gon na bother me. That was a little too much looks. The hair is super, duper soft and hairs. I was like in college, and that was one of my first videos that i've ever made on youtube. You guys can go look at it if you want to, but please excuse the way, my eyebrows look, because what the hell is going on um. I really do love and do
Comments
‘ mulaanii💮: you need more subs ur such a good content creator ! i love ur content .