@Cranberryhair 4X4 Brazilian Deep Wave Lace Closure Wig W/ Added Color
Hey Everybody,
Check out the review of this gorgeous 4x4 Brazilian deep wave human hair lace closure wig with added color from Cranberry Hair.
I hope you enjoy the video!
**I do not own the rights to this music**
Wigs For Sale on My Website: https://msebonyveesbeautystore.bigcart...
Binge Watch My 2021 Playlist:
https://youtube.com/playlist?list=PLgA...
Long Human Hair Wigs Playlist:
https://youtube.com/playlist?list=PLgA...
Customized Human Hair Wigs Playlist:
https://youtube.com/playlist?list=PLgA...
How to Bleach Knots: https://youtu.be/mGy3h0-GUvg
How to Pluck the Hairline: https://youtu.be/2rg_WWFfLP0
Video Schedule:
Mondays – Human Hair Slay
Wednesday – Synthetic Wig Reviews
Fridays – Budget Friendly Fridays (Wig Reviews under $25)
HAIR/PRODUCT INFORMATION:
Cranberry Brazilian HD Lace Wig 4X4 Deep Wave Virgin Hair 14-36 inches Long Transparent Wig
Price: $274.51 (24”)
https://cranberryhair.com/products/cra...
TIMESTAMP:
0:00 – Intro & Welcome
0:16 – Unboxing of the Wig
0:36 – Coloring the ends
3:10 – Plucking the hairline
3:44 – 3-Step Styling Process
4:40 – Installing of Wig
7:34 – 180 View of Wig
7:50 – Closing
8:00 – Bye Shug Muffins!
PRODUCTS USED:
- L’Oreal Hilights (Red): https://amzn.to/3HBzdDv
- L’Oreal Hilights (Magenta): https://amzn.to/3znq8v5
- 40 Volume Developer: https://amzn.to/32F08zx
- Silicon Mix: https://amzn.to/3mVbLJg
- Crème of Nature Leave in Conditioner: https://amzn.to/3EUUd6i
- Crème of Nature Moisture & Shine Curl Activator Cream: https://amzn.to/3HwxJtZ
- Crème of Nature Style & Shine Foaming Mousse: https://amzn.to/3EOrEHx
- Felicia Leatherwood Detangling Brush: https://amzn.to/3mTzklU
- Hair Clips: https://amzn.to/3zm5gUR
- Ebin Lace Bond Adhesive Spray: https://amzn.to/3Jzb2rb
- MAC Foundation Powder: https://amzn.to/3FVPPW0
- Wax Stick: https://amzn.to/3Hv0wPJ
- Hot Comb: https://amzn.to/3mTmXGh
- Mini Hair Scissors: https://amzn.to/32JRtvy
- Got2Be Gel: https://amzn.to/3sU5PUE
- Edge Brush: https://amzn.to/3HxHvfv
Infinity Spray Bottle: https://amzn.to/3zpSZif
HAIR SPECS:
COLOR: Natural Black
CAP SIZE: Small-Medium
LACE: HD Swiss Lace
TEXTURE: Brazilian Deep Wave
LENGTH: 24”
PARTING: 4x4 Closure
SHEDDING: Light
TANGLING: Light
OVERALL RATING: 9/10
Follow me on social media!:
Instagram: https://www.instagram.com/msebonyvee/
Facebook: https://www.facebook.com/msebonyvee
Snapchat: @Ebonyvl
Twitter: @vee_ebony
TikTok: @msebonyvee
Email: [email protected]
Please be sure to Like, Share & Subscribe!
**FTC Disclosure: This video IS sponsored.**
If you want to send me something, please send it to:
MsEbonyVee
P.O. Box 184
Locust Grove, GA 30248
Music: Epidemic Sound – Here’s my referral link: https://www.epidemicsound.com/referral...
“Hot N Sweet” by Park Lane
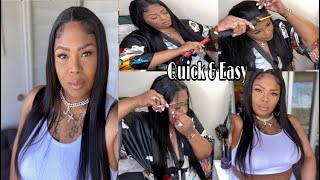
Hey, what's up everybody, it's me miss ebony v, welcome back or to my channel. Today we have another human hair sleigh on a monday and in fact it is the first one of 2022. So, let's go ahead and dive into the unboxing and styling portion of this video, so today's video is sponsored by cranberry hair. They included these goodies in the packaging and they were kind enough to send over this brazilian deep wave 4x4 hd swiss lace closure wig. It comes in 24 inches with 150 density, so because i've reviewed several of these types of wigs on my channel, i wanted to go ahead and add a little color to the ends of the hair. So that's what we're going to be doing today so for this process, i'm going to be using the l'oreal technique. High color highlights, and the colors red and magenta also be using the silicon mix, hair treatment to keep the hair protected, as well as for the volume developer. I'M going to start by placing a generous amount of the silicon mix in my mixing bowl and then i'm going to go ahead and add both of the colors, the red and the magenta. Next i'll be adding the 40 volume developer so that i can get a very creamy consistency. I'M mixing everything together using my little mini spatula, that i absolutely love and that i got from amazon i'll, be sure to list all of the products used in this video down in the description box below i'm adding a little more developer. Because i want the consistency to be really loose and creamy so that it applies to the hair easily. So, as you saw before, i already have the hair sectioned out. So i'm going to go ahead and work on this very first section i like to brush through the hair to make sure that i detangle it as much as possible before applying the color. I also made sure to have several pieces of foil set aside as well. So, as you can see, i'm just applying this color all over the ends of the hair. I'M not really focusing too much on the root. It is only on the ends and then once i feel like i have enough of the color on the hair. I go ahead and fold up that foil so that it remains and it can kind of process within the foil. So i'm basically repeating this process for all of the areas that i have already pre-sectioned out. When i'm applying the color, i am sure to apply a very generous amount. I want to make sure the hair is very well saturated. Once i was finished, applying the color to the hair, i actually let it sit for about two and a half hours well. In reality, it was about three hours because i think i went an additional 30 minutes, but that was enough time to get it to process now, i'm just removing all of the foil very carefully so that i do not make a mess with this red dye. All over the place - i'm really taking my time here, so i'm going to go ahead and wash as well as deep condition the hair off camera, and this is pretty much how the color is looking after, i washed it. It'S not super bold and bright, but it gives a little subtle hint of color at the ends which i like. So now, i'm going to go ahead and start plucking, the hairline. I normally do this off camera, but i figured i'd, bring you along the journey um. So, of course, you saw that i just kind of pulled a section of hair from the front and then i begin squeezing - and this is what that looks like, and then i like to go back another two or three more rows and do the exact same thing. So for this particular wig, i did end up going back three rows, um and then you know just plucking within each row, and this is all of the hair that i plucked out now, i'm going to move forward with my three-step process, starting with this leave-in condition From cream of nature, argan oil and then the moisture and shine, curl, activator cream and finally, the style and shine foaming mousse. I use this three-step process anytime, that i have a curly wig and it always leaves my wigs super shiny and very defined, which, of course, i absolutely love. I also make sure to place a lot of focus on the ends of the hair as well. Next i like to go in with my felicia leatherwood, detangling brush and just kind of brush through the hair. This also helps define the curls very well so i brush through. I go ahead and scrunch up the hair with my hands just to make sure them. Curls are nice and defined and popping so i normally let the hair air dry overnight, and this is what it looks like as a result. This was honestly like several weeks. Y'All, i'm gon na be honest, like i did not get back to this hair for a few weeks. So let's go ahead and get this baby installed. Now i did not bleach these knots. However, i did go ahead and apply my true match. Lace, conceal tint spray underneath the lace, so i'm gon na be honest with y'all. I was a little concerned about this cap. It felt like the wig kept sliding back and i was like okay um. I need you to stay forward now. So that's why i went ahead and decided to glue it down, because i needed to feel that level of security that it was not going to go anywhere. I am using the even wonderlace bond adhesive spray, extremely firm hold in the black bottle. For the very first time i have tried the yellow bottle, as well as the red bottle, and had no issues with either of them, but this one i don't know if i'm a fan, um it leaves a lot of white residue that i am not a fan Of i did not have that experience with either the yellow or the red can so i'll, give more thoughts on that a little bit later. But right now i'm going in with my foundation powder into the parting space and then i'm using my wax stick just to kind of flatten out the top area in the parting space as well. Now do you see all of this residue going on like i have? Never experienced that with any of the other adhesive sprays and so yeah. This was just not the business for me. I had to do some serious cleaning up of this residue now something to keep in mind anytime, you're wearing a closure. You need to make sure that your edges are in some decency as well, because they will be mildly exposed. So if the wind blows, you want to make sure your edges are in place too. So now i'm just going in with my spray bottle to liven up these curls a little bit. I told you it had been several weeks since i had touched this hair, so i'm just kind of laven it up a little bit. It really doesn't take much had. I installed the wig the next day. I probably would not have needed to add any water at all. Now i'm just taking some of my contour powder to go along the hairline just to make sure we're blended as much as possible, and this is pretty much the final look. You guys - and i am quite pleased with it. This hair is absolutely beautiful. I had no issues with this hair, so let me go ahead and give you a quick 360 so that you can see this hair all the way around may not be at 360, because i didn't come full circle, but you get the idea. I absolutely love this hair and i think the pop of color on the ends just set it off very nicely. So that's pretty much all i have for you, wonderful people. I thank you all so much for watching. I truly appreciate it. Please be sure to give this video a thumbs up, make sure you hit that subscribe button. If you have not, and i will be sure to catch you beautiful people in the next video bye, y'all


Comments
Silky Saks: You always do such a great job at dying these units. The curls are really nice and looked pretty when it dried. Very pretty sis
Ashley InQ.: QUEEN!! You are so gorgeous!!!!!! I love how you rock this unit, it looks so natural and the deep waves really compliment the frame of your cheeks. Gorgeous mamas!! I love your reviews! ❤️xx Ashley INQ
Love Yourself: This is really pretty and love the subtle color on the ends You look Beautiful and love the lippie Have a Blessed Week and Stay Safe All this is for your benefit, so that the grace that is reaching more and more people may cause thanksgiving to overflow to the glory of God. - 2 Corinthians 4:15
Fantisha Sherifa: Heeeeeeeey Ms. Ebony! Happy New Year! I love this! Its beautiful on u! Loving the color u added n curls are poppin!
DeAnna Monet TV: Come through with the wave and vampy lip! Issa look
Blackberry- Rose: Beautiful ♥️ the curls and pop of color. Tyfs.
Lilian Dare: The hair looks so beautiful on you great video gorgeous
DeeDee Hair: Yesss twinny love love it as always you slayed ❤️
30 yrs a nurse: Wow turned out very pretty !
april G: Gorgeous
Sammy Da Goat: Fourth Comment Makeup Always Stunning Your Content Is Everything Lipstick Is Pressure Nails Are Super Bomb Slayed Once Again Like Always