How To: Braided Heart Tutorial | Dopeaxxpana
Join this channel to get access to perks:
https://www.youtube.com/channel/UCCCIs...
***********PRODUCTS USED*************
1. parting comb: https://amzn.to/3FmkhZI
2. pure o neat braid: https://amzn.to/3izZ58x
3. 2 packs of xpressions braiding hair: https://amzn.to/2Yu0qa5
Do You Love Me? SEND ME FAN MAIL!
15501-G San Pablo Ave #196, Richmond, CA 94806
Shop ALL my fave products here: https://www.amazon.com/shop/dopeaxxpan...
OMG I LOVE YOU SO MUCH FOR ACTUALLY OPENING THE DESCRIPTION SECTION!!!!!!!!!!!!!!!!!!
FAQS:
Location: Bay Area, California
Keep Up With Me:
INSTAGRAM = @Dopeaxxpana (Personal) - https://www.instagram.com/dopeaxxpana/...
INSTAGRAM = @BraydedUp (Hair Page) - https://www.instagram.com/braydedup/
Facebook = Dopeaxxpana - Bre C. - https://www.facebook.com/Dopeaxxpana/
Snapchat = @Bigbrowneyeguh
FOR BUSINESS OR COLLABS:
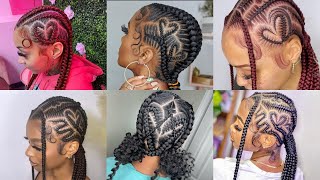
What is pop youtube? Welcome back to my channel, it's your girl, the best panda and today, i'm gon na, be doing some heart part lemonade. Braids today, i'm gon na be doing two hearts on my client. One is gon na be at the back of my client's neck and the other one is gon na be on the side of my client's hair. This is a super cute and trending style that was done by mia on the hair and i'm super excited to finally be able to recreate it. And i told you guys on my last lemonade, braid video that had a heart part that if you guys were interested in seeing a heart part tutorial and knowing how i achieved the heart, then let me know in the comment section and you guys did so today. I'M going to be walking you guys through step by step, how i'm going to be creating this heart. You guys can see me creating the one on the back of my client's head and i'm going to show you guys how to do the same exact thing on the side. So if you guys are interested in knowing how to do this, then just keep on watching what you mean. You don't know panda she's dope. What you mean, what you mean, what you mean, what you mean all right guys, so we are going to start by placing the outline of the heart. You want to do this right at the middle of your client's, eyebrow or where their hair naturally starts to poke out, and we are going to be parting out c type shapes this first, one you're only going to do the round c, the second one you're going To do a round c shape and you're going to point that all the way around and down until you reach the front of your client's ear. This is what is going to create the point of the heart. As you start to part this out guys, you should be able to see the shape of the heart form and if you need to see it better, then you can kind of take the hair that you have and twist it that will help. You see the shape better in case any parts of it are off, so why i choose to line the heart up with the middle of my client's. Eyebrow is because i've noticed that the bigger i do this heart, the more defined it's going to look and the more it's going to pop and stand out. If you do a really small heart, sometimes it is a little bit harder to really see and get the curve that you want in that heart. So next i'm just going to go through and take my product and really define that part out. So i'm just going to go over those lines and make sure that they're, nice and neat for the client's hairline. You really don't have to do anything for that. It'S going to naturally create a point, and i'm going to show you guys how we are going to do that. So you only really need to part the point out on one side of the heart, and that is the side that i'm defining now and, like. I said you want to make sure you drag that to the front of your client's ear and that's how you're going to create your point. So you guys can see here. As i twist the hair, i can start to see my heart being more defined, and this is when i can make any changes that i need to make to it. If i wanted to make it smaller or bigger or skinnier, it would be really easy to see by really twisting it and seeing that definition. The next thing you're going to do is part the heart down the middle, so you're going to go to where the point of the top of the heart is and where the point of the bottom of the heart is. The point of the bottom of the heart is going to be, where you finish that part for the second c shape, and this is going to create your two sides to your heart. If you have parted out your initial shape right, then this should be really really easy to find, because all you should have to do is just part straight down the middle, and you should be able to create your two sides of your heart just like that. But you can always go through like i'm doing now and really define that point and just make your heart look a lot better. So i'm going to pin one side back we're going to work on the opposite side and to create the heart shape. We are going to take our comb and you're going to part diagonally down. This diagonal part is going to start where you want your heart to curve, and that should be at the outermost point of that side. So this is going to be the outermost point of this side and i'm going to part diagonally down. You don't want to part too far down in, like you, don't want to make this diagonal part too far down. This is where you kind of have to just like visualize your heart and it's totally: okay, to start your heart and take it down and redo. It don't forget, like i mean raiders, we are perfectionists. We want ourselves to be perfect and look nice and neat. So it's okay to redo a braid! If you have to so i'm just going ahead and redefining this top section here, i'm actually going to be braiding upward and then curving it down and that's going to create our side to our heart. So, first i'm just starting off by applying some product and then i'm going to show you which direction i'm going to braid this in and i'm going to be curving it around and down. So this first section i'm going to start from the inside corner and i'm going to start to braid. It upward and i am stitching just because guys i always stitch. I just feel like it makes my braids look neater um, but once i get to the end of this first section where i started this diagonal part off, i'm going to take my braid and i'm going to curve it around and i'm going to start to braid Around and connect it to the bottom section of this hair that is going to create the curve, and it's going to start to create the part you do want to add hair into this. I try not to add too much hair because, if you add too much hair in that first section when you go ahead and get time to do this curve, it's going to be really bulky and we don't want that. We want this curve to be really natural. So i add a majority of my hair down in this second section here, that's going to prevent my curve from just being too bulky and too big and yeah. It'S going to help my heart to be a little more defined if you're curious how to curve your braid guys, you just literally switch the direction of your hands and um start to braid down in the opposite direction, and your braids should naturally curl. This may take a little bit of practice a couple times, but i promise you guys: if you just switch those hands over, then it should happen. So you guys can see this first side of my braid has started to form so we're going to go ahead and get on over to the next side. So on this one, i'm going to be doing the same exact thing. The only thing you want to make sure for your second side is that this diagonal part is matching up and pointing to where that other diagonal part was so you just want to take your comb, make sure it's matching up. That'S going to help your heart. To look symmetrical and then you're going to literally do the same exact thing: you're going to braid from starting from the inside braiding up and you're, going to curve your braid around and down. So, as i break this around, i'm just going to talk about the finishing touches that you can do to this heart, so i chose to make this heart cross over at the bottom, so you guys will see once i'm done with the style. These two braids are going to be overlapping each other at the bottom. There'S also an option where you can combine the ends of two of these braids so that you only have one braid. I'Ve also done that before. If that's something that you guys want to see a tutorial on, you guys can, let me know in the comment section down below, but i am going to be showing you guys how i sew these braids together, so that they stay overlapping. I just feel like it looks a lot better and it closes up the heart which is going to make it once again more defined. And so i'm going to show you how to do that. And as long as you're, using a dark, colored thread on dark hair or a light color thread on light hair, then that thread is not going to be visible. But it's just going to give your braid a little bit more security and i just love the little crossover look. So i'm going to show you guys how i do that on this front, braid as well. So i'm going to take my needle and thread and i'm going to cross the braid over it really honestly doesn't matter if you do the front braid over or the back braid over. I just like it to lay naturally and i'm going to take my needle and i'm going to sew it through the top and the bottom braid, and i'm just going to go around it a couple times. I know a lot of people are like well can't you see the thread on top, but it's really not going to be visible unless somebody is like super close up on your client, so you really don't have to worry about that. Like i said, if you have, if they have darker hair and you're using darker thread, it's really not going to be visible, as you guys can see right now, um, you can't even see it. So i go through about three to four times and then i'm gon na knot it and that will keep your braids crossing over. I really love the crossover look just because i don't know it's cute. I like it but, like i said you can also just braid these two braids together into one, and you can also get a balm look. So literally, once that's secure, you're just going to cut off the excess string and tie a couple knots and then cut off the remainder of that string and you're pretty much ready to go. So i didn't do a full video on the lemonade braids for this video. But i actually did record it. So if that's something you're interested in seeing, i will link it at the top of the comment section for you guys. But here is our finished. Look with our hearts sewn together and i absolutely love the way this turned out. If it was helpful, drop purple hearts in the comment section down below, as always, thanks for watching and i'll catch you in my next video what you mean you don't know panda she's dope, what you mean, what you mean, what you mean, what you mean:
Comments
Oh Dani: I braided a full head of knotless yesterday for the 1st time, just from using your tutorials. Took me 6 hours - medium butt length. The way my respect grew even more for full time braiders, and I completely understand the pricing, I feel like I got beat up this morning the way my body hurts
Delicia Perry: thank you for this I'm going to try this on my daughter's hair because I know if I try this part on mine it's not going to end well
Ashley Lemmons: Beautifully done! I love your videos and your energy is everything ❤
ShortyAuthentic Epic: I love how you explain, it’s so appreciated and shoes you’ve mastered your craft
bweezy2187: loved this look and yes, I’d like to see the tutorial for the lemonade braids.
Najah Newton: i wish one of my friends needed their hair done lol i did this on myself a couple weeks ago and just the parting of the heart alone took me an hour and a half it looked bomb though!
Tanautica Montgomery: Thanks to you I got the heart braid down packed thank you
Handcrafted by Nava: Amazing job sis!! Love it!!
HENNESSY the BLACK ROSE 🌹: THANK YOU I have been using your videos to rehab my left hand it’s working out pretty good thank you so much you’re very thorough in your explanation I hope you’re having a great day today
Courtney Morgan: definitely helped as all of your tutorials do!
Mani Smith: Always wanted to learn thank you ! Nice work
Briana’s Life: this video helped me a lot you braid so neat btw
Q Beauty: I appreciate your work and how you explain things. I wanted to know when you started off braiding did you struggle with time? I do my childrens hair and it always takes me a long time to get e style done. Like 8 hrs in a 3layer feedins or 2days for medium box braids.
Amanda Mattis: OMG I am actually trying this in my cousins hair right now ❣️
valeria jackson: You did a excellent job Doll. Wow. Amazing beautiful ❤️
Valerie Naylor: Those lemonade braids is freaking gorgeous
Styles by Gabby: Thank you soooooo much for posting this bc I needed help with this bc this is the hairstyle I wanted when I go back to school
The Homeless Advocate: That is a awesome design, thanks Pana.
Sireana Pierre-Louis: This is so cute!!! I want this!!!
Francine Washington: Beautiful!!!! A work of art Pana!!!
M Bell: ♀️you did that sis..gorgeous job ...thanks for sharing...ky
Ruth Shields: Amazing love this look
Ashley king: I couldn't part a heart shape now I can thanks to you
aleialaw: I would love to see the full style.
Gemini Beauty: LOVE LOVE LOVEEEE!!! Definitely one of my favvvvv braiders on YT.. did you do the single braids on the right side?
Shayshay: Great tutorial ❤️
Roni Huff: Very cute. Whenever I need to learn the latest trends I can always count on Pana. ❤️ I’m going to try on my daughter.
Terric Domonique: very detailed I love it
Lelethestylus: Thank you so much the heart on my baby doll is the cutest
Latin Barbie: Hearts are in style now i just learned to do the the bow and i did the $ sign they all turned out great the first time around ima gohead and learn to do a star and numbers and. Flower..
Destiny Kelly: These look perfect
Lady Kim A: Love this thank you for sharing Panaaaaaa
Brittany Graham: What advice would you give for maintaining the heart as the style gets less fresh?
marshay: I love when you do heart lemonade braids it be so neat I wish u was in Chicago
Bella Singh: Girl I remember when u did a live of the heart and I managed to figure it out and do it just from that
Deborah Shoates: That heart is perfect her hair is Beautiful .
Cristal Blygen: Loving the style
Sandra DeJesus: Beautiful ❤️
QueenSP Enterprise: These are neat af ❤️❤️❤️❤️❤️
Jasmine L: So beautiful
Miz J: I’m so glad you are doing this cause I wanted to learn
Lori H: Hey! What product is being used for the edges? (Anyone can answer if they know) Thanks! :)
Sky Life: I love you pana your such a good hairstylist ✨
Judyy Rosé: Can u show us a tutorial on a butterfly part and a star part pleaseeeeeee
Angel Moore: Love the video and style can you show the full design #IM NEW TO THIS
Dainty Rose: Great tutorial.
Sydney Pridgen: Please drop it I literally just searched how to do this and you posted p.s. I love you
Keanna Mcalpin: I want to see the whole braid tutorial
Yopheena Panama: So satisfying when you clean up your lines
gwendolyn walker: EXCELLENT!! THANKS!!
Obashanu Ifeoluwa18: I love it
Linda W: Very pretty!!
Malia Prim: what product are you using so the hair doesn’t revert as you braid?
Donnie Lindon: Beautiful stay safe yall.
brown_ skin_kpop_khiphop_land: U be killing these hairstyle fr fr they be looking so so cute
me Shaw: trying this method on my daughter tomorrow
wifesnatcher_donald 1x: thanks Pana for this Tutorial
Anjola Diya: Thank you pana. Your knowledge shall increase!
Shia_Iam: bomb as usually good job!
keisha green: Girl see, that’s why we ❤️ you love
Brittani Gaskins: Hey Pana! One I love u and what do u use on soft hair that's curly to part and lay hair down? What kinda gripping techniques u use with this kinda hair too. Love u girl
Felicia Kennedy: Where can I come get my hair done that's beautiful
lexxxymarie96: thank you for this video
Piano Worship for The Heavenly Bridegroom: So cute!
B: Great job pana
TheInfamous TASHA: Your the best! ♥️
Shaia Lamar: I love you pana and I love the style
Toya B: thank you
The Real Beauti Guru: Can you post the full tutorial
francoise angel: brush that heart part got me mad but I finally got it
Nay The candy house Lady: How amazing ❤
Marilyn MonHoe: Can you do the one with the butterfly? It was parted like a butterfly.
Char Calhoun: thank you
Kyla Smith: Can u please post a how to video on the Chanel sign ?
MrsQueen LadyRed: Another Slay Mamacita
Charlotte Deamus: I LOVE YOU PANDA YOUR VERY..... DOPE! LOVE FROM DALLAS TEXAS
Vanessa Harvey: thanks pana . Your dope
Kelsey Roberts: ❤️❤️❤️
Jakayla Dionne:
Breana Dixon:
Brittany Gaston:
kaci sonma: How many packs of hair did u use?
Bervaley Chevery: first love yo work girl
Amelia r:
chyna b.:
APRIL HOLMES:
Kiara Johnson:
JoySorandom M:
Nique Lynn:
Maryam Olawuyi: Please what type of blow dryer do you use ?
Judi Joseph: I thought you put gel on a Apple watch for sec. lol Smart idea
Anaiah Brown:
Meggy901 Morris:
Fatima Jobarteh:
douthedou:
BossLadyQV:
Jess Denise:
shanelle walker:
Masoka Wilondja: Please what is the name of oil that you’re using ?
Jahzea Prince: