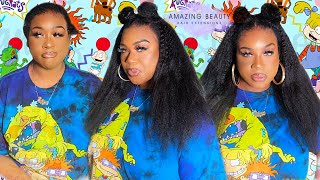
Diy Trendy Heart Braids On Natural Type 4 Hair | Valentine'S Day Hair Slay (No Added Hair)
Hey Besties! In today's video I am giving ya'll the trendy heart braids/cornrows! I have been wanting todo this style for a minute now, and Valentine's Day weekend is the perfect occasion. In this video I am braiding on natural type 4, 4C, hair! side note: I blow dried my hair before braiding.
XO- Mani
Product List:
Murrays Edge Wax
Rat Tail Comp
Eco Styler Gel (to really slay the baby hairs!)
Hello, beautiful people, my sisters, my virtual queens, welcome back to money in the middle, this, your girl, imani and in today's video we are getting into this cute little trendy, valentine's day, hairstyle natural of course, but before we get into this video, make sure you like comment And subscribe and then i'm gon na catch you guys at the end to do a few housekeeping things, because there's some things that i didn't include in this video. Well, the overhead audio of this video that i just want to share really quickly. So you guys um when you try this hairstyle, you know you guys know what to do. Okay, just a few housekeeping things so for this hairstyle i used murray's edge wax. I don't know if you guys been following me for a minute, but i used to use an edge control when i do my braids, but i have now switched over to murray's. It depends on the type of hair that you have since braiding people's hair. I realized that sometimes edge control works better and other times, depending on the hair. The type of hair you know you have edge wax uh murray's edge. Wax is perfect for my hair. Specifically, this gives me a whole, like a nice tacky hold without one leaving a white cast and two stiffening up my hair um, which, once your hair is stiff, it's like kind of hard to braid. I don't know if you guys experienced that but yeah. So for my parting, whenever you see me doing something like in the parts it's this and then i usually put um mousse in my hair after my breeding style, i did not want to do it for my hair this time, because i really wasn't going for a Crispy crispy look, but you know if you want that crispy crispy, look, don't sleep on. You know some mousse and then wrapping your hair. After your finish and then the last thing is this parting tool: comb um. You don't need like this trendy one. You can just use like a rat tail comb or any comb if you can get some precision um, but let's roll the footage. Okay, you guys, i am going to start off with parting, my hair down the middle. I did not pre-part all six braids because, as you will see, or if you haven't already noticed, these braid sections are all going to be different sizes because of the designs. The only two braids that are the same size are the two middle braids. For this first side, my second braid has the biggest section, because this is the snake design braid. Just a pro tip that i like to remind you guys about the front of your head, has more surface area than the neck, so remember to wrap your first braid around your ear to prevent from crowding your neck, i'm going to be braiding the design braid first, Since this is the braid, that is the focus and the other two braids that are on the side of this braid are just straight backs. Essentially i'm going to make four straight parts going down. You are more than welcome to add more of these straight parts. My to try to play is is, is, please don't deny what you feel baby after this design was done. All i did was braid the remainder of the straight backs for the other side of my head. The first braid is going to be the biggest section because of the heart design. This is very hard to explain, but really this is how i did it when it comes to this braid. All i did was part at the start of my ear going up, and then i parted a diagonal line through that. Then, at the end, i just rounded the top a little bit just to give me some direction. As i went along to braid. I think this heart design is more about how you move along as you braid and less about the parting, looking exactly like a heart. Hopefully that makes sense after this design was done. All i did was braid the remainder of the straight backs. Okay, first things. First, let's get a hair check; hopefully i add something in the beginning, so you guys can really see the full details, but if i don't yo, i'm in love, this style has been on my radar, for i want to say a few months now i just haven't Done it yet, and i'm super happy that i saved it for valentine's day or valentine's week or valenti or or love week, whatever you guys want to call it. You know i got my pink on i'm just giving. Today i laid my baby hairs. You know i got the swivel swivel swivel, oh, and to let my baby hairs. I did not use um murray's. I use eco styler gel, i'm gon na wash it off tonight. Trust me, i am, but you know sometimes, when you get those fresh braids, you just got ta go with og um products, okay, but yeah. That'S all! I have for you guys in this video. If you have any questions be sure to leave them down in the comment section below you know, there's going to be more behind the scenes. Action footage, video explanation in my weekly vlog that i'm feeling filming for you guys this week um. But until then i just wanted to get you guys something quick, natural and cute, so we can just slay all weekend period, i'm gon na catch, you guys in the next video ciao. For now you


Comments
Lisa Richburg: You have improved soo much! Your braiding and styles are "On Fleet", "Lit", and "The Bomb"❣
aquariusbaby214: You just gave me an idea. I've always wondered how people do designs. I wanted to braid my hair different for my bday (Valentine's day) . Looks cute!
C W: Omg, it came out so good!
Favour xx: Best in beauty!! knowing how to do your own hair is a flex, but being able to make cornrows with complex shapes? that's even harder. ❤ from
Malaya J: Hey so pretty as usual. I’m sleepy I’ll be back to finish video lol