Valentine'S Day Inspired Wig + Install | Tutorial
Watch my tutorial on how I achieved this colored wig using the water color method and how I installed this glueless using Liquid Gold from BoldHold !
LIKE, COMMENT, & SUBSCRIBE !
------
Wig from ifeslayshair.com
Keep up With Me! :
INSTAGRAM: IfeSzn
MY HAIR PAGE : IfeSlaysHAIR
TWITTER: IfeSZN
---------------------------------------------------------------
*I do not own any copyrights for these songs*
*If you are a company wishing to contact me for Product Reviews or Business Inquiries please email me at Justife99@@gmail.com
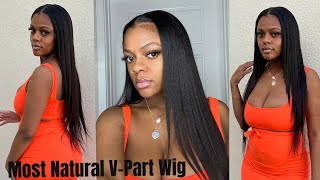
Hello, beautiful people - thank you for tuning into my channel. If you want to see how i achieve this color using the watercolor method and how i install this beautiful wig keep watching this video to find out. So the first step you need to do to watercolor hair is to get a bowl or bucket of hot water, and you want to fill it like midway or so. I'M going to be using these three colors from kiss temptations, so paprika dusty rose and rose gold, and i have my 613 wig hair, which is from also from my hair company, if you're interested in purchasing and it's a transparent, 613 wig, it's 13x4 pre-made, frontal wig. So i'm going to start off with the rose gold color first, because it's the lightest one and i want the roots of the wig to be like a light pink color. As you can see, i have a lot of water because i don't want the color. The first base of the color to be too dark. So i'm adding i'm gradually going to add the pink and i'm going to dip it in to see like if i like it and whatnot, and if not i'm going to keep adding more dye mixing it. And i'm going to add, i'm gon na dip the wig in again with roots first. So when you're watercoloring your hair, you want to make sure you get everything in there, because it's literally like it's so easy to miss certain spots, and things like that. So you want to make sure you saturate every part of the wig you're trying to get so um there's like a little bit of blonde spots, which you can't really see it's off camera, and i didn't really. I didn't really want the roots this bright, so i'm gon na go in again with the rose gold dye and just keep pouring it and then mixing it, and then i'm gon na dip the wig in one more time to get it a little darker. So i let the wig sit in for a little bit, probably like about three minutes, and i kept dipping it in the water just to make sure that the wig gets saturated enough and then now i'm gon na. Let that sit and then move on to the next color, so i'm gon na pour some of the water out, because i want the second color to be darker um. Second color i'm going to be using is the dusty rose and i'm just going to pour some some of the bottom and i'm actually going to pour most of the bottle in the water and then mix it and then dip the wig in from the roots up. So basically i didn't like how light the rose gold was, so i basically i don't really need the rose gold after like dying this wig. So what i was, what i'm gon na do is add a little bit of more of the rose gold and i'm gon na add a little bit of the paprika just to make a little darker. I want the wig to flow seamlessly into the next color, so yeah, i'm just going to add a little bit of the paprika and then more of the rose gold to get that darker color on the wig. So for this middle color, as you can see, i'm not dipping it all the way, because i still want that light pink into the like mid, pink, dark pink flow. So this is still the pack a little bit paprika with the dusty rose mixture and i'm going to keep um dipping the wig into it. So i could get like that darkness. As you can see, the wig is getting darker all right. So last but not least, i'm going to go in with the paprika color and there's a little bit of water left, but i'm gon na add a little bit more of hot water and i'm gon na add the paprika color just to get that really dark bottoms And um, as you can see like the wig, is already like dark a little bit, so i'm just gon na add more pepper, we're gon na to get that darker um tips and yeah. Overall, i let the wig sit in the paprika for about like three minutes and then i'm just gon na wash out the color and yeah we're done so. I'M just gon na wash out with the wig with water and i'm gon na go in with my conditioner and shampoo. So i don't know why i showed this: the shimmer lights, generic one i'm gon na, be using this conditioning balm and this um color lash shampoo. For the wig, which i both got from sally's, not the shimmer lights, one, okay, just the color protecting one and the conditioning balm. So since i colored this wig, i'm going to use this color lash shampoo. I started investing in these because i realized that when i use regular shampoos like i realize that color doesn't last as long over time when you keep watching it. So i invested in this generic um color lasting shampoo, so i'm just gon na make sure i get it well into the wig and just wash it off and then i'm gon na go in with my conditioning balm and let this sit in a wig for about Five minutes - and this really like locks in the moisture in the wig and also helps seal in the color and prevents it from damaging and stuff and voila. We have our color just look how it flows so seamlessly into each other, like i just it's beautiful. So now i'm going to blow dry it off camera and i'm going to install it on my client. So this is how the wig looks blow-dried. I ran the hot comb through it through the roots and yeah. I was so pretty and i'm coming to the store. This wig, so my client already came with her hair braided and we're going to install this gluelessly. So my client has a low hairline um, i'm going to use a gossipy spray and just like brush her edges back. She did not want like the stocking cap method because she wanted to just like take off the wig like right away. Basically, so i'm just going to use the regular black stocking cap because it's not going to show under the wig and i'm not going to do a second camera thing, so i'm just going to go on with the glues install so yeah. Basically, this is an alternative. Like if you don't want the stocking cap method, like the whole process done, you can always opt for using a black stocking cap, and literally you just throw it on put it under your wig, like even me when i wear my closure, wigs or so on. My frontal look, i just throw on my black stocking cap and keep it pushing, because sometimes i really don't want to do something with them myself. So i believe this is a good alternative. If you don't want to, you know, go through that whole process, i'm going to be using ruby kisses, and i'm going to just i like to put this over in my client's foreheads, just to see which color matches them perfectly and i'm going to use that with The makeup brush and just brush it into the the lace to make it blend easier, especially because it's transparent lace and as a whitish effect. You want to make sure you get the the color of the lace as close as possible to your client's, um skin color. After i'm done tensing the wig, the lace i like to put the wig on my client's head just to make sure like the wig fits properly and then i'm just gon na cut the air tabs out and things like that and then i'm gon na tie it Up in the back and just um secure the back with the elastic band that comes with the wig, because this is going to be a glueless install, i'm just going to cut the lace off um, usually for glues, installs, you don't really have to keep the lace On you can just um cut the lace off first and then like, however, you do your glueless method with mousse or without anything, got to be spray whatever you don't need to keep the lace on. So i'm going to cut the lace off right before where the um the hairline, starts on the wig and cut it all the way across and zigzag motions. You always want to cut your lace in the zigzag motion, because that helps create a more natural look. Instead of cutting it just straight across which gives a wiggy type of look, so today, i'm going to be using liquid gold from bullhold for the very first time and i'm excited this is my first time using their product. This is their glueless um product. So basically, it's like a fake. It'S it kind of reminded me of like a got to be gel, but it's more liquidy so like just disclaimer like it gets really messy so like in this video, i'm like kind of like going back and forth because my first time using it. So i'm just going to make sure i'm using it properly, so i initially pour it in my hand on my palm and i use my comb to like place it on her skin and also prior to this. I cleaned her skin. Just so you guys know so. The um got to so the liquid gold could stick in more and i'm just going to go with my blow dryer on warm to make sure that the um liquid gold melts in to the lace, like i said like this product, i feel like this product is Like a little bit messy, so you want to make sure you're using it in small increments, like you want to make sure you're using small amounts, don't pour so much at once. I think it's best to pour it on your palm and then use your comb to put a little bit on to your client's skin a little by little and as i was installing it like girl. This wig was sticking onto her head, like it was glue like i might have started using this on my wigs too, no no funny but um. Overall, i feel like it's a good product. Um just got ta use it um carefully and yeah. I just use this all over her wig and use my comb to help melt it in, while using my blow dryer on warm also with this product. It could last very long, depending on your maintenance, i feel like comparing it to got to be spray um. I feel like it lasts. The same i mean got to be spray. Usually that has that whitish effect i feel like this product doesn't really have it unless you use a lot to be honest, so it's best to use a thin layer of this product to prevent from getting that white effect and um yeah. I feel like this product is really good overall, and it really sticks very well. And if you ever want like to use this as a glueless option, i would recommend it because if it sticks very well and plus, if you also aren't the type to like use, blue or things like that, so i'm done with the liquid gold part and i'm Gon na just go back in with much um ruby kisses and just put it over the lace, as i, as i said before, is transparent lace. Transparent lace has a whitish effect to it, so you always want to make sure you go back to make it look more natural and appealing. So i'm going to use this, and i'm also going to use true match lace conceal in the color tan, just to make it a little darker and match her skin tone even more also on the packaging. It said that it's best for the true match: lace concealer, to be dried to be air dried. But honestly, no one really got time for that. So i'm just gon na spray, it a little bit and then um just use my blow dryer on cool, and so it could dry quicker now, it's time to style the baby hairs. So i'm just going to take out some of the baby hairs in the front. Um, i'm going to use a got to be spray and just like spray, the hair backwards, just so to get that like sleek um. I don't want to describe it, but like this sleek type of look, so i like to use my got to be spray. I spray the hair and i go in with my hot comb and it's like comb it backwards and afterwards i'm just going to use, you could use scissors or you could use like a razor comb for your baby hairs and just customize it. However, you like it, i'm not going to do dramatic baby hairs, i'm going to do like a few on the side and and i'm also using a little bit of mousse and got to be to lay these baby hairs. So i'm going to start parting, her hair in the middle and then i'm going to go in with the styling wax, and this helps create a flat install like a styling wax and a hot comb or necessities. Trust me when you're installing a wig um. This helps keep the wig flat, gets rid of flyaways and so forth, and it helps create that flawless install. So i'm going to be using this elastic band that i got from the beauty supply store just to lay her wig down while i'm styling it and then i'm going to add some curls and some layers into this. And you know i love love, love, love, adding layers, trust me, adding layers to curling, adding layers to hair and then curling. It gives it a more voluminous effect and it makes it more. Bouncy just makes it look so much better and not flat on your face. So here i initially comb my hair out and then i'm going to go in with my razor comb to add the layers into her hair and before i do this. I part the hair into sections and i use my razor comb, which i also purchased from the beauty supply store um. This is the best tool to use when you're laying layering hair, because it doesn't create a blunt effect it creates. It makes the hair flow into each other and yeah, so i'm just adding a few layers in the front coming. I want to create bouncy curls in the front. I don't really care to add layers throughout all of the hair, just the front itself to give that um voluminous look so now onto my favorite part of the style of installing wigs is styling hair. I'M going to be using this one inch, curling iron from red, kiss by red yeah, and then i'm gon na use this um heat, protectant spray, slash shining spray and i'm just gon na be doing calm. Curls i feel like. I have a lot of curling hair videos, but i don't have a curling hair tutorial, but i'll eventually upload one soon for you guys. So you can know how i achieve these beautiful curls and we are done baby. Just look at this. It really be the curls for me no cap, like i love curling, hair y'all. I love it. I'M just gon na comb this out with a white tube comb and yeah. We'Re done basically so you're gon na just enjoy and watch how i comb out these beautiful curls and yeah. I'M just gon na go in and do some finishing touches. I'M gon na retrace her part with this ruby kisses and i'm gon na go with my hot comb again, just to make sure it's really flat and then i'm gon na use my got to be spray to make sure that the top of the hair is rid Of any flyaways so just get into this wig like y'all. This looks so good, but anyways thanks for tuning into my video, more videos coming soon tutorials clothing hauls, you name it if you like this video, give me a thumbs up. Comment like and subscribe, see. Y'All. My next one later, you


Comments
Oh Ok: Very gorgeous. Reminds me of Valentines Day and strawberry shortcake.
local jamaican: Do you know how to cut curtain bangs in your units? I really want to buy a unit so i can get curtain bangs but I'm scared I'm gonna butcher it