4 Easy & Cute Braided Hairstyles!
Braided hairstyles are my go to when I can't decide how I want my hair. These braided hairstyles are perfect for the summertime when you want your hair to look cute but out of your face so you can stay cool as well. In this hair tutorial, I will show you how to make elegant braided double buns, a cute dutch braid with scrunchies, intricate double fishtail braids, and dutch braided ponytails with scrunchies!
If you want to skip to a specific hairstyle, here are the time stamps:
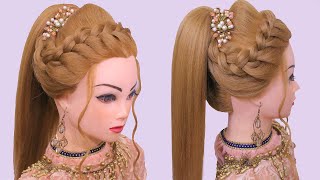
BRAIDED DOUBLE BUNS 00:42
SINGLE DUTCH BRAID WITH SCRUNCHIES 4:32
DOUBLE FISHTAIL BRAID 7:03
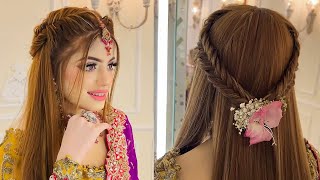
DUTCH BRAIDED PONYTAILS WITH SCRUNCHIES 11:35
Let's be friends on social!
BLOG: https://NizhonifulMe.com
INSTAGRAM: https://www.instagram.com/nizhonifulme...
FACEBOOK: https://www.facebook.com/nizhonifulme/...
Music by Reggie San Miguel - Daydream - https://thmatc.co/?l=2789A28
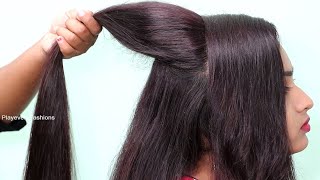
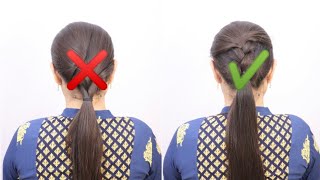
Hello and welcome back to my channel today, i'm going to be showing you four different braided hairstyles. You can do that are very cute and put together. If you would like to skip to a certain style, i will leave the time stamps below alright. Now, let's get into this video for the first hairstyle, i'm going to be doing a low messy double bun start by splitting your hair down the middle, so that you have two parts. I want this hairstyle to be messy and a little undone. So, to give my hair texture, i am going to curl random pieces near the root. I am mainly focusing on the hair near the top. Take one inch, sections and curl outward holding the curl in your hand after to help keep its shape. Don'T worry about curling the bottom half because you won't be able to see it anyway when we make the ponytails, the goal is to be able to still see the curls in the hair after it's tied, repeat this process on the other side, while leaving a few Face framing strands loose, tie your hair into two low ponytails, while doing this make sure to keep your curls intact by curling some strands with your finger and making sure the ponytail isn't too tight after the hair is tied gently pull on the strands around your scalp To make it look more messy, you should be able to see some curls still now curl the pieces in the front going outward and making sure they are looser, curls from here braid, both ponytails once you get to the bottom tug at the braid to loosen it. This makes it appear bigger, but be careful not to pull too much or it can come undone secure with a tiny, clear elastic. Now we will start forming the buns by wrapping the braid around itself. Holding onto the end with the clear elastic lift up the hair tie and tuck the end of the braid underneath it, this will conceal the ends and help the bun stay in place, adjust the bun if needed by repositioning and tugging at it now start pinning the Bun down with bobby pins, make sure to pin the ends in as well to hide them repeat this on the other side, and you are done, i think this hairstyle is so romantic and laid back. I love a low messy bun look, but what's better about this one is that it has two for the second hairstyle. I will be doing a single dutch braid brush your hair back and take a small section of hair near your forehead split this into three equal parts to start bring the middle piece over the right piece now take the new middle piece and bring that over the Left piece: this makes one plait in the braid before doing a second plait. You will take a section of hair and add it to both the outer right and left strands that you are holding repeat the process by bringing the middle strand over the right strand and taking that strand over the left strand, make sure to add in more hair. After each plait, what helps me is to always remember to bring the middle strand over the right, and the rest will follow also being able to hold all three strands in one hand, while keeping them separated with your fingers is helpful when you have to add in Hair, it may take some practice if you are new to braiding. What helps me is to have two mirrors so that i can see behind my head, and that makes it less confusing when i can see what i'm doing braid until you reach the nape of your neck and secure with a hair tie gently tug at the braid To loosen it up a bit, take a scrunchie and tie that over the hair tie, the one i am using is a maroon colored, one that i made continue: braiding halfway down the length of your hair tugging again, when you reach your stopping point and secure with The hair tight and scrunchy braid down the rest of your hair and secure. I like this hairstyle because it takes a single dutch braid and makes it so much cuter with the scrunchies. This hairstyle is so simple and easy to do for this next hairstyle. I will be doing two fish braids. This one is a little more complex. So if you have some extra time in the morning, i would recommend doing this. One begin by parting, your hair into two: i'm going to be tying up one side to keep it out of the way before braiding. I recommend wetting your hair to help reduce flyaways. If you want spray, some hairspray near your roots, to give your hair more grip. Unlike a regular three strand braid, the fishtail braid only uses two strands start by grabbing a section of hair and splitting it into two take a small piece from the top section and cross it underneath adding it to the bottom section. Do the same thing with the bottom section remember to take from the outer edges? Always now we repeat, but this time we will start adding hair, take a small piece of hair from the top section and bring it underneath to the bottom. Section now add in hair from near the top and cross it under to the bottom. So now we have added twice to the bottom. We repeat this process to the other side, take a small piece of hair from the outer edge of the bottom section and cross it underneath to the top then add in hair from near the bottom and cross it under to the top. Continue this all the way down to the nape of your neck until you have no more hair left to add in this took me a while to get this braid down, so i will repeat: take a small piece of hair from the top that you are already Holding and add it to the bottom, then add in hair from near the top that you are not holding and cross it under to the bottom repeat this with the bottom strand now adding to the top from the section you are holding, take a small piece from The outer edge and cross under to the top now add in more hair from the bottom and cross under to the top. Once you have these steps down, it gets so much easier. The key to getting a nice fishtail look is to add in small sections each time to the braid. While this makes it look nice, it also makes braiding take longer so have patience. I know this may be confusing as well. So if you are having a hard time mastering this, i would suggest you practice doing a regular fishtail braid one where you don't add in any hair, continue braiding all the way to the nape of your neck. Like i mentioned in the beginning, this braid takes more time to complete, but it is so worth it in the end. Also by this point, my arms were on fire, who knew you would be getting an arm workout in as well, once there are no more pieces to add, continue braiding by taking sections from one side and crossing it under to add to the other, remember, to take From the outer edge each time and use small sections when adding it to the other side, secure with a hair tie at the end repeat this process on the other side - and you are done - i feel like this double fishtail. Braid is a step up for my regular dutch braid hairstyle. It looks so much more intricate and detailed. You will be turning heads for sure. This is also a nice hairstyle when you want to keep your hair out of your face, which is on most days. For me, when it's 100 plus degrees outside by this point, my hair is getting very messy for the last hairstyle. I will be doing two dutch braids with ponytails section your hair into two and to help keep one side out of the way secure it into a bun. I am going to use a spray bottle again to wet my hair. This makes braiding easier and keeps those flyaways down before we start braiding. I am going to section off some face framing pieces. First, remember to do a dutch braid. We will be taking the middle strand and crossing it over an outer strand with the new middle strand cross it over. The other outer strand now add in hair from both sides to the two outer strands and continue braiding make sure to add in hair after each plait as you get to the nape of your neck, keep tension in the strands you are holding, so the braid holds Tight gently tug at the braid to make it bigger and then secure it with a hair tie repeat to the other side of your hair. To make a second ponytail. Now we can start curling the hair for the face framing pieces make loose curls going away from the face for the ponytail. I am taking one inch sections and curling them outward to make the curls keep their shape better. I am holding them in my hand, right after i take the wand out, while they are still warm now we are finished, i decided to add some scrunchies to the hairstyle. I think it makes it look cuter. Thank you guys so much for watching. If you decide to try out these hairstyles, please tag me on instagram at nigerno. Follow me. I would really love to see your braided hair creations. Also, don't forget to like this video and if you aren't already subscribe to my channel and i hope you have a nijona full day, you
Comments
Christina Haswood: Beautiful video! I am excited to try these hairstyles out! Looks like an arm workout too!
Sean O'Reilly: All 4 braid styles are winners! The fishtail braid had me spinning even though it's only a two strand braid. Thanks for sharing another great video
Colette: Your hair is gorgeous and very thick. My hair is thin, fine and short but I may try a small version of one of these. I liked the way you explained although it's still hard for me. I watched your video with my friends daughter in mind. She has long hair. Thank you for your video.
Angelo Suke: Hey