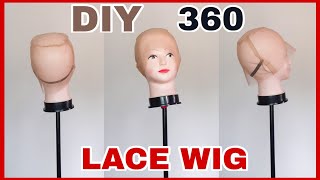
How To Make A 360 Lace Wig Cap From Scratch | Diy Frontal Wig Cap | Belle_Graciaz
- Posted on 11 February, 2022
- 360 Lace Wig
- By Anonymous
Hello friends, in today's video, I'll be making a requested video and showing you how to make a 360 lace wig cap from scratch without using a wig cap as a template
this is suitable for those who don't want to go through the process of cutting an already good wig cap just to make another wig cap
It does involve some maths, but I'm sure you'll understand it because I made it as detailed as possible.
let me know which 360 wig cap method you other, this or the previous video
thank you for watching and I hope you find it helpful
#360lacewigcap #diy360wigcap #howtomakea360wigcap #diyfulllace
Music by Laura Zocca - From Loving You - https://thmatc.co/?l=58F74684
Music by Laura Zocca - Boys - https://thmatc.co/?l=D0E0146C
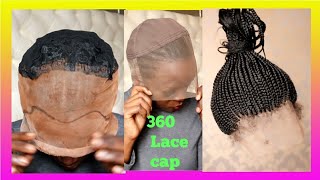
Hello, everyone welcome and welcome back again to my channel, so in today's video i'm going to be making this 360 wig cap a lot of you requested. I make one without using a wig cap as a template, so this video video is for you if you requested that so yeah. This is what it looks like and let's just jump right into the video. It'S actually very, very simple and straight to the point - and i hope you find it helpful: okay, so yeah, let's jump right into the video okay. So these are the items you'll need for this project right here. Okay, so after doing that, the next thing you'd want to do - or the first thing you want to do - is to take uh measure the the circumference of your head after measuring the circumference of your head, you want to get the radius of that. So this is the formula formula right here on how to get the radius okay. Now, once you get the radius, you just um just trace that around the paper like so after doing that, you would use your pen or your marker to just trace out the dashes. You created just so it's easier for you to cut like this okay, so the next step now is for you to measure from the front of your head to the back of your head um, and when i measured it on the mannequin, i used for this project Right here it was 17 inches and keep in mind that i made it longer than needed. You could see because i prefer having it longer than shorter, so that it's i could easily cut all the excess. If i don't want to okay and and i'm going to explain this measurement or this formula or this much, i'm creating right here this moment, okay, so i'm going to simplify this a bit more so you're going to take your measurement from the front to the back Of your head, so basically from where you want the um release week to start from all the lace caps start from so the back where you want it to stop at okay. This does not include seam allowance and the extra least you leave in front and for this wig cap it was 17 inches, which was what i measured on my mannequin okay and you're, going to divide that 17 inches by 2, which is going to give you 8.5 Inches that 8.5 inches is half of the 17 inches, so that is half basically, the 8.5 is one which is going to be in front another 8.5, which at the back, i hope that makes sense. Okay, so you remember, you already took the radius of your um head circumference, which is going to be the crown area of your wig cap, and that is 3.5. So you're going to subtract that 3.5 from the 8.5 and you're going to get 10 and 5 inches. That five inches is the length of the wii cap. Okay, i hope that makes sense. It'S the length of the wig cap and you're, going to add two inches to that which includes seam allowance and a little bit of space in front. So i really do hope that makes sense. Okay. So now the next step is to measure um half of the radius you already cut out at the beginning, and for me it was, i believe it was 11 inches. So i'm going to just mark out 11.5, which is also going to include um seam allowance, and you remember the five, the the seven inches we already did at the beginning, which was it looked like a lot of mats. This is where it's going to come in place because it's going to be the length you need for the wig cap, okay and you're, just going to just connect all that together and when you connect all of them together. It'S going to give you a rectangle. That'S just a couple things: i've learned about boys, these okay, so after cutting out the rectangle you're going to fold it into two so that you can find the midpoint of this rectangle right here after you find the midpoint of the rectangle you're going to go down By half an inch at the top and go up by half an inch at the bottom on both sides. The reason why you're doing this is so that you can have a curve at a top and a curve at the bottom, so it sits well on the top part of the wig cap, which was the first thing we created. If you remember so you're just going to connect everything like so and do the same thing to the top, it's you're just going to create a curve, and this is what you'll have so you're just going to use your lace um, your lace. Basically, so i have this list right here that i've had very well, so this is what i'm going to use and for the brim or the sides you'll cut out two and for the top you cut out one okay. So this is what you have, so i'm just going to connect both sides together and sew and after sewing it. This is what you will have use a straight stitch when sewing, but that's what i used anyways and you just trim off the excess thread. You do not need anymore, so after doing that, you find the um center of the top part of the wig cap and you just create a notch there on both sides. So it's easier for you to know where to place each side like so i hope that makes sense. After doing that, area is going to pin them down together, pin the top part and the body together like so and you're, going to sew round it. Okay, you want to make sure that um both sides are lined together, so that you don't end up having a look bulky or anything. So after doing that, this is what you should have. Then the next step is to insert your elastic band um onto the wig cap, because you need that to secure this, and for this i made it seven and a half inches um, depending on how small or how big your head is or something or, if you, How loose or how tight you want it to be. I think that's the best way to put it um, you can cut it to your own preference, but i feel like seven and a half is okay, because it allows for stretch and also for seam allowance and you're just going to go down by four or five Inches, i would honestly recommend you go down by four inches from the top part of the wig cap, because it's not going to be too low. Okay, um, but i believe i went down by five inches, which was too low and i went ahead. So you know correct that mistake, um, so yeah. I would recommend you go down by four inches and you just saw that onto the recap like so and after you do. This is what you will have and if you're basically going to go so easy, do not need to use a wii cap or a previously made wig cap to create this. You can use this easy step. It'S just that it's! It involves a lot of maths compared to the previous video i made, which was basically straightforward, so i really hope you like it and find it helpful and informative. So i really appreciate it. Thank you so much for watching this video. I really hope you enjoyed it that you found it helpful. So yeah see you in the next video and let me know what you think about this, which do you prefer? Do you prefer this method right here or do you prefer the previous method i used in my previous video? If you haven't seen that video go check it out i'll leave the link in the description box as well as leaving the link to this video in the description box of that video as well and in the comment section. So you can check both out and compare and contrast and see which one is easier for you to do so. I personally, i find the first method easier because, like i said it doesn't require a lot of maths but um. This is also helpful for you. Just in case, you do not want to have to cut your um already made recap just to make another list week: okay, so yeah! Thank you so much once again, and i will see you all in the next video make me bye.

Comments
belle_graciaz: Hello friends, this is the other method on how to make a 360 wig cap, for those who don't want to be bothered with all the calculations https://youtu.be/r-kGk3nxllQ
simplydemi: When you said this seems like a lots of maths , I was like she read my mind it’s very detailing and the end result look very beautiful and neat too❤️❤️❤️
Matt Malone: Keep making videos, love your energy!! Do not get left behind - P R O M O S M!!
Odette Young: The wig cap looks great. Are you a seamstress by trade?
Dpowers stiches: My sister no b small maths but thank u so much chop kiss