Fall For Me.. Ep2.| Clean, Color & Re-Install| 613-Fall Color Ombre| Jt Inspired Look
- Posted on 09 October, 2022
- 360 Lace Wig
- By Anonymous
Welcome to My Channel
Be sure to SUBSCRIBE & TURN ON YOUR ALERTS
HAIR CHANNEL @iambeautifulhustlertv
——————————————————
MY PERSONAL YOUTUBE CHANNEL : @Life with ShaeTV
https://www.youtube.com/channel/UCB9xX...
——————————————————
Follow My Socials:
PERSONAL
@iambeautifulhustler
BUSINESS
Instagram:_Beautifulhustler
@thebhslay
@girlsniteoutapparel
Twitter:_Beautifulhustl
YouTube :IAmBeautifulHustlerTV
✨For Sponsorships ,Reviews,& Questions
Email:[email protected]
786-571-1313
To Purchase Hair & Products Www.ibhslays.com
Allow 3-14 Business Days For All Orders
#miamihairstylist,#miamihair,
#browardhair,#browardhairstylist, #Atlanta #atlantahair,#atlantahairstylist #reels, #explore #trending #tiktok #viral #miamimakeup #miamimua #miaminails
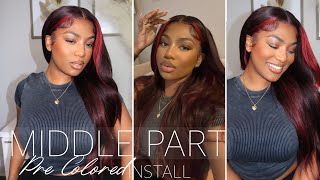
I still love my [ __ ] from time to time. I just be [ __ ] up hey. If you can hear me, I love you in a way you suck it up. I call him my suction cup, Houston, [, __, ] Double Cup and if I lose my [ __ ], I'm just gon na double back and double up. Let'S go he's sucking me, like he's sucking a vape pen. I want it now. [ __ ], I'm not waiting you. I was that [ __ ]. As soon as I came jumped off of the porch. I need no training. I'M outside. I don't care. If it's raining got good strokes, but he not painting he give it up. He don't do. No complaining, I'm that [ __ ], I don't do no, explaining hey, hey Beauties and welcome back to item beautiful hustle TV. Today we are back with another video, and this is episode 2 of our Above Me, series now, as I can see today, I'll be doing a reuse, revamp, color and reinstall. You guys always request me to do a reinstall video, so today I'm going to bring it to you today with a nice, pretty exotic color and a reinstall okay. So this is a 0613 wig that we have for um that I have for some months and it was only it was one time so I decided to use it today, um to do our custom, color and reinstall. Now. The first thing I'm going to do is just go ahead. Wig. I don't think when I first installed it that I toned it because, as you can see, when I use the purple shampoo um, it did, you know turn a different color or you know, remove the yellow tones out of the wig. So I just wanted to do a quick little dip shampoo to tone it out before I begin to color it, and the wig is very dirty as y'all can see, it had um glue, build up and also you know, foundation and everything on it. But I will show you how to clean that afterwards um, but the colors that I will be using today for the Ombre is funky, yellow, I'm using cinnamon and I'm also using raising red um. I also did end up mixing in another color, which I forgot to show you guys, which is spice Amber. So you want to use funky, yellow, cinnamon and spiced Amber mixed together, and then you want to use that raging red on its own. But the first color that I'm going to do is a funky, yellow and I'm going to dip the whole entire wig. I'M not doing just the section where I want the color, I'm the reason why I decide to dip each color. The way I'm doing it today is just so that everything just Blends and flows in together and and just create whatever color mixture that is going to create when um you know, mixing it all together, but as you can see that funky yellow from um kiss Temptation, Um, it took very very quickly really after the first dip all the color was on the wig, but I just wanted, you know double check and just make sure. So we don't have any um blonde patches in a wig, and this is what it looks like. After just using the funky yellow, beautiful color, you can rock it by itself, but for today I really wanted to do a ombre. So now I'm going to take that cinnamon and I'm going to fill up the water um. Like I mentioned, I did add that spice Amber to it, um, which I didn't show on camera, but remember guys, cinnamon and spiced Amber are the two colors that you want to create to um. Well, you want to mix together to create my middle, my middle color. So um I went ahead and added that mixture and I'm going to dip the wig um about halfway up a little more than half, because I want to make sure I leave space for me to be able to add my third color. So what I did was um. I voted the wig in half going. He like said he had a part down the middle and you take the wig off and you hold it up in your hand, with your apartment in your hand, um. I parted it kind of like that. I folded it like that way like the up and down way like the way you actually wear the wig and I folded it in half and then I dipped it that way. Um, the color could be um pretty symmetrical on both sides of the wig versus me just taking it the regular way you hold the wig when you're dipping it, and you know it doesn't really even out as much so that's why I folded the wig and half The way that I did so, I can really get that color up in there, but you just want to continue to dip that wig in there and you want to take a wig brush and brush through it. That way the wig is not um. Well, the wig is taking all of that color in between in the middle and the back. All of that you know all that all the above so just keep dipping away, brushing the lip real nice and easily and we're just going to keep doing that a few times and once I feel like the color is dark enough and well saturated. We will move on with the third color now last but not least, we're going in with the Raging red, so we're just going to go ahead and pour that Ridge and work in there and do the same thing as we did with the first two colors. But you don't want to take the color all the way up to the top of the um cinnamon and spice Amber. You want to just focus towards the like. Basically, you want to split the wig in three parts and that's how you want your color to go. Like you want to see the flow of all three colors so with the yellow, we dipped it all the way in with the cinnamon and spice Amber. We dipped it, like you know, two thirds in, but for that final color, you were just focusing on the ends. Okay, so you can see all three tones once it's all um you know rinsed out and conditioned, and all of that you'll be able to see the perfect color Blends and the way that I do it like and, like I mentioned, or the way, the reason why I do it like this is so that it can all just blend and flow together, and that way you don't have any lines of demarcation, because the colors were mixed together and create whatever color they're going to create. Plus, you will still go for the look that you are going for so um just to ensure that I really got that raging red on there um I just kind of like the wig on the counter and took the Raging red and with the gloves I just Brushed it mainly on those ends, because that's the only part of the wig that I want to have this burgundy-ish um color. So I just really rub that in and mix that in really good and as y'all can see, give me my props y'all, I'm wearing gloves today. Y'All know I never wear gloves, but I am wearing gloves today, because that is a lot of color and I want to have my hands looking like pumpkins and everything else. Okay, so I'm just brushing that on in mixing that color in you know my hands and with the gloves and then I will go ahead and dip that and I will go ahead and rinse out the entire wig and show you guys what the color look like. But, to be honest, y'all when it comes to see my color see my permanent color, it's not really best to shampoo it out, because you can like kind of wash the color out so instead of shampooing, the color out just rinse, it out really really good and Then I'm going to take a um silicone mix in the bamboo um silicone mix and just conditional, wig, really really good and then course we'll move on to the next step foreign, and this is what the color looks like after going through the whole process. So now you guys they're very important it's time to clean the wig okay now I know everybody has their own little technique on how to clean it with some people boil it and do all this and do all that listen y'all. I don't do all that. I keep it simple and straight to the point, as you can see guys, the glue is still a bit on the lid. So what I'm going to do is just take a dry towel dry, towel, okay, and I'm just going to rub just like the glue downward. Like like you're trying to roll it off the front of the edges, I'm just going to place the wig on that arm, stand and take the two potato towel and just roll that glue down like y'all know how the Elmer's Glue uh school glue is, and you Know how you we used to be little and pour it on our hand, let it dry and then we roll and peel it off. It'S the same thing when using any white adhesive that turns clear. You just rub it off. Okay, now you can do this when the wig is completely dry or you can do it when it's wet it's up to you, but I am right now, I'm using because the hair is wet. I am using a dry towel and I am just rubbing that glue. All the way up to the edge now, if the glue does get on the front of the hair, just take a small two comb and comb it out. The reason why I say small tooth and not wide tooth because of the uh, the teeth on the corner too wide. It'S just not even going to really pull the glue out of the hair like you needed to, and that's why I say: go in, like you see me doing, hair with the thyme small tooth comb and just combing those hairs out, and it's not going to rip The hairs out the wig or anything like that. Oh look at my man that is so flimsy. Oh, I need a new one, but nevertheless y'all just continue to rub the glue off and once I have rubbed all that glue off the hairline. I will then go in with some 99 alcohol and just go over my work with that 99 alcohol. In my system, all right, foreign foreign foreign is nice and clean and ready to go. So what I'm going to do next is go ahead and blow dry. That wig - and this is what the wig looks like after being blow dry - the color is so pretty y'all. It'S definitely giving fall, colors Sunset fire all the B above and absolutely nothing, but now it's time to go ahead and get into that install. So the first thing I'm going to do is take that little because it's Foundation - and I am using that level 16 palette, taking those two shades slightly mixed and applying it on the inside of the lace. This was a transparent lace, so you know sometimes with the transparent lace. You have to go with shade darker. So that's why I use a combination of both in that 16 palette and I'm just brushing it all on the inside of the wig and all of the above okay hairline background expands all that, because I don't know well at this point. I didn't know about the stocking, but the conclusion to do that: JT. Look when she was on Croatia, please with the Chinese bang in a little side part. So I said oh yeah, that is going to to give honey and it did what it was supposed to do and again what it's supposed to gain and so period. So, first and first and foremost um I'm putting a wig on my head just to kind of map out where I'm going to lay it. This is a reinstall, so you know the laces are already cut and the install is pretty much simple and now I'm going to take um my lace, adhesive and just apply it on my above my hairline and just brush it like onto the cap. Now for this install today y'all, I only use two layers: okay, you believe for stuff like Chuck and it's just to go so um after I apply my two layers and I'll. Let that time clear. I did go ahead and start. You know the same way. I normally do when I do my brand new wigging stalls. Is I start from the middle and then work my way to the sides so um like I said after that. Second, I'm spread and it turned clear I'm going to lay my wig right into that glue. Starting with the center first and then um working my way on the side, and I'm just going to nicely and firmly press the lace in really really really good, because you know you want to make sure you really um melt it in. So you guys will see that part there in a few minutes and then y'all know we would go in with the rest of our foreign. So now that that lace is on I'm just going to continue to use my fingertips, all y'all can see just give yourself already period, so we're just going to push that lace White on CE. You want to take my comb and my blow dryer and just really begin to melt the ends in and then, of course, I know we're going to tie it down with that melt belt and then come back and Tuck down. You know tack down any other lace that is still lifting around the ears edges or whatever, like that. So on the heat settings, I know you guys um often access to the cool or the heat setting. I like to use the heat setting and just really blow dry, that in and out the original heavy on the original melt belt and tie that thing on down and then once we do that um, you know once we do that, I'm gon na go ahead and Just remove that tap down, whatever's left cut any extra lace from around the ears and then we begin to prep for Style foreign foreign foreign tail comb. So you can just really Slide the glue under those Tiny Places and then just use the teeth of the calm. Apart to push the lace down and really just get it to blend, into melt like it's supposed to foreign foreign, foreign foreign, and now that we have all that tacked down for sure this time, we're just going to go in with the blow dry and just blow Dry that once again now, as you can see, the color is so pretty so vibrant, like the color is just really really giving and honestly y'all when it comes to color, it's like if you really want to pull a color off, no matter how dramatic or how Simple, it may be it all. Is the styling like The Styling is, what's going to make it hot or not? Okay and honestly, y'all everybody who I see in this fall color season is really doing the same color and it's really doing the same. The same style example part down: the middle is with the body curls side Parts by I'm happy, I'm half Downs body curls like everything just been curls curls curls, with the fall color that everybody's doing so I wanted to be different. I wanted to bring some spice some, so when I sing the JT look, I knew I always wanted to do it, but I never just did it. I didn't want to do the typical red that everybody was doing or the typical jet black or natural brown color. That everybody was doing like if I was going to do it. It had to really hit and had to really pop. So when I put this wig on and I was beginning to do my side part - and let me tell you why you always go with your first mind because my first mind kept saying. But then I started you know getting a little discouraged like no because what, if nobody don't like it, let me just go ahead and do a regular side part, but then, as I was driving in the car, because I had took a little break to go pick. My niece up from school, my brain just kept saying whatever I can do - that bang do that things like say you know what I'm just gon na go ahead and do that thing? Okay, but before I even get into that thing, part y'all. I am going to do the side part how comb it out really good, because that's like the base for this look and then I'm going to you know, go in with the waxy, apply it on the front. The rules y'all know how we do um. Just don't do the amount of baby hairs like the baby hairs, that's on a wig already, because when I did this style, it had baby hairs because we're not going to do that. We'Re doing a bang anyway, but if I did want to switch it to a side part which is kind of cool like now, because I do have to bang, but you know, but I'm just creating my curved part. This is a 13 by 4 wig. So it's only four inches of parting space in that middle area. So I can't create no deep side, part or anything like that. But, however, I'm still going to apply that wax hot comb, it out um and then once I get that soupy silky smooth and everything like that, I will go in and flat iron the wig to get it nice and straight. And then I will show you guys how I created the main part foreign foreign that I will be using is from a Miami hair stylist down here, um the enhancer. I absolutely love her flat iron and goes to 480 degrees and y'all can see. That thing is smoking and giving tea. It makes my wig look super straight super silky, like by the time I'm done with this install y'all y'all would totally forget it. This is even a used wig like it's given brand new fresh out the pack, the luster, the shine, the everything all I did was just rinse it out and remember. All I did was rinse it out and just add that silicone mix like that silicone mix really does soften up your wigs use, the one that says, bamboo y'all know my baby, Jordan put me on today. I used to be using a regular silicone mix, but he was like no bae. You need to get that bamboo that [ __ ] hit different and he ain't never lied period shout out to my day, because yeah that's silicone mix, bamboo is definitely given. It makes the wig super soft super silky, like I haven't added any oil or anything to this wig. I just colored it rinsed it bambooed it, but - and I blow dried it, not even air dried below dried it, and now I'm just pressing it out and look how straight and pretty and silky this week is getting look at the [ __ ] color Mill. Let'S get into the color melt the color blend like y'all can't tell me I ain't pop, my [ __ ] on this one. If you feel, like I ain't pop my [ __ ], it's giving you a headache anyways, but but anywho I'ma go ahead and flat iron. The rest of this wig all the way around and then we're coming in to get into the bag, foreign foreign foreign. So the best part of it all creating the bangs so y'all know this look is a like a side part and then you kind of scope out your bang. So I'm just taking like my rat tail comb and creating, like a curved part, um pretty much towards the front of my head like where bangers usually go. You know how y'all usually carve it out into like a little semi-circle, but this time, when you do this in my circle, don't make it so big or don't make it don't make it where it goes so deep into the lace like just do it maybe, like Two to three inches um from the front of the wig to um like into the bang, because you really want to leave some of that hair to do that flip over look as if you were rocking a regular side part. So just look at how um I parted it out and how I still left most of that hair to be, like my side, part flip over type of look like. Oh my God, I don't know what I love more y'all, the style or the color, but baby. It'S just really really giving my this is the my by far my favorite color I ever did and I actually wore on myself, okay, but I like to go in with my eyebrow razors and you want to create a fringe bang. A fringe. Excuse me. I say a French: you want to create a friend thing, so I'm using um some fresh razors eyebrow razors to cut my bang. You can use a um, the razor comb. If you want for me, I like to use the eyebrow brace, because I put a little bit at a time and I can really control what I'm cutting and then I'm going to go in with that same um. The enhancer flat iron and just give my wig a slight bump y'all, already know how you feel no grab my bangs, Don't Miss Shirley's, no hello, Miss uh, no Barbers, Barbara bangs uh bumps, none of that nothing extra hard extra crispy, just real real life when it Was just a slight look uh, never too much, okay and um. This is like the base of it, so you know you always want to start off longer than you could gradually go shorter to where you comfortable and make sure you can see. The hair is not even taking your eyes and everything like that. So after I created my first bump, then I'm going back in with the razor and just tapping on those ends just shorten it slowly, but surely me I'm a close to the eyes. Bang type of girl um it never gave like above the eyebrows. You know how some of y'all like to do y'all bangs above the eyebrows yeah. That'S not really my thing, um, it's close to the eyes as possible, where I can still throwing my lashes and give Nikki period. Okay, because y'all know we love the Mickey bobs but um. Now that I'm done with that part, I'm just going to go ahead and layer the front of the wig when JT had this look, she did have layers in the front Okay, so I say you know what let me go ahead and add some little light layers. Still, once again going in with that eyebrow eraser and just ain't gon na angle, angle, angling, angling, it down okay and once I do that, once again, go back in with the enhancer flat iron, give it a nice nice little bump. No Barber, no Shirley, nice soft, tap the ends, okay and then we're going to continue to flat iron, the wig and just really play with the style book. But how y'all feeling about this? What we doing again, we dropping Flames, or we dropping leaves like what are you doing because I killed this, but I need some suggestions y'all. I also need my beauty to tap in with me um. First of all, if you've been watching this video all this time and subscribed yet go ahead and hit that subscribe button and give this video a thumbs up like right now, imma give you five seconds. Thank you. Okay, so y'all should have had enough time to go ahead and thumbs up drop a plane Drop a lead subscribe all that okay, but uh like I need some suggestions Beauties. What is some color ideas? I could do for the third episode of The Follow Me series, because right now, I'm just falling for myself y'all all these colors y'all know we came in with the um, with the vibe with the um. You know the fall color highlights on Mika. Now I'm coming through with the raw ombre JT look, you know what I'm saying like it's giving. So what should the third look? Be? The third color drop me some. You know some ideas down below what y'all want to see. Let me know: what's tea, which I want to see what colors y'all want to see in this fall series, because we got about four more episodes left. So let me know what y'all think. Let me know how y'all feeling about this look, this color overall, we drop them, leaves we dropping Flames, that's what we doing y'all, but yes, get into it. Okay, super pretty hairy, soft ombre inspired is giving layers lit. Bank is raw. Like I, ain't gon na lie. Y'All after I'm finished with these, I might have to sell these weeks to y'all, because I need somebody else to share this slate with me, but real for real, like I might go ahead and throw this in a refurbished wig cell and let y'all catch the tea. All right, but here's, the final look: I'm gon na go ahead and give y'all a 360.. Yes, normal speed turn around. I haven't all wet, but I should have probably all black to make it pop, but it Wiggles, I'm gon na get y'all that 360. Let y'all catch a tea, the colorful, it's the color. For me, the sleekness, it's the movement, it's the yeah y'all stop playing thank y'all for watching episode. Two y'all know three is on the way. Let me know what y'all want see. Y'All next time don't forget to like comment and subscribe once again:

Comments
SlayedBy Jordan: You definitely did that
lneal2800: I already know this is gonna be a bomb slay!
MrsQueen LadyRed: I loved everything about this install
ItsNeicy: It’s the no Barbara, no Cherly that keep taking me out You did your thing!
Janee Bivins: This color looks so beautiful on you boo ❤
Shell Shell Beyond Beauty: Love the colors. Not sure if I could pull it off but it won't hurt to try.
chicdede9534: You killed this look
cici5164: You really are the goat! Self made! ❤❤ I’m going to have to come to Miami to get my wig slayed!
Kimberly Smith: My good sis alway has a ass slay for us let’s go sister slay u got me liking bangs Shay
All About The Hayes: Love it ❤
ItsNeicy: So when are you and SlayedbyJordan giving a tour?!?! Y’all killing the game!
Kimberly Clark-Christian: This is absolutely stunning , how about doing this color in reverse
Pretty Kimmy: I love this ❤
Christine Zapata: You murdered this look sis
The Glamorous One: You should do a ginger color ❤
Verel Smith: It’s super cute without the bang
_Vanntastic: It’s giving tequila sunrise.
Shea Baee: That's so fire
nikkistayfocused: oooohhhhh just so pretty ♀️how about a wig with some browns ombre shaye✌
NETTYD39: Green .. dark greens ❤️
Divine_Cosmetology: ✨
Brandie Riggins: Flaming!! You know you did dat!!
Latanya G: Reese’s peanut butter cups for Halloween sis
Shaniece Juel: You should try a hunter green color next time
CiCi La’Beth:
Alisha Jones: This is soo hardddd ❤️❤️❤️
QUEEN OF BEAU TV: OMG
QUEEN OF BEAU TV: ❤
Moodahh King:
MrsQueen LadyRed: Third should be green and yellow and brown
deseraymiles87:
Kandise White:
Miranda Brown:
#MadeInDesignzSlay:
Sammy Da Goat: Fiiiirrreeee Color Lovely Thumbnail
Trin Dinn: Slayyyyyy
clarissa howell:
Shaletha Quenton: Good morning ☀️☀️☀️
Shaterika Hall: Name of flat irons plz?