All Run Hair - Amazon Wig Review
- Posted on 05 January, 2021
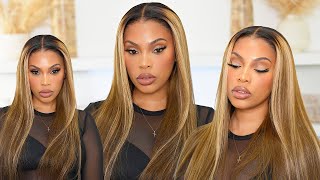
- 360 Lace Wig
- By Anonymous
Welcome to my channel. Thanks for tuning in. Feel free to like, comment and subscribe. To know when the next video will be posted remember to turn on the post notifications.
To install this wig you will need:
Got to be freeze spray
Rat tail comb
Ghost Bomb
Wig Cap
Water Bottle
Brush
Razor / Scissors
To Bleach the knots:
Bleach Powder
Developer
Brush
Bowl
All Run Wig: Human Hair Kinky Curly Wigs with Pre Plucked 4X4 Lace Closure Natural Color(16 Inch)
https://www.amazon.com/dp/B08HYZGCF5/r...
Follow me on social media
Instagram / TikTok @__jnelly
Twitter @janel_lowman
So if you guys like want other styling videos, like me, straightening, hey guys welcome to my channel um today, i'm doing a review on all run hair on amazon, and i have my little cap on i've not done my ball cap method, yet um i'll be doing That off camera, i just want to do the unboxing first and come back on camera installing it and everything. So if you need, i, like another bobcat video feel free to comment below when i post the updated video, but it should be on my page somewhere. If i can find the exact video i'll, add the link somewhere here and so look, this came so quick order on amazon. I'Ll put all the descriptions below this is actually 16 inch lace front closure. So this is the packaging i'm not even gon na lie. I ordered a few more because the cell was so wonderful for black friday and everything, so i purchased it during then to show you guys now, because i'm just so excited okay, so so inside the box, i got more ball caps. I never need to have so many of those this then here's, the actual wig. I forget what density it is, but so far no shedding. So that's good. It smells fresh, and this is the lace you got clips here and two on the side, one, the back and the adjustable strings. The lace kinda already blends right to me hold on. I think i probably will still bleach that i'm gon na do that off camera. As well and then once i bleach the knots, oh yeah, it came pre-plucked. If you can't tell hold on, came pre-plugged, i might plug it a little bit more because, like i like my thing but i'll show you guys it look like before i plug in everything. So i'm just gon na put it on real, quick, always pull my cap back someday. So i will be gluing mine down personally, because if i can take it on and off, i will happily snatch this bad boy right off like i need something. That'S going to stay, oh, i might need to poke it no more a lot, but i might do a little bit more, just a little like the front, but that looks good angle a lot and it's like really sturdy hold on clip it in there yeah. It'S like really sturdy. I, like the curls like and stretch length, i've got a little shedding this one two of your foggles, but this is cute. This is like very cute and, like i said, this is the 16 inch and then i also bought a 20 inch. So if you guys, like one other styling videos like me, straightening this or curling it like buttoning it like big curls, let me know i will totally do that for y'all. But like i said this, is it right here and it's only a closure but like if you wanted to switch the part you can put like somewhere over here right here and look at that oh light, like that? Okay, so yeah, it's not too bright and bright. I don't like confuse me: it's not too heavy and it's not too thin. It'S like the perfect consistency for me, honestly so yeah, because i'm a little bit more along the lake like the lines, don't like it too thick and i'll bleach it a little bit more. Just to get it where i wanted it, but if you don't want to do all that, as you can see, you don't really have to. I miss a little extra and i just want to see what it looked like if i bleached it, it says like already plugged everything, but i want to see what it looks like when i bleach it more. Like i said, i bought other wigs from this company listed below, but i really just want to see like did. I have to go that far at the beach takes and everything so i'm gon na pluck it first then bleach it i'm doing my ball cap as well. So, if you guys have never did the ball cap method you want to eat, got to be some ghost bomb. I love ghostbum, some scissors or eraser, and once you lay the bad boy down, you want me some mousse and a scarf. Oh yeah. I need the tweezers so hold on here. The tweezers are the plug, so i'll be right back and stay tuned until then, like comment subscribe and move back momentarily okay, so i'm back so i recently bleached the knots and washed away, and i did my little ball cap method. I did a little rush on this one. Just ain't gon na lie so now i'm about to see how i installed the wig. So first i already put one layer of glue right here, but i'm about to put two more, so you just get the glue and then place it along the line. Put a few dots like that, then just make sure the even layer across so that your wig has something to stick to yeah. I know a little off center because i didn't really want my um direct middle part. I want to be a little off just like that and then once that dries, i'm going to put another layer on, and you know it's dry when it's clear right now, it's very white! So let that be, and while that's drying this is actually how much i plucked i'll show you so i'll put a little bit more down center i'll fix it up. Once i put on my head and then i made the line across the front a little bit thinner, so it looks more natural when i put it on so that's almost there just a reminder on what you actually need to actually place all the way ignore my Snoop dog breaks and jump those in real, quick. Just like that, you need a scarf. You need your wig, your glue. I use a rat tail comb. I keep this on handy. You can do this. Breaking scissors is pretty much your comfort zone. This is way easier for beginners, because once you clip this wraps - and this gets you a little bit closer to the line and then i'll keep tweezers just in case, i got ta pluck a little bit more, then some mousse and spray. So that looks clear. So i'm gon na add another layer now and off camera. I already cleaned my forehead off and everything so make sure that you clean off the alcohol or soap and water just to get all the oil from your forehead. So the install lasts longer, and i kind of like measured how much um cap i was gon na need for my head by looking at it. You can use a ruler, a measuring tape, whatever makes it easier for you. I wasn't trying to make it perfect, because i usually change my hair quickly anyway, and i personally like to reinstall it every one or two weeks, but it does last longer than that. So when i'm trying to take it off, i use water and alcohol to loosen up the adhesive and then carefully remove it. I'Ve got to shake it off because that'll mess up your hairline and pull out a little baby hairs. So let's get this a little dry. Okay, so while that is still drying, i'm still going to try to listen back my head, so just tucking on my braids in right now start pulling it forward a little bit see i did a good job measuring it and then, when you're, laying it down make Sure you use a scarf leave that on there for a few minutes, just to make sure it is down, and then once it's set for a little bit, then you can go back and cut it. If you try to cut it, while the glue is still kind of wet glue, this clear still sticky it ain't fully set. Yet so once it's like down, wait a few minutes and then cut it. Otherwise it's going to go key annoying any guppy glowy. So that's about good enough for me and then i'm putting pull it down to where you think right you see. Sometimes i do have to cut it, but this one is good. Okay, so that's there. Let me use the back of my comb to make sure that so it you can see. Mine is off center because that's where i wanted it see i'm just making sure that it is glued down. So it's okay to comb that um curls out we're just making sure that this thing is secure. Like i said, all you got, ta do is add some water afterwards. So here was the original part right here, so i might move it over we'll see. That looks like scalp. Don'T worry about how fuzzy the top is that just for me combing it for when i was plucking it and everything, but once i wet it and everything look at that, is it me or is it giving you scalp vibes? Okay? So i'm let it sit a little bit longer and then i'm going to my pluck a little bit more we'll see here's my scarf. I got this card from amazon as well. This make sure that thing is tight and i mean tight and secure so i'll. Come back in a few minutes once this is secure and i'll show you how to put it be back okay. So i'm back look at that secure! Okay! Sorry! I got really excited so i'm gon na use this little razor and cut it. I don't do it all the way first, just because i want to see how close i can i get. I may sniff a little bit first, oh here that will allow me to cut across. Like so and same thing, i don't want to cut off too much at a time cut off a little bit more so now you guys can see why i plugged it more by plucking it more. It gave us this illusion of actual, like hairline. I could be real, hair will look so that is why i bleached it, and i also colored it so now. Okay, so it looks so frizzy like i said: i've been manipulating it a lot. So there we go. Oh combed it across look at the scalp. All right, so i'm gon na give you something baby hair, so swim. Do you get a little thin line like this? Just like that and you get the razor and the same thing other side a little bit of mousse a little bit of freeze spray. This is only a frontal alkaline, my real baby hairs too, as brush head brush and if i told you about that but you're needing the edge brush too. Okay, now i'm about to just wet the hair. So i get that natural curl back, see it's going backside with a little bit i like to put a little bit of mousse, where my part is as well just to make sure that i think it looks nice and flat. This is where i just go in and manipulate how much it's actually being laid. Then the hair can go in front of it. Just like that. It'S the scout for me so far, i'm in love with this wig. Of course, i'm shedding a little bit more now because i plugged the part and baby hair. So so this is the final product. It'S my part, look how natural seamless that look! So this isn't like after i bleached it and i'll insert the before again. In case you forgot what to look like, so just that little step, i made a big difference like i'm in love with this wig and i'll insert the description below remember. This is 16 inches, but it's curly, so stretch length will be 16. and i already bought two more wigs like i know i was gon na be in love and i also put their instagram and social media in the description and other questions or comments feel free To leave them below, i always try to get back to everyone as soon as i can, and if you're reaching out for me, do it if you're complete, feel free to dm me message me whatever you have i'll be sure to get back to you, you

Comments
Nadia Fryar: How’s the hair holding up now?
ALLRUN Official: Thank you so much dear,
Guiliano Visuals: