Perfect Water Wave Lace Front Wig | Amazon + Glueless Lace Frontal Wig Install! | Vivi Babi Hair
- Posted on 14 November, 2019
- 360 Lace Wig
- By Anonymous
WATER WAVE LACE FRONT WIG | AMAZON + GLUELESS LACE FRONTAL WIG INSTALL!
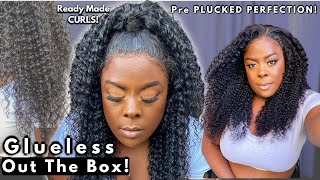
You guys! I tried a glueless lace frontal wig install for the first time using this water wave lace front wig from Vivi Hair Babi an Amazon wig brand. This hair is so soft, easy, and manageable! I did not have tangling issues recording this video at all. I could easily run my hands through this hair. I did not experience any real shedding either, and the cap fir my head great. Now that I've finally tried a glueless install I think it's a great wig install method for beginners because you can happy slap all the mousse you want on your forehead without worrying about glue/gel residue! Also it doesn't require the same precision as required with glue gel. I personally don't think it THAT much of a difference between mousse and gel.. or at least freeze spray.
Full Detailed Wig Install Tutorial Video: https://youtu.be/s62UCKCl-R8
Wig Details:
Direct wig link in the video: https://amzn.to/2m6AVbn
Hair details: 13x6 Transparent Lace Front Water Wave Wig 150% Density 18 Inches
Brazilian Loose Deep Wave Wig: https://amzn.to/34goP03
Brazilian Water Wave 3 Bundles with 6x6 Transparent Lace Closure: https://amzn.to/31QsaBs
Brazilian straight hair 3 bundles: https://amzn.to/2Msnpsj
Brazilian Body Wave 4 Bundles: https://amzn.to/2M5RiQd
Email: [email protected]
Follow @vivibabihair on Instagram: http://bit.ly/2qxQIm1
Shop My Amazon Store: https://www.amazon.com/shop/xoxosheba
NEW TO YOUTUBE? PICK UP MY GUIDE TO REACH 1K AND GET MORE VIEWS: https://mailchi.mp/ad7b5933b0ee/new-yo...
Serious Business Inquires: [email protected]
Follow Meehh:
Twitter: https://twitter.com/XOXOSHEBA
Instagram: https://www.instagram.com/xoxosheba/
Intro: "Say It x Sam Ward https://soundcloud.com/samwardgotit/sa...
Guess what you guys I'm going to attend to do my first glues install for the first time ever using this hair from VV baby hair. It is the water wave unit and it's already got the elastic vent in. So that's awesome and it's got two cons on the sides, one in the middle of the wig which we're gon na get rid of, and it has one in the back as well. So I'm gon na go start by taking that middle comb out cuz. We don't need it and to make this process a little bit easier and quicker, I'm going to go ahead and just spray tan. The knots as you've seen me do if you watch my videos, I'm just gon na use the spray tan from Sally Hansen and then once that's fully covered, I'm going to go in with my three sprites who seal in that product you know just all over and Then once that's done, I'm gon na use my blow-dryer full blast and cool to speed up that drying process took me about two minutes to do that, and then we've got some tan lace and fake bleach knots, but we ain't done yet. That'S not enough. We have to go pluck this real, quick I'll, be right back and now I'm back with some plucked knots. I did that off-camera this time, but don't worry. I have a full detailed video on how I customized my wigs that'll be in the description box. If you want to see it so I'm putting on my two wig caps, because my hair is very thick and it's not braided. So I need that and when you are putting on a wig with an elastic band, you want to put that elastic band on to the back of your head first and then put the back of the wig on your head. You can customize like you. Don'T really would so I'm going to just touch it up just a little bit on my head, even though I customized the hairline off-camera on a mannequin head this time just to try it out, since I usually do it on my head and it came out pretty Good, I have to say not that, but this week actually does come with a lot of dips and grooves in it already, so that was good, so we're gon na start by cutting off by the ear. We have to do that. We just you got to do that first, because the wig by your ear, it makes it easier to pull like the wig forward. Once you cut that part off like you're, seeing you do right now so again, if you want to see that in detail, click that video to watch my full detailed, install tutorial, but basically I'm just cutting and behind the ear. So that way the wig is situated behind the ear and then, when I pull it forward to fit correctly, while I'm installing it won't be hard in same thing for the other side, so guys now, let's start installing this, like normal totally forgot, I was supposed to Be doing glueless totally forgot, so, let's get with the moose, then this is what you want to use when you're doing a glueless installed and I have to say doing this process. I think that it's just as easy or hard as using like gossipy glue free spray or got to be glued, but that's me so you are cutting off the lace first, which is not something I normally do so we're gon na cut that off and I'm just Following the dips and grooves in my hairline, even though I am using scissors this time, there's no rhyme or reason why bees and scissors it just felt a little bit easier since the way wasn't already glued down, and then I'm situating the wing making sure it comes Past my hairline, but not too far, past my hairline and then this part is like you know just me personally because of where wig sit on my hairline. That piece of hair is like the only part of my hairline that comes out too far, so I usually just blend that in with my wig. So I'm separating that to go ahead and you know get it ready to be slicked put a water on it. Get any product I had off of it and again this is just a personal thing, because the hairline comes a little too far on the sides. So if you are that problem to you, this is what you can do and all I do is slick it with some gel or something so it blends in with the rest of the hair so now getting into how you install with the mousse. It is a lot easier to apply because you just have to put it on like there's no real precision you have to have or anything you just slap the mousse on your forehead. So I do think in that aspect. This is a lot easier than trying to use glue or gel I'm trying to lay down those pieces that are like a rolling up on me. That is definitely something you will find a lot of with knees. It'S because it's not tacky. You know mousse isn't really like something that gets very tacky, so the Maja's is rolling up on that in front of that leaks, I attempted at first to add baby hair. It didn't go so well at first cuz it kept rolling up the lace cuz. You know. It'S not stuck on and I'm just like, I'm just it's not working, I kept trying, but it just wasn't working so I was like well. Maybe we just see if I could do this foolish without baby hair and don't think I'm like using the got to be to like secure the wig down, that's literally just for my edges to select them. So I went ahead and just put a scarf on without adding any baby hair first, even though I'm like most videos, you see they add the baby here and then put the scarf alone, but it came out pretty good. You almost don't even need to add any baby hairs and pluck it right like the lid right. So now I'm just going into styling and I decided to go with the middle part. That'S just what I was feeling and I did it kind of gon na flip over with middle parting. So it's kind of short of a part, but the part is actually a 13 by 6 frontal, so it goes really far back even farther than I'm even using it. I'M using my hot comb to help me set my part in place. I kind of want to set it so where it's still big, but it's like setting in the part that I have it in. If that even makes sense, if not just watch what I'm doing - and I did it to get the style you see so now that it is dry, I did go again and try to add baby hair and it was successful. This go-around, I didn't add a ton of baby hair. I just wanted something slight, just cuz, I felt like you kind of can't tell on camera, been in person. I did feel like it needed just a little bit of baby hair. I don't know if that's anything to do with the way it was installed, or maybe it was just me just wanting some baby hair, but I just felt like I needed just a tad bit. I don't know just because I don't apply it glueless, often or something like that, but I definitely found it easier to add the baby here after the week had dried to my head and then after that, I'm just brushing out the rest of the hair. I got to that point because, when I brushed out like the shedding for me plucking it it got big and I liked it so we're rolling with this, so I'm fluffing it out and kind of getting it styled the way I want it to fit this big Hair, look I'm also adding some long layers to help me shape the look. I'M actually using got to be gluten-free spray for what it's intended for hairspray to help me set my hair in the style that I you know wanted to sit in and then I'm pulling that comb on it to help me pull the hair back. So you know I can pull it back, but forward like it's going right now and then there you have it. That is how I put this wig on glue is okay, it's not too bad, I'm not mad at it. I don't think it took me. I don't find it any harder easier than using the guts to be glued or anything like that definitely easier than using glue. It is a tad easier. I will say I know that's contradicting because you know you should just slap it on your head, an entire scarf down versus having to be precise, but other than that, I'm not too bad. I like it. So if you liked this video go ahead and like comment and subscribe - and I will see you guys in my next one thank you - bye
Comments
Katerica Stephenson: You did that
XXX Xjack: But I've bought wigs from this company, and they're not as good as the doubleleafwig I've bought
catmo59: 10thumbs up for not doing the wet look
XXX Xjack: U are so beautiful