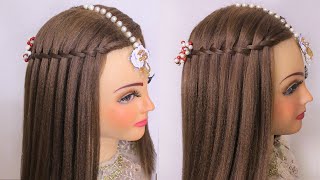
Live With Pam! Gorgeous Half Up Half Down Bridal Hair Tutorial!
- Posted on 12 November, 2020
- 360 Lace Wig
- By Anonymous
This week's live tutorial is another gorgeous and textured half up half down bridal hairstyle. This style relies on solid hair prep to create a perfectly placed cascading style, which looks gorgeously loose but at the same time is secure and will last all night! Master the techniques and learn the hairstyle with Pam - live!
Visit https://www.createbeautifulhair.co.uk/... for more information on learning with Pam.
Links to the products used by Pam (where available):
Big Sexy Hair Play Dirty Spray Wax: https://amzn.to/3g7oVwA
L'Oreal Infinium Extra Strong Hair Spray: https://amzn.to/2wQ5b08
Goldwell Style Superego Structure Styling Cream: https://amzn.to/31IoFiq
L'Oreal Elnett Hairspray professional: https://amzn.to/3dfXoZV
Silhouette by Schwarzkopf Super Hold Pump Spray: https://amzn.to/3eS2s7J
Want to master the art of bridal/wedding hair and learn with Create Beautiful Hair? There are many ways to learn with Pam:
1. Join our Habia approved award-winning online bridal hair course, learn from home and submit work directly to Pam for assessment and feedback as you work through the models; receive as much support as you need! Complete the assessments and receive a Habia approved CPD certificate upon completion of your bridal hair training. We have a 50% off offer on the full subscription (use code HOMESTUDY at checkout), or join from 9.99 per month on a view-only basis. Click for more information: https://www.createbeautifulhair.co.uk...
2. If you are in London or nearby, enquire into private Bridal Hair 121 tuition for yourself or for a salon! DM for more information on private courses!
3. Check out more of our YouTube channel for a selection of our freely available tutorial...like and subscribe for more information and updates, YouTube link: https://www.youtube.com/channel/UCDKU...
4. Join us on Facebook for more tutorials and all things bridal and wedding hair!! https://www.facebook.com/createbeautif...
Whichever option you choose, please do get in touch and share your fabulous creations and suggestions on what you want to see next!
We've got it covered . . . we even have tutorials covering the curly girl technique!
Great for fans of natural unintentional ASMR!
We've got it covered . . . we even have tutorials covering the curly girl technique!
Hairstyle tutorials include: hair prep, hairstyling and hair up, braids, blow drying, curly girl techniques, working with different hair types, hair textures and hair lengths.
Create hair up & bridal hairstyles and become a bridal hairstylist, with Pam Wrigley, UK Wedding Hair styles of the Year
Just SUBSCRIBE & LIKE!
We'll also teach you how to blow-dry with videos on curly blow dry, Victoria secrets blow-dry, short hair and smooth & sleek blow drys.
We've got it covered . . . we even have tutorials covering the curly girl technique!
Great for fans of natural unintentional ASMR!
Hairstyle tutorials include hair prep, hairstyling and hair up, blow-drying, curly girl techniques, working with different hair types, hair textures and hair lengths.
I'M going to show you how to create a beautiful soft textured hairstyle that one of my students eileen. We have an online training course and eileen is sitting the exams at the moment and eileen sent this particular style in her. I think it's her daughter, her granddaughter is having a formal, so she's been booked to do hair this particular style for a formal now where eileen is she's in australia, so she's lucky that they can actually still have parties not like us here in the uk and But this is the style that she needs for her client um, for a formal that that she's going to be going to so i thought i'd show you how to create this style tonight um. Now, if you have any questions as we go through the tutorial, please just type in your questions and my beautiful assistant, just off camera will read out your questions to me and i will do my best to answer i'm working with a mirror just off camera here. So if you see me looking slightly to one side, that'll be that's why, and i find it's always really helpful when you're creating hairstyles for any special occasion. It'S always really helpful to have to work with a mirror, because it gives you a different perspective on the hairstyle and it allows you to kind of step back and see what you're doing without actually stepping back. So i mean i definitely would recommend recommend try giving that a try, so tonight's hairstyle, as i say so, tonight's hairstyle - is going to be this particular style that eileen asked for and she's going to be doing it for one of her clients for a formal. So i'm going to show you how to do it, so i've already done some hair prep. We'Ve got some beachy waves in the hair here and a little bit of kind of textured height, which we have um. We have covered on previous tutorials and we do have them on some of our youtube tutorials, but they're actually in more detail. If you want to know, you know, get the breakdown to how to create these specific pc sections. We do have all that information on our online bridal hair course and where i go into detail and you can get kind of hd versions of the of these all these videos. So you can see close up and in detail exactly what i'm doing. But i've created a little bit of textured height here with a little a couple of little twists, just picking up the hair from the side of the crown taking it over with a twist and from this side. So really that's kind of the foundation of the cell. Once you've got your little beachy waves in the hair, this practice head does have some extensions clipped in just to give her a little bit of extra body and a tiny bit of length. Although you can might be able to see, can we see the bottom of the hair yeah, so the length of the hair on the practice head is actually more or less the same as the length of the extensions, but what the extensions do is give it thickness And volume, so i think you'll find if you're working with a practice head. It will make a big difference. If you just can clip in a few extensions and if you're working with a dark, haired practice head, then adding a few extensions, maybe in a slightly different tone, as i have here, will give a bit of depth to your style. So when you take your pictures, they'll look fabulous. Okay, so don't forget. If you have any questions, please just let me know you can type your questions in and my beautiful assistant will read them out, don't forget to comment and like and subscribe if you're joining us on youtube. We do also put these tutorials out on instagram and facebook, but we'd love our youtube, subscriber youtube watchers to subscribe and don't forget to hit the notification bell. Okay. So what i'm going to do here is basically i'm just going to pick up a little bit of hair at the side here. So i've got two sections of hair and i'm leaving a little bit of hair down at the front here. So we've got the part. Let me just clip that away this hair away, so you can see where i've already decided, where i'm going to part the hair for this style, but we're going to take two sections of hair and you can smooth this down a little bit if you want to. With a bit of curl cream or your structure cream, you know if she's got any flyaways in the hair or even a little bit of hairspray and i'm just using the elnette um. So the l'oreal infinium stronghold hairspray, because the hair on the practice head is kind of coarse, so it needs a quite you know. It just needs a little bit more taming. So i'm going to pick up just two sections of hair. Be careful when you pull the hair back when you're doing this kind of style, you want to kind of keep an eye on your client's kind of hairline, and sometimes, if they've got quite fine hair at the front, you don't want to kind of be pulling it Back tight, so i want it to look like the hair is all soft and beautiful and there aren't any kind of patches of scalp visible and i'm just going to create a simple twist in the hair. Now, if you want to, if your client had layers in her hair and you found that it was kind of you're running out of hair a little bit here at the back, you could always add a little bit of hair from beneath to that section to the Bottom section there so there's the section of just this is the section i'm going to add and it kind of helps you to thicken the twist as you bring it back. Let me just come forwards a bit, so i don't want to do too many twists. I'M adding my section of hair and twisting and depending on on how thick you want your twists to be, it will dictate dictate how much hair you can add. But you might you want to be careful, because i mean i can be quite generous here with the amount i pick up, because she's got the extensions in so her hair is quite thick, but if your client only had thin hair, then i would probably recommend not Picking up too much hair from underneath or you might be in danger of making it look a little bit thin and sparse, and literally all we need to do when we've created this twist is just loosen and pull so with the hair prep. I have actually put some salt spray in the hair and what you can do here and the salt spray just means it's. The hair isn't too soft so that when i do the little pull out it kind of separates nicely and it holds its shape. So you can do some hair prep, maybe with a bit of mousse at the root and salt sprays through the mid lengths and ends, and then you can see i'm just pulling that simple twist out and using a fine pin, i'm just propping the twist up. As i go along where i want it to sit, we'll move those pins later, but just for now now you could do a tight twist, but i think if you do a tight twist, you'll get lots of kind of loops and we actually don't want too many. So kind of it's almost doing fewer twists, but pulling them out and making them look bigger. But it is a really beautiful style and if you've got that salt spray in the hair, then when you pull out the twist it holds its shape beautifully and then here at the back, i'm just going to use the bobby pin underneath my thumb. That'S it to hold that in position, so once you've done the prep, it's actually quite quick, this style. So i need to turn around now. Whoops over to this side, make sure i can still see what i'm doing in the mirror. Okay. So here now you can see the extensions they're a slightly different color, and actually you can i'm not quite sure if you can see, but i've got some little pins in the hair here, because i want to hold this hair back in position. If i move this, you can see that root of the extension there, so that might not be the root of the extension when you're working with a client - it might just be. You know a bit of hair, that's kind of going coming down, but we almost want this if there's a little area here that you want to cover, i almost want this to look like it's flowing backwards, so i don't want this to kind of come down. So before i start with my twist, i'm just going to use this and just pin it back, and sometimes i do this if i i'm just going to pin it in position, so i can then do the twist, and i know that it's this is all going To be covered - and it won't kind of it won't look odd when i finish the style. Sometimes i do this when i'm creating a kind of maybe a dutch braid or a lace braid at the front here, because if i don't want the part to show, i can just gently sweep some hair over, so i can then create the braid take out the Pins later because it'll be in position over here and then you've kind of you're then not struggling to go back on yourself and kind of correct a gap in the hair. So it's all these little things that will make your life as a bridal hairstylist, much easier. So we could smooth this down. You could, if you wanted to use a little bit of your um creative texture cream, if you feel you need to if the hair is quite fine and um. To be honest, i probably wouldn't use this if someone had very fine thin hair, so it might make it look a little bit greasy, but if she's got quite coarse hair and it and it's fly away, then you'll find it'll do a great job. But if it's quite fine and thin, then you think you'll probably find to be able to get away with a little bit of hairspray or even some style and care lotion. So here we go with our little. Let me just get my brush here, because i just want to make sure before i come into this braid this twist just want to make sure that the hair is smooth and tangle free decide how much hair you want down, and you can start creating your twist And we can come back and kind of loosen this little bit down. I mean when you're working with a practice head. Sometimes it's not kind of you know the hair's kind of punched in in a certain way. So it's not easy necessarily to get the front to look perfect, but you'll find it much easier. When you're working with a client, the hair will be kind of will move a bit more easily and you'll be able to um be a bit more creative. With your front sections and she'll probably have layers cut into her hair, so here i'm just going to decide if you want to pick any little bits of hair up. I have to be careful here if i pick any of this hair up, because we've got the extensions underneath and it. To be honest, i think it kind of shows too much of the different color, so kind of always have an eye on not just on the twist that you're creating, but on the rest of the style and make sure if she's got highlights in her hair. Just make sure that you, like the colors that are showing in here, do we have a question. Yes, um camilla would like to know if someone would like the fringe to sweep over how you've done it yeah, but they don't have a lot of hair. Would you add extensions? How would that work good question? You can add extensions at the front and you probably need to kind of have add them at a bit of an angle here. So rather than horizontal the extension i'm just wondering if i've got an extension here. I don't think i have the extension would sit at an angle here, so you kind of have a little parting at an angle. The extension would sit at an angle, and you probably just need to pin do a little kind of single clip in extension and then, when the hair comes down and over you can hide, it will hide the root of the extension. So we do have some of those tutorials showing you how to work with extensions at the front of the hair on our e-learning course, so you can do that. You just have to be very careful that the root isn't visible at all. That'S a great question. Thank you, camila, okay, so i'm gon na just keep twisting hair's getting a little bit thinner at the back here. Imagine she'd got a few layers, so i can pick up a bit of hair underneath and keep twisting, and you know you don't almost don't want too many twists here. So we look at this style. There are just kind of one two three twists here. So don't kind of get carried away and do lots of little twists, keep it unless that's what she wants. But if she's kind of asked for this style, it's kind of, i would say it's less - is more and then we can loosen. Let'S get some pins ready, be ready to pull some pins in as you need them now. You might find that you have you find the twists on. One side are much easier to create than they are on the other, and it's not to do with hair. It'S usually to do with whether you're left-handed or right-handed, and sometimes it's just the way you work. So when i'm doing these twists, i have to say i find the other side much easier than this side. It just feels a bit less natural. It doesn't flow as easily for me on this side. So if you're not sure what you might find you do, i'm just pinning these up a little bit. That'S it what you might find you need to do. If you do your kind of weaker side first is do when you do the stronger side. If you've, oh - and you realize this side is actually much better, you can always go back and undo that side and redo it, and you might notice on this twist. I'M only really pulling it out from the bottom, not from the top, so it's just kind of getting this. It'S almost like a an upside down wave in the hair and just keep going and that's it and what you might need to do. I mean i have already got these lovely beachy waves in here, but you might need to do what you could do. Is you could kind of create this and then come back and do the beachy waves? If you find that you know it's looking a little bit, you know they're, not quite as perfect as you want them to be. It could be any kind of wave that you that you might do or curl i should say, but i think the beachy wave actually lends itself well to this style, because we've got this kind of lovely kind of wave in the hair. So maybe if she was having a wedding on the beach in barbados, this would be ideal. So here we go. I did a beautiful wedding in barbados. Actually she had and they would get him out on the beach and she had um fishtail braids, a few fishtail braids woven into the style, just to kind of you know, give it that beachy feel to the hair. Okay, i think we're almost there sapping that in and you can come back just check, there's a little. Let'S pull these pins out and see if everything if anything needs moving, i think they need loosening just a little bit, so i am working with a mirror just off camera, so you can see me looking to one side, and this also here needs a little bit Of work just make sure - sometimes i find these styles can look i'll just correct this little bit here. Sometimes these styles, let's turn her around you get to the end of the style now and now's, when we need to kind of make sure that everything looks gorgeous. So you might need to come back and um. I need to just pin those in a little bit come back, and maybe you could pop some little pins along these kind of section along your pc sections here. If you wanted to give it a little bit. More definition, or let me just pop a little bobby, pin here, because i think this could do with it's a little. Can you see this kind of loop here in the hand? I want that to lie a little bit flatter, so i'm going to go in and pop her pins in here. So sometimes i say sometimes these the finishing touches better. The finishing touches can take a while. So you need to make sure that you're kind of not in a rush when you're working with your bride with your clients and make sure you've allowed yourself enough time to finish the style properly, because these textured styles need time at the end of the style. Just to make sure you don't have gaps in the hair where you don't want them and it's always a good idea to take a picture. So i don't like that little bit there. It'S a good idea to take pictures of your styles, because you'll find you'll, see things that you don't see when you look with your with the naked eye, what i'm going to do here? Actually, because i think what i need to do. That'S that little extension. That'S creeping through, so if this were my bride and i was doing a trial for her i'd make a note to make sure before i started on my twists that the height was perfect and i definitely need to be a little bit more careful here with the Extension should this happy happen on the wedding day: don't despair, because if she has some hair extensions, hair accessories, they might just come to the rescue. So here we might just be able to kind of pop an accessory in, and it might just help us to um disguise is a better word than hide. It might just help us to disguise any little imperfections. Are we in the right position with the hair? Yes, yeah, okay, so make sure you've moved any pins that aren't that shouldn't still be there, you can take them out or you can push them in now. We are going to do a more in-depth version of this style for our online training course. If anything, if you can't quite see anything properly, don't despair. If you are a bridal hairstylist and you want to learn, get more information. You know more in-depth information on how to create these beautiful bridal hairstyles, and you can always join me online. We'Ll put a link in the bio, so you can see find out how to get more information on creating these beautiful bridal hairstyles as a job and get paid to do it, and i have to say it's: i love doing hair and makeup and working with brides. It'S a fabulous job to do everybody's happy, putting on fabulous dresses and you're working, fantastic venues, there's nothing not to like, and the thing is when you know what you're doing and you've got your timings worked out properly. It is stress free. This needs flattening down a little bit, but we need to kind of come back this hairstyle. As i say you do - need to allow a little bit of extra time to perfect the style, but there we go. We have our beautiful kind of beachy wave hairstyle with our hair accessory in the hair. We'Ve got our waves here, a little bit of kind of textured height and a lovely soft wave at the bottom. So i hope you've enjoyed tonight's tutorial and if you have any more questions, please just send them in don't forget to like and subscribe and hit the notification bell. And if you have any styles that you would like to learn. Please send in your styles to me and i oh look. I can see a little bit of the comb here, so i need to push that in further and that's where the mirror comes in really handy. But if you have any styles, you'd like to learn eileen sent this into me earlier and if you have any styles you'd like to learn, please let me know and we will book them in for a future tutorial, so stay safe and i hope you can join Me next week and i look forward to seeing you then okay thanks - take care bye,
Comments
April Mason: This is very informative and also calming. Love it. ❤️
maery wi: Very informative, many thanks!
Arielle W: Her voice and the way she says hair just makes me feel soothed I love the video
LYD VINCE CRUZ: Simple but yet beautiful.Thanks for sharing.
Natalie Sully: Looking great Pam !
Molten Vanilla: Nice tutorial. Thanks!
Jasmine ALvarez: When you wrap the twists around the head do you twist all the way around the head or you just pin in the ends into the previous twist?
Julie Rosas: Hi love your technique. You referenced how to create the base but which video is it?
Desiree Gaure: Is there and way I can get the picture of this hairstyle so I can show my hairstylist for my wedding
Alexis Loudermilk: What kind of salt spray and mousse did you use?
chutterball: ❤️❤️❤️
Rabia BA: Where did you purchase the mannequin head from?
zubaidatariq: Where i can get this mannequin ?