Versatile Quick Weave |High Ponytail, Middle Part, Sleek Ponytail Ft. Beautyforeverhair
- Posted on 16 March, 2022
- 360 Lace Wig
- By Anonymous
●▬▬▬▬▬ #BeautyForeverHair ▬▬▬▬▬●
☛Get $20 Off Use Special Code: beautyytb
☛With QuadPay or PayPal / Klarna, 4 or 6 Interest-Free payments
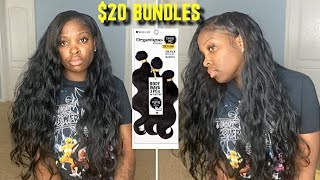
I’m Wearing: Straight bundles 20" 22" 24" 26"
Direct link➤https://bit.ly/3qY8tHR
Pre-made Straight lace front wig ➤https://bit.ly/3fR36Ux
TOP 1 Selling NO-LEAVE-OUT NEEDED V PART WIG➤ https://bit.ly/3KJHuHC
Beginner Friendly Glueless 5*5 HD lace wigs➤https://bit.ly/3G3M001
Affordable Wear & Go HeadbandWigs ➤https://bit.ly/3rGZrxO
https://www.beautyforever.com/ ➤ Full Bundles Deal: https://bit.ly/3rUhFfI
$10 Cash Back ➤ https://bit.ly/3IwOTZ6
Super Brand Day Huge Sale ➤https://bit.ly/3qYXNJ5
#Beautyforeverwig #Beautyforeverstraighthair
Aliexpress Beauty Forever Website: https://bit.ly/3epWyuk
Hot Sale hair on Aliexpress Store: https://bit.ly/3kVOzI7
Amazon Beauty Forever Hair: https://amzn.to/3p4FYHL
Instagram@beautyforeverhair: http://bit.ly/IGBeautyForever
Beauty Forever YouTube Channel: https://bit.ly/38akLUg
Customer Service WhatsApp:+8613783534924
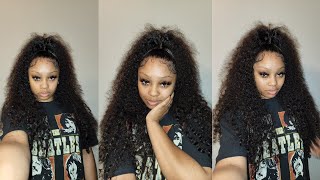
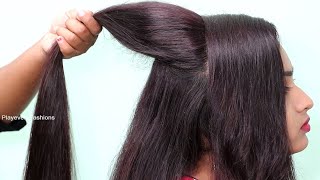
Hey beautiful people welcome back to the channel today i am going to be doing the overdue versatile, quick weave i've been asking. If you guys wanted this video. I finally received some really bomb bundles that i wanted to do this style with, so we're going to jump into it. If you are interested in learning how to do a versatile, quick weave, please continue to watch, don't forget to thumbs up, comment, subscribe and turn on that post notification bell. So you are notified when i upload another video, and i will incorporate more of these on my channel so for this quick week. I am going to be doing it a little bit different than my norm, i'll be using this protective shell on my hair. After applying the stocking cap and i'm going to go in with my salon pro hair glue, this is my favorite one. I don't use any other one. I know a lot of my girls be asking me: how do i get my cap to stay without using this or even um, with using this product right here? There'S multiple bonding, glues out there. This one is my favorite one. I can't stress that enough. It'S going to do you just this when doing styles like this, i tried a quick weave without using this before, and i am a pro at quick, weaves. Okay, it fell apart. It was shambles and i was like i'll. Never do that mistake ever again, because i always gravitate towards this one, but during that time my salon did not well. My beauty, supply store did not have this glue. A versatile, quick weave just depends on how versatile you want it to be a versatile, quick weave. Can mean that you don't have your edges out, but you just want the back out. You can have the top of your hair out, and maybe your edges and not the back. It just depends on what how versatile you want it to be. So today i want mine to be versatile all over. I want to be able to flip my hair girl. I want to be able to flip it again. I want to be able to party on my back out, and i'm also going to have these sides out right here, because i want to be able to throw it up in a ponytail, so you ready because i'm ready so i do have my bundles on deck. I actually have four bundles, but my other one. I actually was rocking it in a ponytail. So i'm going to see if i need four, but i just always get four just in case these bundles are actually from beauty forever. I will list all the information to this hair in the description box below so beauty forever does have really good quality hair, in my opinion, super easy to straighten really easy to style. So that's why i wanted to you know: grab these bundles so once again it will be linked in the description box below i'm going to go in with the 26 first. The 22 next see. If i need the 24 and then i might go in with the 18 only because i want this to be layered, so we'll see what these three bundles do and if i need my fourth bundle, you know we'll go ahead and get her from out the tube. So i'm going to take my hair down, as you can see, it is blown out looking a little crazy over here i took myself out today. I wanted to grab some sushi and i also got my nails done today, so i was planning on doing this after i had came back and now we're here, so i'm going to start sectioning my hair off, where i want my leave out to be now. You can just braid this if you want to, but i like to use rubber bands for my hair, because my hair just be slipping and sliding and coming out of braids so easily. If i don't put any like gel or hairspray in it, but anyway i'm gon na go ahead and just take this section and you can really make this into a v, so it doesn't seem like you have a lot of hair out. So that's enough hair. For me, i'm going to go ahead and braid the remaining of my hair down and i'm also going to apply a rubber band around this section, because this section right here is really important. Okay, so hey me, so here's what it's looking like guys. It looks a little crazy, but it's gon na work. This is what happens when you do stuff on yourself. I'M gon na use two wig caps for protecting my hair. I was gon na use two, but i'm just gon na go ahead and use one one. Since i have this protecting shield, so i've never used this, but i think i got the gist of it. This is the kkw lipstick, i'm using carve out where i'm going to be cutting which children - hey, hey, eh, uh, all right, so we're gon na. Let that sit, i'm scared. If y'all don't know, i am scared just to let y'all know it may seem like this is pretty bulky, but it really isn't so i'm just going to let this air dry for a little bit and i'm also going to take the blow dryer on this. So it can be fully dried down and we're going to move on to gluing all right girlies. So, of course, you want to go ahead and unravel your weft and start measuring, while your weft is completely full, never just cut random pieces, that's a no go and my suggestion is to always cut at a decent length for your first weft, because you don't want Anything too short or too long. I like to cut mine a little bit past my ears, nothing all the way up to that leave out section where i'm doing my middle part, but that's just what i like to do. I'M sure there's people that go all the way up where that middle part section is, but that's not what i do. I find that i have a little bit more security. When i make my first piece a little shorter keep a blow dryer near you, so you can blow dry after each lay of a weft and try not to separate them too much and remember to follow that cream. Slash white line, the ghetto right. You guys like, why am i using lipstick to do this, but you know it's in me to always find a way. You can always pick up a white cream pencil. I just forgot to do so, but you know i may do with what i had now. I'M just doing it how i usually do it laying the weft and then i'm going to cut the remaining of the wig cap off afterwards, but just try to press and use your blow dryer if necessary. With this i do like to make sure each piece is a little bit longer than the next piece and with the back half i like to make sure the wefts are pretty close, not too close, but close enough that you're going to have that security. Once you do cut off the remaining of the wig cap, put a generous amount of glue on your weft, nothing too crazy, but just enough that you know it's going to actually stay about that much glue and, like i said, keeping it really close, move the sides Down pressing the back down, but just like be very gentle when pressing at the weft here. So i'm making sure that the weft is right underneath this little bun of mine. Because when i cut the remaining of the lace off, i want to still be able to have like that. Flatness have that security underneath it. I don't want it to lift just because i cut the remaining off, because that can look really crazy. If we do it like that, hopefully that makes sense hey. This weft is literally the same length as the other one, because i want the density to be pretty full right here. I don't want it to be too thin and then once it gets to like these points, i'm just going to do one long, one in that area. My technique is honestly about how well you measure your hair and how far apart you space your tracks, because if you, if you space them, if you space them too far apart, it can look crazy and it can curl up on you. And you really don't want that so once again, just follow that white line so and we're going to start putting the weft on top of my little bun, i'm going to place this completely in this area and that's going to be our first piece to hold this Down and we going to place this bad boy right on top curve it - and this is what i mean by pulling it tight - you want to pull it tight, so it's not going anywhere on you girl. Now we're laying it right. On top of my little baby, bun back there so press it down, you guys have the just, but this is what the hair is. Looking like, girls flat flat, okay, uh, hey this uh, hey all right! You guys! So here is the scariest part, but you're almost done. Please have full concentration, get up, get a huge mirror in your face, so you can see what you're doing i prefer you using shears instead of these little stupid scissors right here, but i didn't. I didn't realize how dull they were until, like. I was almost finished. Doing this whole entire process, but be careful you guys, that's my number. One thing is just to be careful and i did want to let you guys know during this process before i you know say what i'm about to say. I am using chi in my baby, bliss flat iron to press out my hair, but what i was going to say about the protective shield product - i actually didn't think it was as messy as it could have been trying to do it by myself. Take your time and really focus on your lines that you actually put to guide you where you need to stop and where you know your leave out starts and the reason why i'm saying that is because i put the product on my leave out at the top. Just a little bit, but it wasn't hard for me to actually lift that off of my hair, so that's the plus about it and, like i said, just pay attention um, you know i will let you guys know how i feel about it in the future, because I still have my quick weave in i'm, going to wash my hair blow dry and like treat it after this. So i'll, let you know if i felt like it actually did what it was supposed to do, but this product has been out. You know the girls know about it. This is my first time using it, but yeah. So let me know how you guys feel about that product. I would love to know your input about it and yeah don't forget to thumbs up comment subscribe, just vibe out for the rest of the video. I am going to comment, or i am going to come back and talk to you guys towards the end, but i just wanted to give you guys my little input on my little protective shield. I recommend you get a bigger bottle. I didn't get the smaller bottle, but it wasn't really a lot that i had to work with because i left so much of my hair out. But i would just recommend you getting the bigger bottle because you just never know: okay, um um, hey, hey uh, um, hey, hey uh! I am excited you guys. This is my first time doing a quick weave like this, and i think this is really cute. This is like the perfect density used about two and a half bundles, but i'm here for it. Oh, i think these lengths are perfect, 26, 24, 22 and 18. I didn't use my 24 inch that was in the bathroom still have this much of my 18 left beauty forever density is definitely there hun. Let me finish my look off and i'll be back to give you guys slo-mo's with beauty forever straight hair family jump like this, so i wanted to give you guys more slo-mo's, but unfortunately, my storage on my camera is going crazy. I don't know: what's going on, i'm going to have to go up to apple and figure out what the tea is, but i hope you guys enjoyed. I had so much fun doing this install my quick weaves are my favorite. I haven't done one in a very long time, but i hope you guys learned something in this quick weave and if you guys enjoy once again give me a thumbs up and you know, join the family if you haven't already. I love you guys and thank you for always coming back to support me and vibe out with me. I appreciate you and i will see y'all in my next one bye, y'all
Comments
Natasha S.: I'm doing a quick weave with beauty forever hair this week too! Now I'm even more excited and taking notes honeeeey
MsKimmyK: TATYYYY your natural hair grew man! I’m going to do this style on Friday, will be following your tutorial because you killed it OKERRR ♥️
Deja Davis: in love with this quick weave, like can you do mine
imani: Love it! Can you pleaseeee show us how to do that 90s layered middle part
Beauty Forever Hair: Great job. Slayy always!!!
lola wolf: I use that protective stuff everytime I do a quickweave. it helps with the removal process so much and doesn’t pull out my hair at all. I will never not use this
Ms.BrownGirl: So pretty ♥️
Pamela Gordon: Love it❤❤❤
Tigress M: What hair growth products did you use?
Dee Luther: Love Your Video Cute thumbnail tho Beyond Pretty you are Makeup on Point Nice Cheeks Structure Happy Woman month EnJoy your night Have a MarvelouS Week STAY BLESS N BE SAFE ALWAYS
Laquita Wilkinson: Your hair grew so fast.. natural hair update please
Lashawn Jones:
TappIntoBeauty: You always have the best music boo
lovmusehair: I cordially invite you to do a hair review for us. Look at your email, I keep sending you messages and you don't reply
Kersha Beaver:
lovmusehair: I cordially invite you to do a hair review for us. Look at your email, I keep sending you messages and you don't reply
Janelle Watts: Cute