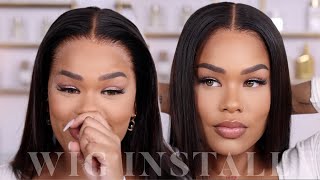
Very Detailed Lace Frontal Wig Install Video! | No Glue Method‼️
- Posted on 16 March, 2020
- 360 Lace Wig
- By Anonymous
Hello Beauties!
This video is on how I install my lace frontal wigs from start to finish. I created baby hairs for the first time ya'll! lol Let me know in the comment box if you found this video helpful! #howtolacefrontalwig #Gluelesswiginstall #Lacefrontalwig
#starttofinishlacefrontalwiginstall #lacewigseries #Lacefrontalwig #Nogluemethod
(Excuse my skin in this video! I went through a really bad reaction that led to a bad breakout in November but I'm on the road to recovery. My skin has drastically improved since filming this video last month. Skin care journey coming soon!)
+Specs:
Megalook Lace Frontal 360 Wig
Length: 24 Inches Long
Brazilian 100% Human Hair
Color: Natural Black
Price: $163.30
Pre-Plucked Hairline with Baby Hair around Perimeter
4.5inch Part Space in Front
Hair Density: 150% Density
Average Size Cap
Medium Brown Lace
Elastic Straps and 4 Combs
⭕️Link To This Unit: https://amzn.to/2SJ7CZU
CHECK OUT MY LAST VIDEO
DIY Whipped Shea Butter | HOW-TO ➡️ | For DRY, SENSITIVE, & ECZEMA prone skin❗️
CONNECT WITH ME ON MY SOCIAL MEDIA
Youtube IG: http://bit.ly/Milas_Mind_YT
Personal IG: http://bit.ly/Mag426
Snapchat: http://bit.ly/LIta426
FB: http://bit.ly/MiguelitaPreval
About ME:
My name is Miguelita, I'm new to YouTube, and I live in Massachusetts. Check out my videos and subscribe to join the family!! Subscribe: http://bit.ly/MilasMind
♥️ I will be POSTING videos 2X a week!! ♥️
BUSINESS INQUIRES ONLY: [email protected]
Disclaimer: This Video has affiliate links.
+Music: I Do Not Own The Rights To this Song
NCS: Music Without Limitations
Queens Uplifting Queens
1. Miguelita Preval https://www.youtube.com/channel/UC-rg6...
2. The Spencer Family https://www.youtube.com/channel/UClmzr...
3. Lebeau Lifestyle TV https://www.youtube.com/channel/UCvJhe...
4. C&NKids&family https://www.youtube.com/channel/UC32W0...
Hey guys welcome back to my channel and today the video I'm going to show you how I install a lace front to a wig from start to finish. So here is my hair in two ponytails. Usually that's how it is under my wigs and Here I am applying a weight cap and I'm just gon na show you how I cut out the excess lace in the back and then just have to be careful to make sure you don't cut off any excess Hair and you don't cut it straight across to leave with that blunt line that looks really unnatural, so I kind of follow the wave of the hair and it's pattern, and here I'm just going to put it on Brad. So, of course, I look silly and I'm just adjusting it to see how it fits making sure to comb it out. So here I'm just adjusting everything, so I can see where to cut the lace. I'M just gon na cut right above my ears so that it could fit comfortably around my head and not like bump into my ears of that makes any sense, because that can get really annoying and irritating really quickly. So you just have to be careful and I do the same thing for the other side. Of course, since wiggler like one size, fit up fix-all it just they're really long, so you just have to adjust it to your head size, and here I'm just showing you just how the hairline looks. It was already pre plugged. Thank goodness, and here I'm just going to show you my method of cutting off the lace in the front. You have to be really careful, because this is where the hairline is and it will affect how your wig Blais and I kind of follow the pattern of the hairline kind of digging in and out with the scissors excuse. My scissors, I should probably have more professional grade once we're cutting the lace, but honestly, I don't know where they went. So this is what I've got my hands on and just doing the same thing for this side and again, I'm not gon na cut Jade across because then that would give me a even the hairline going straight across and that's just not natural. Looking just have to play around with it be patient, keep looking in the mirror, keep adjusting and eventually you will get to the end, and here I'm just going to show you the closure. I mean the front, oh sorry, and how much parting space there is. I do plan on doing like the half-up half-down style, and this is how long the hair is it's 24 inches and, of course it looks bone straight well, that's because I washed the way the purposes of this video. I don't usually do this with my wig tags and cut it off cut off the front dick ban just so that it blends better. But I just did it for this video and for me to wear the next day, but I don't usually do that. But it does help delay slimming effort. Let'S leave, and here I'm just creating baby hair is probably the hardest part of this whole process. I would wearing wigs for a while, but honestly, I don't think I've ever customized one to the extent that I did. This is probably the most work I've ever put into a wig, so I'm kind of glad that I didn't like sew it from scratch and put the butter bundles together and create a wig, because then I would have been over it. So I'm glad I just purchased one that was already pre-made and had to just do a couple finishing touches on it, such as baby hairs, which are not as easy as they seem. I usually wear my own baby hair is all, but I said no. Let me just let the fronto do its thing and keep all my hair concealed. Why not? So this is mousse that I'm using and also this is like. I did a baby hair edge type of brush that purchased off Amazon. I have two of them. I use it for my own address a couple, wigs, very versatile and again just apply more mousse. I found most easier to work with and I went in with gel, probably the next day or later on, because gel is just more permanent and I felt like the mousse was easy. It is thicker, and I thought the mousse was just lighter and easier to work with okay. So here I am one curling, the hair, because I'm gon na bring back the body wave and the curls that was once in it. That'S how I want to wear the hair and my the loose curl wavy / straight style, and here I'm going to use my eyebrow razor and that's just a create and I'm just showing you what it looks like after just using the wand, curl cleaning, some layers. Not going in on the front part and just getting the pieces in the front, but I created layers with just getting those again, and this is what it looks like after one curling it after creating baby hairs and now I'm going to move on to Lexi. Well, I was exhausted at this point to do all of this, and one sitting is a lot anyways, so I'm going to put these flexi rods in because we're have to go it's the next day the event, so I just wanted those curls to stay and actually Pretty much lock them in place without having to want curl it again. I think that time, for I don't know about you, but I don't have the time. So if I can find anything to give me a quick fix and that's what these do, why not you can even use them in your natural hair. I'Ve done so in the past. So just basically going around as a technique. I use a twist Bend. I'Ve done this so many times in the past. I couldn't even explain it if I tried, but it's like the process of wanting your hair. It'S like the same process, but just doing it with a flexi rod as if that was the wand, curl and then locking it into place. I think that when you had seven yeah seven and I have seven of them - and these are the I believe, the medium size - what's the gray ones and it's time to scarf it up, make sure everything stays in place. I don't usually sleep with my weight, but for tonight I did because I had someplace to be the next day and I just wanted everything the same to in stay in place. But normally I would just put the flexi rods in and take the wig off and sit it in his corner and then slap it on the next day. Tada finished product, so does it after makeup getting ready the whole nine yard? What do you guys think? I think it came out really pretty and I think the baby here is came out really good, and this was my first time doing that. So I hope you enjoyed this video. Please comment down below if you liked it did. The like subscribe button and stay tuned for the actual get ready would be part that showcases that outfit and hair bye


Comments
Bae & Bella: You made the whole process look so simple..You did an amazing job
Mama Nek: Loved this cute look! Something easy and quick!
The Spencer Family: Never worn a wig but this is a great tutorial I would follow if I did. Love the edit & final product! This serious was fun to watch.
The BS Family: I will definitely follow this video for my next wig . It was soooo easy to follow and yours looked great. Loved it ! :)
Marie Geneviève: Nice install, love! It looked great! Keep up the good work
caleigh grace: Love this wig! So pretty!
The Francis Family: Great tutorial keep bringing us the content ❤️
The Spencer Family: So detailed , love it
Mom Of Five Budgets: This is great tutorial girl.i dont use wigs but I know it helps out alot of people that does use wigs.
The Francis Family: Such great end results!
DelliaWyn Entertainment: End results are beautiful. Good job.
Bae & Bella: Beautiful I Love this
beautybyada: You did a great job
Bee Stokes Styling: Really nice install ❤️❤️I've been waiting on this video
Mama Nek: Loved that you didn't use glue! Great video!
Lee & Lay's Life: Back again showing love This has me wanting to get a wig and finess it lol. Love it
Mom Of Five Budgets: great tutorial like always
Mila's Mind: Hey beauties Can’t wait for you to see my new video on how I installed this AMAZON lace frontal wig on myself! Don’t forget to hit the like button ⭕️ & drop a comment down below letting me know if you found this video helpful! All details about the wig or anything else is in the description box! If you have a question drop it down below & I will be sure to answer you as soon as I can! See you in the next one!
The Spencer Family: This was such a great video!
caleigh grace: Crazy how natural these wigs look!
Mom Of Five Budgets: Showing you some love !!! GREAT INSTALL
VIBINGWM2: You did great
Mama Nek: Nice, love it!
Lee & Lay's Life: Yesss this was fun to watch!. You did thaaaaat it looks so gooodt
Queen Mariee: yaaass i loved the final look
Mom Of Five Budgets: Great install girl
TKM FAMILIA: Great video sis love it
CROCHET AND LIFESTYLE: Looks nice!
Sia thehappy: you did your thing with this one.
Pam's Naturally Beauty Naturally You: Very cute
Bae & Bella: Beautiful Sis!!
Bae & Bella: My girl Mila know's how to do everything, Thats what's up
Mama Nek: I been waiting to watch this video!! And I missed the premiere!! But this was great!! Ima try some baby hairs on mine soon!
Petal's Corner: Very nice install video my dear and you looked beautiful for your event...pretty in pink
Sia thehappy: Those before and afters get me everytime
Mom Of Five Budgets: even though i dont use wigs ,i still like seeing the process of making a wig
The Chelsea O Show: Woow this is legit!! Okay yesss I’m here for it
Busy Bee Buzz Topics: you slayed this look
Bee Stokes Styling: I love how you didn't use glue
Mama Nek: Loved this tutorial especially since that glue will take your hair out if you don't know how to use it! And I do NOT know how to use it!! lol
Silver Linings Vlog: wow awesome channel i do love your style and fashion stay in touch have fun and God bless
Dia Lavonne: Great video
The Spencer Family: Super impressive
The Spencer Family: Did you use your ring light ?
caleigh grace: I'm back showing love!❤️
Bee Stokes Styling: Back showing more love
TKM FAMILIA: Ok nice intro
MrsNewtons BigFamilyBigNoise: bruh lol