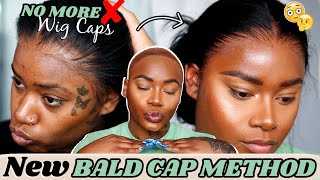
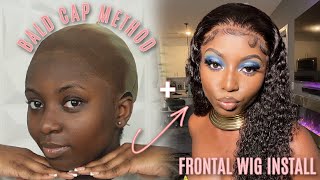
Bald Cap Method + Lace Wig Install No Glue! (Super Detailed + Tips!)
- Posted on 24 May, 2019
- 360 Lace Wig
- By Anonymous
HEYYYY YALLL! I hope this video was VERY thorough & helpful! This glueless lace wig application will normally last me 5 days to 1 week with proper maintenance. Once you master the bald cap method & the meltdown, you will be READY TO SLAY! If you have any questions, please COMMENT BELOW.
LIKE & SUBSCRIBE!
Connect With Me:
Business Email - [email protected]
Instagram: - https://www.instagram.com/arianna_lyf/...
Facebook - https://www.facebook.com/Ariannalyf/?r...
Twitter - https://twitter.com/Arianna_Lyf
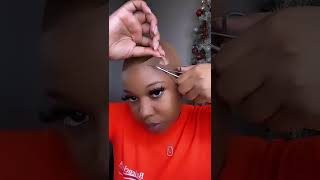
What'S up you guys, my name is Arianna and welcome to my youtube channel. I'Ve been wearing wigs, probably for like two years off and on, and this by far is probably one of the best wig applications I have ever had, because when I started, I would always have to do like a crazy amount of baby hair just to get it To like blend, but I've actually learned the right methods on how to do it. So this is all gon na be compiled into the same video. We'Re gon na touch on the ball cap method, as well as how you can melt your lace as well as how you can lay your baby hairs with hairspray instead of like mousse. We just don't get into all the details in the video, so I'm not gon na keep rambling before we jump right into the video. Please feel free to give this video a big big thumbs up as well as subscribing to this channel. If you are new, also follow me on all of my social media platforms, the name is going to be somewhere on the screen, as well as the links down below in the description box. So let's just go ahead and jump right into the video y'all. This is my third time filming this video, I'm so tired of refilling this video. Now, I'm just to the point where I'm ready to just get good content and get it out for you guys, because the first two times were unacceptable in my opinion. So I had to trash those videos the first time I tried this new lace glue and I liked it, but as far as the like removal or after I would sweat it out or whatever there would be like residue on my edges in that ain't cute. The second time the video was popping, the wig application was amazing, but I messed up on like filming. For some reason, parts of my clips were clear and the other parts were blurry, so I was a little salty so now third time's the charm. Hopefully the camera quality is poppin and I looked up some videos and reset my camera to get like different type of. Like filters, I guess you could say I really don't know, but you guys hooked the camera. Hopefully I really like the quality. Let me know down below in the comments. First things. First, you want to make sure that, like your edges are clean, so you want to take a cotton swab or cotton ball, whatever you want to call it and 91 % alcohol and you want to just clean around your edges and it's low-key gon na mess up. My beat but it'll be alright, just a lot. You see the line. Okay, the reason why you want to clean around your hairline is because, if it's like oil and dirt and like residue from like makeup or anything, then the hairspray or whatever, glue or - and he said whatever it is you're using - will not stick to your head and We trying to be late and melted, so please clean your hairline. Oh, we don't have to blend this makeup back out, cuz, whoa, okay and blend. Since this is a ghoulish lace, wig application, I will be using - got to be glued hairspray hairspray works way better than the glue like the Jo only because this dries faster and it's just way easier to work with it doesn't leave us much residue. None of that. So if you are a beginner, this is definitely the tutorial for you if you guys have seen my other videos. As far as my natural hair, you know that my hair is really really curly and, as y'all can see like my hair, don't want to lay down so I'm just gon na take the hairspray and I'm going to spray on my hair just to get it to Lay down and then I'm going to dry it with the blow-dryer, so it'll stay like slick. Also. You want to use a comb to just get your baby hairs to lay flat, because if you're using hairspray it will be fun. But let's say you were using actual lakes glue. You might potentially rip your edges out during the removal of your wig if you leave some of your edges out. So if you try to save your edges, please comb them back before you put on your bald cap. You guys are going to notice that I put my hairline a lot and that's because in the second video that I filmed that I also deleted, I noticed that I could have been a lot better as far as cleaning up where the hairspray was at versus. Like the wig, the hairspray, it doesn't dry matte, it kind of leaves like a shine to it and that's the only downside to the glueless method. I would recommend, if you want, like a matte finish or like your adhesive, I would recommend using glue, but for hairspray you just have to make sure that you do the best job that you can as far as cleaning up around the hairline. So, in between each step, I will be cleaning my hairline off now. I just want to take your wig cap and place it on your head, and that was the whole reason why I put the hairspray on because now it's going to be a lot easier. For me to apply the ball cap, I think the best way to get the most flawless ball cap application is, if you put the ball cap over your ears, I'm pretty sure a lot of y'all have seen this technique. I guess all over YouTube and it actually does work. So whoever was the originator. Thank you, because y'all Papa I'm just gon na use hairspray for the entire application. You could also use got to be glue to secure the ball cap down first and then use the hairspray, but it kind of takes a long time to dry. So I'm just gon na use the hairspray for today and what you want to do. Is you just want to spray around your hairline as well as down by your ears, so you just lump spray like a healthy amount and don't try to spray the whole hairline at one time, because then it's gon na run down and you're gon na create a Big mess, so just take your time. Please no come on man when you get down by the air. You also want to spray like back here that way. The ball cap will stick to this part of your skin, that's by your ears, so it will lay flat, because I noticed that the hardest parts are laid down, whether it's your wig or your ball. Cap is the ear tips, so you just want to take your time with that. If you want to put glue right there, you can, or if you want to put the ultra blue gel right there you can as well, but you really don't have to it's just optional. It'S fine! If you spray it on your ear up here, because again, we can go back and clean that off later, once you get the general outline, you want to go back in and you can blow-dry it on cool or hot. It doesn't matter because what hairspray is going to dry either way caused by the air times whenever you're blow-drying it? You also want to press down like press the ball cap against your skin, and that way it'll actually stick to your face, instead of just like drying to itself. The next thing that you want to do is you want to take whatever powder foundation or any powder. That'S really close to your skin tone. It don't matter if it's foundation or not, and you just want to put it on the ball cap. You could also do liquid foundation, but sometimes I just know like how that looks, and I think powder is a lot easier for beginners. So that's why I'm using powder today, the two powders that I'll be using today is Maybelline fit me matte and poreless pressed powder in the shade Sun beige, which is also 310. I don't know if they sell this on the market anymore, but this is just what I have for my wigs and stuff. It'S not really like my nice powder. The other powder that I will be using is more of the pricier powder, and this is my Sephora micro smooth powder. The only reason why I am using this - and I'm still testing it out to see if it actually does make a difference, is the fact that the micro smooth powder has been like finely milled, I'm assuming because of micro smooth, I don't know, but the powder just Seems to like melt in my makeup on my face, so I'm thinking that it'll have the same effect on my wig cap and it will be like even more blurred. I guess the micro smooth powder really just gives me that seamless blend that I'm looking for and it's just like popping like. I really don't know how to explain it like it literally makes me look bald and, as you guys, can see kind of take this powder. A little bit further back because it also depends on the size of the frontal or lace wig that I'm wearing if the front. So, let's start scene by 6 or just a full lace lead. I will go pretty far back because it allows you to achieve that deeper part, but if it's like a 13 by 4 frontal mmm, it really don't matter how far you go back just go back far enough to where you think you would part your hair once I'M done applying the powder. I will go back over my hair with the got to be hairspray once again and that just kind of like melts everything together. The second layer is a lighter layer than the first layer, because I'm not trying to have build-up because, as you guys can see over here on my ear, I kind of went a little crazy as far as like moving my comb. While I was drying and it's turning white, so you just want to keep that in mind to not apply too much because then it's gon na leave a white residue. The next step is to cut off the additional piece of wig care that you don't need. How I like to start cutting my lid cap is, I will like pull the piece of the wig cap from the middle of my ear and I will cut that out. First, you got to be really careful to make sure that you don't cut your ear cuz. We all want it. So I will pull the leg out out a little bit and just make like a little slit like that, and then I'll pull my ear through the lead cap. And then you just want to start cutting like the part of the leg cut off that you don't need. Once I get my ear through, I will go back in and spray down the ear tabs one more time, because again, those are the most difficult parts of the wig cap to lay down to cut the rest of the weight cap off. I just start in the middle and make a snip, and I kind of tried to see through the lead cap, to see like where my natural hair line wants to lay and then I will just go in and like. For example, I have a widow's peak and I'm gon na like cut around the widow's peak as well as my edges, kind of go like down a little bit right here and I'm just gon na cut in the direction that my hairline naturally goes. You also want to be very careful, especially if you have actual hair shears, because you can't cut yourself. So what I do is I like to pull the wig cap up and then cut once you're done. You can just cut off the additional wig cap at the back, that you don't need anymore, and then we can move on to the next step. As you guys can see, this part of the wig cap is not really seamless and we want it to be like skin, like all the way back like you, shouldn't really be able to see the line of demarcation, so we're gon na clean that up now I've Watched a lot of other videos on how people do their ball cap method, but again everybody is different. So what worked for me? The best was just like taking the hairspray again and just spraying where the line like separates from your face and just like relaying that back down and I'm pretty sure, there's a lot of other people who have done it. But I just really didn't see any videos for, like simplicity, I guess like to me. It was just the easiest way to do it, so you want to like final on spray, a little bit of hairspray, and then you want to take like a comb or your finger and just like lay it down with the blow-dryer and like let it dry. Now it's time to go in and clean up the hairline, because there's a lot of extra hairspray in places that I don't want so we're just gon na take a q-tip this time and not a cotton ball. Because, with this, you kind of want to be a little bit more detailed and get as close to the hairline as you can without lifting up the wig cap. Since this is my third time filming this video, I actually have a couple of tips that will help you guys from the mistakes that I did. I noticed that the hardest part was getting a seamless, wig application has to do with how stainless your bald cap is. As well as how well you can clean up the hairline, and this doesn't really apply if you're using a matte adhesive, but what this got to be hair spray, it's not mad at all. It leaves like showing on it, so you have to do as best as you can to get all of the additional hairspray off of your face. Otherwise, you're going to be able to see it, so that was something that was very very hard for me to understand. The first couple of times and that's why I didn't like my application, the first two times I did this video another stuff that I will tell you guys is to please be patient. I understand that with Instagram and how quick like technology and stuff is we make it seem, as this like applying a wig is actually a very quick process, but it's really not like. You actually have to go section by section and take your time to make sure each piece is like, as detailed as it can be, and to make sure that it's as right as it can be. Because trust me, if you rush through a specific part of your wig installation, we all know - and I'm trying to be out here - unlockable, so I personally don't mind taking my time and with hair I've just kind of been patient with it. Since I started so, I know there's a lot of people who are not patient with doing their hair and if you're one of those people then applying wigs may not be for you, since I'm gon na just be honest, because it takes a long time, especially when You'Re still in the learning process, I know that I personally take a long time with like putting my wigs on, and I know that there's some people out there who can put their ways on really fast and it's on clock able, but I'm not one of them. People I'll take forever to do my makeup and I'll take forever to put on my wigs, but that's how I get the best results. So for me, slow and steady wins the race. Once I'm done cleaning out my hairline, I will go back in with my Sephora micro smooth powder, one more time just to make everything as seamless as I can, and I really just focused this powder application like on the line of demarcation. So it's like really really seamless. I know this is a lot of cleaning the hairline. But again this is just what works for me. Y'All don't have to clean as many times as I do, but this is how I get the best application for myself. After applying the powder, like I said, if you guys have like dirt or residue or even makeup, still less like on your skin, then whenever you put your wig on, it's not gon na stick, because the makeup is in the way, so I'm gon na take another Q-Tip with more alcohol and clean up the hairline one more time, just to pick up any powder that may have dropped on my skin. When I was reapplying when it comes to the hair details on this wig, I really do not have them. I do know that it was an Aliexpress hair company, but I bought this hair back in October for my birthday before I went out to LA and I never wore like, I left it in the box because I found some bundles that I liked. Instead, this is a full lace wig. You know, I do know that, but I don't remember where it's from. I just know that it was from Aliexpress. It looks to be about 20 to 24 inches. It seems like a loose leg type of texture. So sorry, I don't have the specs on the hair, but yeah we're not. I plugged my wigs, I like to pin the hairline like the hair right here. I like to pin it back because it just kind of makes things like more organized for me, because, if not, I'm gon na end up gluing all the baby hairs down and all that and we're not trying to have that. We trying to be popping and melted. So what I'll do is I'll pin on my hair out of the way, and then I will take a spray bottle with just water in it and I'll go like spray, the hair just a little bit, and that is just to get the baby hairs out of The way for the lace like glue down and then after that I will go back in and like frame my baby hairs. That'S just how I do it when I have hairspray it's a completely different process whenever I'm using glue. You also want to keep in mind to not spray too much water, because then you will lift up your ball cap and you're gon na be salty, because I literally just meant to our laying down my ball cap. So I know y'all will be salty too. If it came. Look I personally like to line the ear tubs up first, but when I start gluing it down, I will glue it down in the middle and that's only because I have a widow's peak, but it just kind of makes it easier for me, because once I glue This down, I can just do like half and then half and voila, so the method is still saying you just take your hair spray and let it get tacky, and then you stick it down pretty self-explanatory whenever you're spraying the hair spray. This tongue, though, you want to spray a little bit in front of the wig cap, because you don't want to put the wig like directly where the wig cap ends cuz, then you don't see it so we're doing it as you guys saw. I did not let it dry for that long and it's already like sticky and tacky. So I probably let a blow dry for like five to ten seconds and then now I'm going to go in and just pull the wig down as carefully as I can, while keeping the lace flat and then I'm just gon na stick it down where I want It once I haven't stuck down like this I'll, just go in with the end of my rat tail comb, and I will kind of just like smooth it down like that. You don't want to manipulate it too much because you can like mess with the product and then, depending on how much hairspray you have already sprayed you can make the residue show up. So I almost took another ill. I forgot whenever I was like letting my hair air dry overnight, that I wanted to flip the wig inside out and like apply the powder foundation onto that as well. But there's still a way to do it because I haven't glued my hair down. So I'm just gon na apply my Sephora micro smooth powder onto this part of the lace right here. It really doesn't make a difference because I didn't put it there, but you really can't even tell so I might go back in at the end and like put some like up here, but you really can't if y'all can see like right here. My legs didn't lay down all the way and that's fine. You can just go back in with a little bit more hairspray and just like. Stick that little part down and that's kind of like the tedious part that I was explaining, because I can get like the general outline done with like one spray, but most times I will have to go back in the second time and like lay down the little Pieces that didn't get adhesive on it, so my frontal is as late as it's gon na get for now, like I'm still trying to perfect my craft, but now what I'm gon na do is I'm going to section out my baby hairs rule of thumb. I know that a lot of people on Instagram they normally lay their baby hairs with mousse, but if you're using got to be hairspray and you put mousse on it, it's gon na lift your whole frontal up. So what are you doing that today? So what I'm gon na do is spray the hairspray on my fingers and then, like just kind of run it over the hairs that way they will kind of lay in the direction that I want them to and then I'm going to tie my hair up with, Like the tail end of my do-rag and then once I take the scarf off, that's when I'm going to comb out my baby hairs in the way that I want them to laid that way, it doesn't really give you like a super gel baby hair. Look because that's not what I'm going for today, because on this side it looks very like melted already, and I haven't even laid it down yet to tie the front of my edges down to melt my lace. What I like to do is I'll. Take the end of my do-right and I would like spread it out and so it'll be flat on my head and then I'll just use that to tie my edges down and then I just tie it like a shoestring in the back and I leave it on. For like 10 to 45 minutes, it really depends if I'm hungry or not, and I'm hungry right now, so it's probably gon na be more like 45 minutes and then I'll come back and show you guys the finished result. All I'm doing now is styling the hair. I spritz it with water to remonstrate because it was kind of dry and then I went back in with the same conditioner that I used the first time. I styled it and I just ran that through the ends as well as I detangle it again with my denim brush to get the curls back popping and then on the root of my hair, where my part is that I just like to spray that with got To be glued hairspray because it'll keep my flyaways down as well as it will keep the integrity of my part, it'll keep it going in the direction that I want it to go. So that's literally it for styling this hair. This hair is actually very, very easy to style. It'S very pretty. I also like the conditioner that I use because it smells so so good and now I'm just gon na, let it air dry. You could also diffuse it, but since this wig is so thin, you can honestly just get away with letting the air dry and then once it's dry, you good to go. This brings it to the end of the video. I really hope you guys enjoyed my wig application and I hope that I was able to give you guys some really helpful tips if y'all have any requests on any other wig application or hair dye or any type of coloring tutorials. That I want to see. Please feel free to leave your requests down below in the comment section and I will be sure to like read through those and figure out which one I'm gon na do next, because I'm telling you these wig videos is about to be pop and they bout to Just be coming out like crazy, so please stay tuned! Thank you guys so much for watching. I will see you guys in my next video peace.
Comments
Kneemoi Foster: this is the best hair tutorial i’ve seen love how detailed you are, thanks so much!!
Brownwoman ofGod: I want to do this. I have a frontal that was glued on professionally a few years ago and then I have a wig that covers the back. I want to sew on the wig part and then glue the frontal. I'm watch closely b/c I don't really do my own hair.
Janiah’s Wonderland: I’m part of #AriGang ❤️ loyal supporter.
Jazzmin Warren: Where is this hair from?
Tiffany Silvera: Them arms though
Shan: Notification gang gang