Wow! Messy Bun Hack! | Superbwig
- Posted on 04 January, 2022
- 360 Lace Wig
- By Anonymous
Superbwigs Merry X-MAS
ONE WIG 16% OFF CODE-----XMAS1
TWO WIGS 18% OFF CODE-----XMAS2
THREE WIGS 23% OFF CODE-----XMAS3
Wig Coupon:Ashley2
Direct Wig Link:https://bit.ly/3ebHvoN
Colored Wig Link: https://bit.ly/2RAX6GG
360 Lace Wigs: https://bit.ly/2SuNMzx
Skin Melt Swiss Lace Wig: https://bit.ly/2lv0pix
Hair Information:
Wig Name: OLYMPIA PRE-PLUCKED HAIRLINE LOOSE WAVE HUMAN HAIR 360 LACE FRONT WIG
Cap construction: 360 lace frontal wig
Length: 20 inches
Hair density: 150%
Cap size: 22.5inch
Swiss Lace Wig: https://bit.ly/2lv0pix
Pre-made fake scalp 360 wig Link:https://bit.ly/2WtEFjL
360 lace wigs Link: https://bit.ly/2SuNMzx
13×6 lace front wig Link:https://bit.ly/2F4Gv3Z
Full lace wig Link:https://bit.ly/2HiBV5M
E-mail: [email protected] (Provide Wholesale)
Follow us know more about promotions and fashionable hairstyles:
Instagram:@superbwigs
Facebook: https://bit.ly/2Jc1OG9
YouTube: https://bit.ly/2Ce91Q3
Email: [email protected]
-----------------------------------------------------------------------------
PRODUCTS USED:
Adhesive https://bedeckbeauty.com
Electric Hot Comb https://bedeckbeauty.com
Wax Stick https://bedeckbeauty.com
Melt Belt https://bedeckbeauty.com
Edge Control https://bedeckbeauty.com
Comb and Baby Hair Brush https://bedeckbeauty.com
Blow Dryer https://amzn.to/342q9sF
Curling Wand https://amzn.to/3sUCZDO
Powder (parting) https://amzn.to/3mLckoW
Powder (lace) https://amzn.to/3FKtwT6
Holding Spray https://amzn.to/3mFlcwA
My Amazon Store: shorturl.at/muS15
-----------------------------------------------------------------------------
Business Email: [email protected]
Let's Stay Connected:
Instagram: https://www.instagram.com/ashleybedeck...
TikTock: https://www.tiktok.com/@ashley.bedeck?...
Facebook: https://www.facebook.com/ashleybedeck
Tech Equipment:
Sony ZV1: https://go.magik.ly/ml/1dlc1/
Ring Light: https://amzn.to/3EeOqIq
Royalty Free Music I Use: https://www.epidemicsound.com/referral...
Get Brand Deals Here: https://www.magiclinks.com/rewards/ref...
Join Herbalife With ME! : http://ashleybedeck.goherbalife.com/en...
My P.O. Box:
P.O. BOX 52103
Irvine, Ca 92619
-SMOOCHES
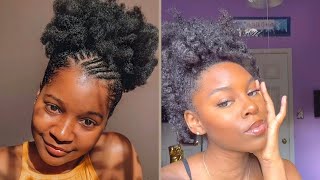
Hey love bugs welcome back to my channel if you're tuning in for the first time, i'm ashley and today we'll be installing styling and slaying this wig for beginners. This is a 360 lace wig. So as far as the hairline and bonding it down and styling it, it definitely will be beginner friendly. We will be using the glueless adhesive from bdagbeauty.com. This one works very well with our melt belt. You just apply a thin layer, put the lace on top with the milk put the milk bill on top of that, and then just let it dry, and this is the result - you'll get not much work needed. As i mentioned, this one is a 360 lace wig. So also stay tuned towards the end of the video. I'M gon na go ahead and put it up in a high bun, and let you guys see how that's going to come out. So i'm not going to talk. You guys to death just go ahead and tune in everything you need to know about this. Video everything we're using is linked and listed in the description box. So let's jump right into the video here is a look at the inside construction of the cap. This one is set as a 360 lace, wig and the length 20 inches, and it does come with an elastic band inside first step is always is just going to be to cut off the excess lace. This is simple and easy. What i found with this one is that it did go behind the ears instead of front of the ears. If you want to remove the elastic band inside, this will make the hair push forward. But the elastic band is what keeps the wig like kind of pulled in suction to your head to fit glueless, and it also will pull the hair um on the edges or the sideburns behind your ear. Hopefully i'm making sense. I like this for a daily look, because i don't like to bond down the sideburns on a daily basis, and i like to clean my ears in the shower. So honestly, my sideburns always get wet in the shower, no matter how secure i put my hair up when i get in the shower, because i got ta get in there with some soap and water and clean my ears. So sometimes for me it's better to just not have the sideburns honestly, but if you do want the side, burns just cut out that elastic band and it won't fit as glue is, and then these sides will push forward. Hopefully, that makes sense. I want to introduce you to a new product. This is our lace glue. Now this is an active lace, glue adhesive, you can bond it down and it will give you a strong actual glue hold. I will be sharing this with you over the next couple of days, so stay tuned and subscribe for that. But let's jump right into the video this one here is a loose wave, 360 lace, wig in the length 20 inches and i'm going to go ahead and use our liquid adhesive. This one is a glueless option. I love this one paired with our milk belt and you're going to see how it's going to melt the lace dry it down and bond it down right before your eyes. So i just applied a thin layer working with clean fingers. It'S obviously best to use tools, but clean fingers also do the trick. I just apply a thin layer, as i mentioned, and kind of just press it and work it in on each side. As i mentioned this one kind of fits behind the ears as far as the sideburns go, so i'm not going to take it all the way into my actual hair, i'm going to take it as far as the lace, glows and you'll see the trick i'll do With the rest of the hair, once it dries down, so here i am just using our precision comb to go in and comb the hair straight. However, the hair is laying, when you put the milk belt on top, is how it will dry. You can go ahead and like use your electric hot comb, to straighten out the hairline. If you just wanted to go straight back, i felt it was sufficient to just go ahead and add or comb out the hairline, and that worked perfect. I'M going to add the melt belt on top. This is going to dry, naturally with no heat. While i go ahead and finish out the rest of the hair, loving loving how this one looks. As i mentioned, this is 20 inches in length and the texture is loose wave. So the easiest thing you can do is just wet. The hair down add a little bit of a leave-in and you're good to go. Of course, i'm extra, so i did the most. I'M going to add the um wax stick from bb.com and i'm going to pair it with the electric hot comb off camera. I did like brush the hair with a hard brush and kind of work that product in first now, i'm focusing on the roots, and i'm just going in with the electric hot comb. You guys know it doesn't matter what the style or texture of hair is. I'M gon na use an electric hot comb as much as possible. This is just my jam, so i just really want the hair to look like it's very flat and thin and just coming out of the scalp making the hair and the lace look. Superb, and i think i did an awesome job at that. Now we're going to go ahead and plug in our wand curler. This one is very thin. Almost like a pencil, maybe a little bit thicker than a pencil size. Maybe a half inch a quarter inch, not quite sure, but i will have it linked in the description box and originally i was just going to take random pieces throughout each side, just to add a little bit of definition. But i got carried away and ended up doing the entire head, so you won't see all that here, but i'll just show you a little bit and then we'll jump into our next step. Okay, so here i'm showing the progress. This is what the hair looks like when you want to curl half of it on the opposite side, i'm gon na do off camera and then we'll go ahead and remove that mailbelt. So you guys can see how amazing the hairline came out without any heat. Okay, so we are done completely. I wish it was this fast to want to create your hair in real life. Nonetheless, we are done. I did spray it down with a little bit of a hold. I used to got to be glue spray to hold it down. Just a little bit um as far as the hairline or as far as the curls go now, let's go ahead and clean up the hairline. As i mentioned, you can go in with the electric hot comb beforehand to keep it straight, but i'm going to show you how that's not necessary, i'm going to take the edge control from beauty beauty.com. As i mentioned this one kind of goes behind the hairline. As far as the lace goes, instead of giving the sideburns, so i like to blend in the hair on the sides with my natural hair, the edge control from our line does a great job in making the two blend. Also, this is a pretty much an edge brush and i love this because on one side it's a comb on the opposite side is the brush, so you'll see me use both sides tandem. I use the comb side to kind of straighten out the hair where it may be like clumped, together or not going in the right direction, and then i use the brush side to smooth it out and it really really really really is like the goat. It is a game changer if i did not have this brush anymore, like what were we doing before. We had this brush honestly and pretty much that is it okay, love bugs so i'm finished with this look. I can actually add a little powder to the parting and hairline. Do you think we needed? Let'S just do it for ships and giggles? Let'S just grab this maybelline powder, it's the first one i seen in my stash gon na work it along the parting as well as in the hairline, and this works great to cover up the grids. Even if you don't have knots, you have grids okay, so we are officially done with this look and i am absolutely feeling it. I feel like the ends. Have that beautiful, curl pattern to it, where you can almost like feel like you can almost like wet it or you can wand curl it typically, i would just wet it. I feel like it's an easier lower maintenance, hairstyle to just go ahead and wet the hair and add some leave-in. But today i just wanted to step it up a little bit and do one curls. And so i went ahead and put on some youtube videos and went ahead at it now originally because the hair is already curly. I was just going to take pieces sporadically and just add a little bit of definition like that, but i just ended up getting to it and almost defining all the pieces. So one cool thing about this one is a 360 lace wig. So i am going to jump to a clip of me putting it into a high bun, so you guys can see the versatility okay, i love bugs. I just went ahead and took some pictures of the hair and it's natural um, not natural state, but just down. So now we're gon na go ahead and try out this 360 lace. Wig feature now keep in mind. My hair is not. My real hair is not um flat. As far as my braids, my make meals go, so you can do it down something like this, where it's like a half up half down, and this is very cute and fun super cute or you can take it all the way up now. You guys know me. I don't really customize the top too much, but typically, if you really want to go all the way up, you got to go. What'S this called put your head upside down and just bring this forward as much as you can now that it's all up, you can just play with it to get it, how you want you think i'm crazy, but i know, and as you guys can see, the Hairline is bonded down. Everything looks nice and sleek no problems, i'm not going to add any extra product, but you guys can see and how you would make the back. This is what it looks like when you just naturally put it up crazy right. I can't even see what i can tell you looks crazy, so you guys know, there's a comb in the back, you take it, you just take it down as low as you possibly can and just hook it also it's important that the wig itself fits back here. If it's loose and it's kind of like not form fitted to your head, this isn't going to work, and then you just take your fingers. You can take a comb um like the rat tail comb. You can take that and just kind of use it to pull pieces down. For me, i just personally just take finger or pieces, and i know i wanted to cover all the way here. So i just take random pieces, not all at once and just loosen it up back here. You can take little pieces, usually when it's at 360. You see these little pieces like this are meant to cover, so you can take these pieces and curl them. You see this is a little piece here. It'S meant to go here, so you just play with those and like let those act as like natural faux is full, but you want it to lay like natural baby hair, so you kind of just play with those um. I burnt my face the other day, so i'm a little bit nervous to go in with the curling iron close to my head, but this is just kind of what i do and then like this piece came out and it's like a little bit too out. So you can redo your bun or you could just bobby, pin it or you can just stick it back in there and then like for the bun itself, because the hair is not super long. If you want like a huge bun, you can definitely like you know, pull it apart piece by piece till you get what you want, and that is how i will do a bun super simple and easy right in front, because the front is laid so nicely and So snatched it makes it look a little bit more put together than it really is. It literally is the art of finesse. I'M going to take some pictures like this. I can add this to the thumbnail, so you know to watch for a high bun yeah and let's jump right back into the video. Let me know what you guys think also i did not go in and pluck or tweeze out the hairline. I did zero customizations and you guys can see how great the hairline came out. This definitely is a very easy install for beginners. Again, if you don't want to go in and wet the hair or at one curve, you can go ahead and wet the hair or you can just leave it, as is straight out of the packaging, either way it's going to look beautiful, so i definitely will try It out with the wet style after i um, you know, wear like this for this week, maybe next week i can go in and just wet it and do a cute little curly routine, and i think that would be absolutely beautiful. So let me know what you guys think of this one. As i mentioned this one did come from superb wig. Of course i have a link to it in the description box as well as lists and links of everything i used to complete this. Look. You guys already know: budakitty.com is my brand and i went ahead and used a couple of things from our line. This was the adhesive we use. This is our glueless adhesive. It is like a gel formula, it's a clear, gel formula. It offers a nice hole. So when you put it down like this, it's a little bit like a gel consistency and as it dries it becomes more and more tacky. I feel like this one works best with the melt belt that you guys see me use. You can definitely like put it down, put the lace on top and blow dry under cool setting until it dries, but i feel like it works at its best when you just put the milk belt on top and just let it do it job, let it do Its job and dry on its own, i did add a little bit of mousse on top of that, this would be great for the curls if you did not do the heat on the one curl style on it, but i feel like this also works by itself. As a glueless adhesive, but together they work even better to give you a nice solid, install and, as you guys can see, the wig is bonded down. If i spray it down with a little bit of water, it'll come right up. If i put the melt belt or an elastic band, or even like a satin band around it for the night, it'll still be bonded down tomorrow, as long as it doesn't get wet so yeah. I also use the wax stick and also i think i mentioned this to you guys, but we do have a glue. I will be showing you guys how to use this um. Probably tomorrow. I still have some things to do. Another tutorial do so i'm going to be showing you how to use our glue tomorrow so make sure you are subscribed and you stay tuned for that. I hope you guys are enjoying the new year's. Thank you guys so much for watching and as always i'll see you in the next one smooches


Comments
Gyna Paul: It’s beautiful!! You can hook up any unit and make it look like it’s coming from your scalp.! I’ve learned a lot from watching you through the years!! Thank you for all the reviews!
Bob Gierke: Wow! You so slated this wig. You made it all look sooo easy. I'm a fan and a new subscriber.
Certainly Cee Caldwell: Good Morning Ashley I enjoy watching your videos. Your product for laying down the wigs is bomb. I have a couple of 360 wigs. I'd like to know how to pluck the hairline it's confusing. This wig you reviewed is very nice. I like the loose wave never purchased one the curls are very natural. The hair looks very manageable don't have to use much product to get the look you want. Thanks Ashley
rac Gillett: Cute!!!! I love how you do you wigs. Oh, also loving the fannel shirt
Jackie Randolph: Hello Ashley love this wig curls and pinup lovely hairstyles.
jetta charles: Love the curls, looking
My prerogative dd: Hi Ashley, do you ship your products internationally?
Beverly Lambert: Girrrrrl you are so beautiful n that unit is the bomb....you are amazing in all your videos n Ashley just keep them videos comin n are you giving that one away.
Atunya Walker: Nice job
Yolanda Suarez: Cuanto cuesta
The Krafty Station: