*Must Have* Natural Hairline Super Preplucked 360 Lace Wig W/ High Messy Ponytail Ft Ronnie Hair
- Posted on 09 May, 2022
- 360 Lace Wig
- By Anonymous
HERES ANOTHER ONE YALL BEAUTIIBYDAYXRONNIEHAIE
TELL ME WHAT YOU THINK
➷➹➷➹➷➹➷♛Hair Details♛➷➹➷➹➷➹➷
►►26% OFF CODE FOR 360 LACE WIG: BEST
Wig in the video: https://bit.ly/3vtOMbJ
►►Coupon: DAY to save money!! $$$
Super Preplucked Hairline Wig: https://bit.ly/3q8PlpH
Swiss Lace Wig: https://bit.ly/3tv9lD2
Ronniehair Website: www.ronniehair.com
Transparent Lace
Super Preplucked Natural Looking Hairline
Four Combs (Front*1& Sides*2&Back*1)
Hair length: 18"
Hair density: 150%
Cap construction: 360 Lace Wig Cap Construction
Contact Us:
Website: https://ronniehair.com/
Email: info@ronnieh air.com
Social Media:
Instagram: @ronniehairofficial
Facebook: ronniehair
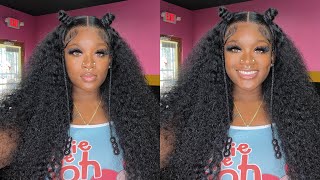
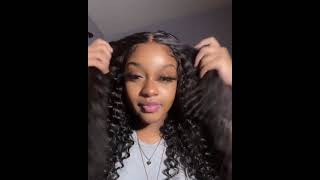
Hey beauty queens welcome back, so we are doing a review on the ronnie here: 360 um lace, wig. This is 18 inches, um body wave, texture uh. We did like a cute little messy up do with this. I had a lot of fun with this um. The lace is actually transparent. Lace is not hd, so here i'm just going to show you guys how we get our foundation done. Um. When i do the braids, i braid all of the braids going up um so that you don't have you know it's just easier to lay the weight down. You don't want anything on the neck, so this is how it should look. Now we actually put the wig on i'll show you guys how it looks before we start gluing it down um. It does have tracks in the middle of this wig. So you cannot like do any other, versatile versatility. Styles, you can put it up. You could put it down um, but it's like. I said this is transparent lace and look how it's looking. I did have to tint the lace um i always use concealer. I don't use any specific yeah. I mean i don't use any lace. Tint um, my secret method is concealer, it's been working and you know what they say. If it ain't broke, don't fix it. So i will continue to use that until i find a product that i like that's worth me, switching um. But yes, so we're gon na go ahead with our beauty bond and we're gon na lay down um we're gon na lay the lace glue. You know you do it in thin layers um. I usually do like about three or four layers um, but yeah. So we laid that down now, it's time to get this on. I always lay the front first and then after the front is laid down, you can go ahead and lay it back down. So i'm doing the same process in the back that i do for the front. Um you're, just gon na apply even layers across the whole entire back. Just like you did the front. However many layers you usually do, like i said me, i usually do about three or four, because afterwards i go back in and i add another layer um, but you're gon na. Do it the same way, you would do the front hairline. So i was having a little bit of difficulties with this video because my phone kept on saying my storage was full and it kept cutting the videos off and i didn't know that it wasn't recording. So i'm sorry, you guys didn't get to see me actually lay that down um, but i laid it down and now i'm tying my band on so that i can get it stuck. You know you add the pressure so that you can get it stuck and now um we let it sit for. I let it sit probably for about like six minutes and now i took it off um you could go ahead and we're gon na cut off our excess lace. Now, oh, do do look at this y'all. Look at how it's looking it's so flat. It'S so neat, but that's not it. We got to go back in and we got to tie this down again because you want it to be melted, you want it to be on. You want it to be stuck, but, as you can see, i'm pulling it i'm you know twisting it i'm doing all this stuff and is not lifting. So i tied the band from back to front because it allows you to get the whole back um and the front without you having to put multiple bands on to keep it slick, i mean to keep it um, pressed up against the glue um that works. For me and look look at how natural it looks, i'm gon na pull it down for y'all, so y'all could see, but i really was surprised honestly from how it looked so natural, but the trick is you can pretty much use any lace as long as the Lace either is for light-skinned people lighter than their complexion never darker and for dark skin. You can kind of use almost any lace as long as you can tint it dark, and as long as you use a tint that matches them perfectly, you're always going to get a final result as long as you you know, especially if you know how to install Lace, so don't ever get discouraged if you don't have hd lace, it's just that that lace is the thinnest um. You know, and it tends to just be a lot of um, less work that you have to put in to make it look like it's really really natural but, like i said this is transparent lace. It is not hd lace, so i'm, like you, know what. Instead of us doing like a regular style, let's do something cute, let's do something fun, and this does not take long at all. So we're gon na do a messy little updo, i'm sectioning off the front part um that i'm gon na have out i'm gon na curl. That piece, so i just need to get it section out and then i'm gon na just do some loose curls on the back and add some like messy little curls falling. It'S gon na be cute. Yes, all right! I love doing different styles, like that. You know it's it's like this. Rather, you know just get you to do something different. You know everybody want this straight middle part with curls straight side, part with curls, curly, hair side part. Everything is like that, like i love doing stuff like this, i'm gon na start bringing out more videos where you know the wigs are styled into different styles. The next video i'm doing, i'm super excited about it. I can't wait for you guys to see that, but yeah back to this look, so i curled the you know i did some like loose curls just so that it can fall with curls, even when i'm pulling it out and when you curl it, it just allows You to you know, play with a little bit and even if you know so, it just doesn't look blah and you know with no volume. So now i'm just going to curl my front and then we're going to be all done after that after we call the front, that's it. This is easy um. I did this install in less than two hours or probably about two hours um. It did not take long at all. I customized it beforehand i did have to pluck. I did have to bleach the knots i did have to tint the lace um, but that's fine. You know if you want it to be as natural as possible and you want it to blend with your clients, skin you're gon na do all of that you know so. Yes, it was, it was fun. This is beauty by day and ronnie. Here this is their 18 inch, 360 wig, um body, wave texture. You can use the cold day to get money off, who don't like a discount tell them. They sent you and follow me on instagram. You can follow them on instagram visit. The website use the discount code. You know i will be back with more reviews, more videos, more tutorials. Thank you guys for watching, and i will see you guys soon. Don'T forget to like comment share and subscribe. Sorry like comment share, subscribe, hit the notification bell. So you guys don't know when i got a new video, so y'all could get you know, let's get it together. You
Comments
Meggans POETICAL Breeze: You dropped some jewels with this one no cap... From the braid down, to the bald cap the lay and the style it's an entire vibe ...
Пётр Лысов: 5:25 artisticas son unos X18TINDER.Uno muchas y un buen ejercicio. Saludos desdea la Cd. de world