How To Make A 360 Lace Frontal | Best 360 Frontal Ever
- Posted on 02 May, 2017
- 360 Lace Wig
- By Anonymous
I finally made a 360 frontal and all I can say is yaassssss! Sis you need to get you one!
CONTACT ME
_______________________________________
Email: [email protected]
Instagram:
Beauty: https://www.instagram.com/nonebutnora/...
Personal: https://www.instagram.com/but.nora/
Twitter: https://twitter.com/nonebutnoraa
Snapchat: @nonebutnoraa
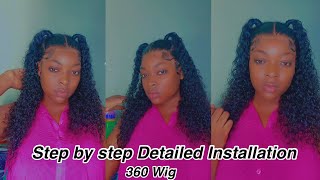
Hi guys welcome back to my channel hi guys welcome back to my channel and today, I'm here to show you how I made this 360 lace front. Wig umm, this hair, you guys, is everything like everything. I'M wow like wow, just well: um yeah, ok! So, first things: first, because we're going to bleach the frontal you're going to need a bleaching powder and a developer and you're going to want to work in a clean space. When mixing these two you're going to want to keep in mind that you want the consistency to be fluffy, do not want there to be a drip, because if there's a drip, it'll seep through the lace of the frontal and I'll go on to the hair. So just use your best judgement and make sure that your consistency turns out fluffy and it's not liquidy. You know you're done mixing when you can turn the brush over and nothing falls off of the brush. This is how you want it to be, because it's going to go on top of your frontal and you don't want to mess it up now, taking the front so you're going to want to make sure you lay it flat out and we're going to start with The back because you want to leave the front for last, because the front is where people will see more and the way you see my fingers going under the least. That'S the part of the lace that you're going to cut off so you're just going to bleach the part of the lace that the hair is connected to and now we're just going to evenly spread out that mixture on top of the lace make sure you don't Put any of the mixture on the lace that you're going to cut off, because that will go on top of hair that you do not want peach so yeah, this yeah and now flipping over. We are going to get the front of the lace and what you can do is you can pick up the ways just to see where the edge of it ends. So you know where to put the bleach and where not, to put the bleach and make sure you get the sides of the lace, because this is again a 360 frontal. So if you want to put it up into a ponytail or a bun, people will be seeing your studs. So we want to make sure you get every corner of the 360 frontal, and now you just gon na let that sit for about 15 to 20 minutes. As you can see, the frontal is Beach perfectly and now I'm going in to plus the hairline. You do not want to be walking around with the box headsets. No, that is not cute. Okay, a harsh hairline is a no note so pluck that hairline you're gon na want to pluck it a little bit behind where the hairline actually starts. Just so you're, not taking too much from the front or if you get a little to pluck happy. You have some hair in the front to cover it and again, because this is a 360 frontal, you need to pluck the hairline in the back as well, or else you will just be looking like a hot mess. You'Ll be looking like an O and you're supposed to be walking on here. Looking like a yes, so look that frontal all over the front. Besides the back make sure you get all that excess hair out, so you do not walk around looking boxy and now I'm just pinning the frontal down where my ears would be and I'm preparing the head. So I can start sewing in my bundles and now you're going to want to slow down the inside of the 360 frontal and I'm sewing it along just the hairline of the frontal - and these are the bundles that I got. The link will be left in the description down below, but honestly Jesus must have touched this hair himself, because this hair is so soft. It is so amazing, and I highly recommend that you just buy this hair, I'm going in with the longest length of hair and I'm starting out by sewing it in. I am double wefted, my track, so basically that means that, instead of just sewing it as one single track, I just kept it double only because I want my hair to be thick and full and, honestly speaking, I hate looking at girls hair and I can still See the color of your shirt through your hair, like no like? No, I need my hair to be thick when I put it in a ponytail, I needed to look like a healthy looking ponytail. I don't want no struggle ponytail, so I'm double f ting, my hair. That'S honestly optional for you, but that's just what I prefer now, I'm going in with the next bundle, sighs and it's pretty self-explanatory from here. You'Re just sewing in your tracks until you get to the top of the frontal where the bundles will connect you. So at this point at the top of the head, I am single sewing my track, so I'm no longer double F ting it only because I don't want the top of my head to look bulky. So again, that's another option for you, but this is what I like to do you and now I'm just going in and cleaning up the ends, giving it a little bit of a layer. I don't have to because the bundles layer on top of each other, but just so that they blend in a little bit better. I'M doing this done and after I cut a cut off on my ears. This is what the hair looks like. I just threw it up into a messy ponytail, so I can only imagine it's like literally styled, but yeah. This is the hair. I hope you guys enjoyed this video. I hope you guys are able now to go and make your own basically frontal and rock it like it's yours, because I definitely will thank you so much for watching my video, please like and subscribe and I'll see you in my next video you


Comments
Snookz: Can you post the link to the frontal?