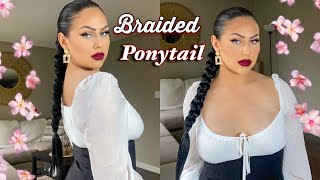
New:(Hair Tutorial) How To Frontal Ponytail | Using The Back Lace Fr A 360 Lace Frontal No Glue
- Posted on 09 June, 2021
- 360 Lace Wig
- By Anonymous
Hey guys . In today's video ill be doing a hair tutorial on how to use the back lace area of a 360 lace frontal wig to make a lace frontal ponytail. So i have this 360 lace ftontal wig, and the front is thin out ,but the back of the frontal is in good condition and not thin . I went ahead and cut the back area off the wig and use it to make a lace frontal, then use it to make the lace frontal ponytail. Dont be so quick to depose your old wig you can recycle them.
https://youtube.com/channel/UC5MrA1Jod...
LIKE
COMMENT
SHARE
&SUBSCRIBE
FOLLOW ME ON MY OTHER SOCIAL MEDIA PLATFORMS
Business page https://www.instagram.com/876fab_hairb...
Tiktok.com/@everythingsher2
Remember to comment on what other videos you want to see me do next oxox
Keep your NOTIFICATIONS BELL on ❤❤❤you guys
Hey guys, hey guys, hey guys, i know you're not seeing me, but we are back with another hair video and in today's video guys i'll be using my 360 frontal. It'S a 360 frontal that i had before i'll be using the back ear of the frontal to do a frontal ponytail on chevrolet's head. So guys, if you want to see how i use the back of a 360 frontal to do a frontal ponytail stay with me. But guys before you even touch or move remember to like comment share and subscribe to my channel and run over to my instagram channel over to my instagram page and follow me at 8765 underscore here, adventure and also guys you can follow chevrolet at today's underscore six Blossom speak up cj via underscore six plus, okay guys. So let's get right into the video okay guys. So this is the frontal that i'll be using. It'S not actually a frontal. It'S actually the back area of a 360 frontal that i have. That was shaded out. The front area was thin and shredded out, so i was going to throw it out. So i just i just decided to remove the back area because the back ear was firm and nice and i'm going to use this part of the back area. Of my 360 frontal to make a lace, frontal ponytail, so i'm removing these parts from the back area, because i want my ponytail to be flat. So guys, if you have your wigs at home, say not even weeks. If you have a 360, we got home and it is thinner, the front is thinner out and you want to throw it away. You can use the back area to make a ponytail and also you can use the back area to make like say, you're going to do a closure. You can cut it in pieces and make it make a closure sewing or a closure wig. So yeah, that's how i got this frontal okay. So now i'm just going to use my hot comb to straighten the back area of her hair. You know the frontal is going to be at the front of her hair, so we want the back to be straight and sleek, because the back is going to be out and it's going to be showing and we want the back to you know we want the Back to look just like the frontal area, you know what i'm saying yes, so i'm gon na use my hot comb to straighten the back of her hair and then i'm gon na use my by got to be freezing spray along with my blow dryer to just Smooth the hair and have the hair looking sleek and nice, and then i'm going to catch the hair into a ponytail. I won't be doing a low, extended ponytail, but i'll be catching her hair, like about a little bit away from the nape of her neck and also guys i'll, be using the morris edge walks just to give the hair some sheen and to make it look a Bit sleek and nice, okay, so now that that's all done, i'm just spraying the gut to be spray around her hairline and i'm brushing that in with my little brush, because i want to get all the hairs out of her face. I want to get all the hair to the back of her face, so when i place the stocking cap over her head, there won't be any hair in the way. I want all the hairs out of the way and i'm using the stocking cap, because i want to get a nice finish and i want to protect her hairline from the got to be gel and spray that i'm going to be using. I won't be using any glue all right guys, so i'm spraying the gut to be spray around her hairline and then i'm going to blow dry it. I am then going to add some makeup to the lace not to the lace to the stocking cap and i'm also going to add some makeup onto the lace and then i'm going to add the got to be gel around her hairline. I'M going to be using two layers: i've got to be gel around her hairline that i'm going to use to got to be spray, make that dry and then i'm going to lay the lace. Oh before we lay the lace um. I forgot to tell you guys, i'm having her hold the frontal down and before laying the lace, i'm going to just sew across the back area of the frontal to secure the frontal on her head. So i'm going to sew the i'm going to be sewing. The cap onto the lace and her hair, so we don't do cornrows for this. So i'm going to just secure the lace on her head and then i'm going to remove the excess lace from her hair and then i'm going to lay the lace into the gut to be gel and spray. Also, we want to clean the area off the perimeter of our hairline off because we want to get away, we want it, we want to clean the area off, so the gel will hold and there will be no grease and even no makeup will be on her Hairline, so we cleaned that off. Okay, guys so now that i've laid the lace on her head, i'm just using the blow dryer to melt the to be spray and gel into the lace. And then i'm just going to use i'm going to cut the lace and then i'm going to use the got to be spray to just spray around the perimeter of her hairline um once and use my blow dryer to dry the area dry around her hairline. Just to secure the lace a bit more for some more security and look at look at her hair so far, guys it's looking lovely and remember we're not using any form of glue no glue. Oh, can i tell you look at that? Oh my god. Wow no glue wow wow. Can i get a wow? Okay, all right, so our frontal is looking all natural and i'm now taking out some small pieces of hair, because i'm about to make her baby hairs not about to me, but those are to make the baby hairs and i'm, i won't be doing any dramatic baby Here guys, i'm just be doing a little bit of baby hairs. So yeah we're not going to be we're not going to be doing all of this fluffy enough baby. Here, just a little baby hairs, just some little baby hairs and i'm not using the cut to be sprayed to smooth the hair backwards, because i'm now about to catch the hair into the pony onto the ponytail that i made before. So i'm using a got to be spray with my brush and also with my blow dryer to get the hairs as sleek as possible, all right guys. So what i'm going to be doing next is i'm going to be using a rubber band to catch her hair up and the rubber band i'll be using? Is those fat rubber bands like these ones and what i did guys is - i cut the rubber band. I don't want to use a scrunchie that when i wrap the hair in it will mess the hair up. So i'm using a rubber band to wrap right around the hair and then tie it, so the hair will be the ear, will catch neat and nice. So all right, so there we go so our frontal ponytail is on its way and i'm not using a scarf to tie her hairline down just to secure the hairline a bit more. So i'm tying this with a scarf and then i'm just going to plait. The remainder of the frontal onto her hair, then i'm going to use my black wrap black strip, wrap to wrap around here just to protect the hair from the glue that i'm going to be using because i won't be sewing it and then afterwards, i'm just going To wrap the hair onto the strip and wrap it until it reaches the end of the strip or the top of the hair, when i say wrap it guys, i'm just going to wrap the hair onto the strip until i get to the top of her hair Until the hair is finished, so we get our nice sleek ponytail and when doing a ponytail guys, it's not supposed to be big. It'S supposed to be slim and neat because, as the word says, ponytail ponytails are not fat. Ponytails are slim and nice all right. So this piece of hair that i just took out is just to wrap around the weft of the hair and to make her ponytail a bit to finish the ponytail off to make the ponytail more sleek and more unique. And i'm using my gut to be spray along with my blow dryer to seal that in trying to get away all the fly ups, making sure that the hair is nice and sleek yeah. Look at that! Look at that! Nice and sleek must say: okay, all right! So it's time to remove the scarf and voila look at that, so i'm just cleaning up the areas that have a little bit of i got to be spray. You know that kind of flaky looking thing, i'm just cleaning up that area and then i'm going to cut her baby ears and make her edges and remember guys we're not doing too much baby here, it's just a little bit, nothing too dramatic and to make the Baby hairs i'll be using the got to be gel and she was all into herself look at her smiling all right guys. So remember, i'm using the back area of a 360 frontal that i had that i had at home that the front area was thin. So i cut the back and i use it to make this frontal ponytail. So, as i said, if you have a wig, if you have a frontal wig at home and the front is thin and it look like it can wear again, you can use the back to do other stuff. You can use the back cut it to make a closure wig or a closure sewing, or you can also use it to make a frontal ponytail like i just did all right guys. So i'm just adding my final touches, making sure that the hair is sleek and neat and um flattened it out and all of that adding my final touches to this ponytail. So guys, if you like this video, don't forget to give the video a thumbs up and remember guys to like comment, share and subscribe all right guys and don't forget to comment spam. The comment section with your comment tell me what you think about the video. Alright guys so until my next video guys bye, you


Comments
Amoy Mckinson- Baxter: Sher never disappoint me yet love it.
shan: I love it
Beverly Powellwilson: Wow wow beautiful love it ♥️
Jacky Lawrence: Looking great
Tamara Davis: Coming to do mines next week
Simone Williams: neat
K.A.V Family Lifestyle:
sushana young: ❤️
Ker Diva World: ❤
shan: