Stop Plucking & Bleaching! Buy This Instead - Realistic Natural Crystal Lace Glueless Bob Wig
- Posted on 18 June, 2022
- 360 Lace Wig
- By Anonymous
--------Atina Hair---❤ USE MY CODE " Asia " to SAVE 15%! -----
*Big Discount* Direct link to the wig: https://bit.ly/3pblRak
Atina Hair Official Store: https://atinahair.com/
Hair Length: 10 inch
Density: 160%
LACE Color: 13*4 HD FILM CRYSTAL LACE
Cap Size: Medium 22"-22.5"
►Buy Now, Pay Later with After Pay+PayPal, 4 Interest-FreePayments
△Guarantee: We Supply Same Quality Products to Youtubers and Customers
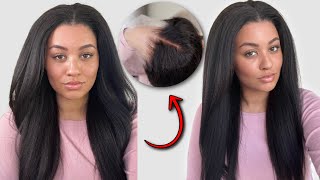
NEW CLEAR CRYSTAL LACE—Which is Skin Melt Wig. Totally beginner-friendly, no need to pluck and bleach again. CRYSTAL Lace is the High-end Lace Material, LIMITED STOCK, SUPER NATURAL AND DURABLE. The Lace is Undetectable and Melts into the Skin, Looks so realistic! LOVE IT. Hope that you all enjoy! Be sure to like, comment, and subscribe.
Share looks on facebook, instagram, youtube and tag @ #AtinaHair, customers will get $15-$30 cash back and discount
○ SOFT CRYSTAL Lace—Ventilated, See-Through, and Invisible. Totally Match all Skin Tones, No Matter What Skin Color You Have.
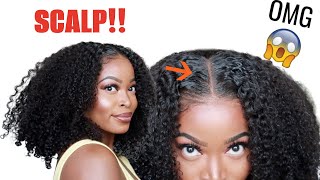
○ Most Realistic Hairline--Tiny Knots, Pre Bleached, Undetectable Look. Ear to Ear Preplucked Hairline. The Hair Just Looks Like Growing From Your Real Scalp.
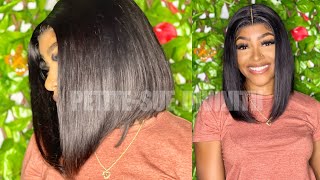
○ Straight Texture—The Classic Texture, can be restyled.
○ Removable Elastic Band Inside of the Wig Cap and the Adjustable Strap in the Back Will Help You Lay Down the Lace.
○ Free but Fast shipping
WANT MORE?
CONTACT WITH US:
Official Store: https://atinahair.com/
Ins: @atinahairofficialstore
E-mail: [email protected]
--------------------------------------------
▼▼SHOP PRODUCTS USED IN VIDEO:▼▼
Don't have Amazon Prime? Try it 30 days free: https://amzn.to/2Ve4Vyq
►50% off Trendy Clothing: https://shopfabuluxe.com/collections/c...
►Lotta Body Hair Mousse: https://amzn.to/2GQn6rH
►Luster's Pink Glosser: https://amzn.to/3iiNZnQ
►Lace Tint Spray: https://amzn.to/3JoWfxW
►Wax Stick: https://shopfabuluxe.com/products/wax-...
►Electric Hot comb: https://amzn.to/2ASZ4Hd
WATCH MY OTHER VIDEOS:
Last Week Video
► How To Knotless Braids Tutorial in Less Than 15 Mins! HD Knotless Braided Wig Install w/ Baby Hair
Beginner Friendly Lace Front Wig Install | Glueless Bodywave 360 Wig - No Glue. No Bald Cap
BEST BOB WIG FOR SUMMER | HAIRVIVI 13x6 LACE FRONTAL BOB WIG
The most REALISTIC Natural Kinky Straight Wig! HD Lace Beginner Friendly 13x6 Wig Install
Best Lace Wig Install - Sleek Straight Wig HD Lace, Side Swoop Wig No Plucking/Bleaching
The Ultimate Clean Hairline Wig | 13x6 Body Wave HD Lace Front Wig Install Tutorial - No Baby Hairs
Find The Lace! Real HD Lace Wig Blends Into Skin! Hairvivi Bob Wig | Best Invisible Lace Wig
NEW! *FITTED GLUELESS WIG* FROM HAIRVIVI !! IS IT A REAL DEAL FOR BEGINNERS? https://youtu.be/YZ-jAZwk89E
Never Pluck Again! Real deal Hairline for beginners | Most Natural Looking Glueless Wig | Hairvivi
Full SCALP LACE WIG / No GLUE , No babyhair needed
I Bought My Dream Car
Make your lace wig look like SCALP | Pre Bleached Knots Wig No Work Needed | Hairvivi
Hair Rehab! Fix Your Balding Frontal Wig & Restore Tangled Matted Hair
Most Realistic Beginner Friendly Glueless Full Lace Wig - No Baby Hair! Yaki Straight
The description may contain amazon affiliate links, which means that if you click on one of the product links and make a purchase, I may receive a small commission. This helps support the channel and allows us to continue to make videos like this.
---------------------------------------------------------------------------------------------------
B U S I N E S S I N Q U I R I E S
I do NOT need free wigs! For product review or serious business opportunities, please email → [email protected] #lacefrontwiginstall #longcurlybob
What, if i told you, you don't need to know anything about laying wigs to get your unit to look like this stay tuned for detail in this video and i'll. Tell you how and best of all she's clueless. What'S up faithful, fam, let's jump right into this video. This unit is sponsored by atina hair, and this is what the unit will look like straight out, the box. It does come pre-plucked and it comes with the bleach knot. Now this is a 13x4 lace, frontal and you're going to have the standard combs on the side, the comb in the back and an adjustable elastic band. So let me go ahead and try this unit on, and i'm just parting this here. Just so you give you guys an idea of what the parting space will look like. So, as i mentioned, this is a 13x4 frontal, so you can part it down the sides. However, this part down the middle will be the longest now they did request that i show you the difference between their lace and transparent lace. Their lace is a crystal type lace, and this is the difference in how it looks as you guys can see. It does have a much more natural appearance, so i'm gon na go ahead and just get straight to this and cut the lace off. So we can get this bad boy install and as always guys, you want to be sure and cut the lace as close to the hairline as possible without cutting the lace. Next, i decided i'm going to wear this unit as a glueless unit, so i decided to do my little non-baby, hair baby hairs and what i do is i just take out a little bit of hair along the sides and then i go with my razor and Cut it down - and this is going to help me get that natural baby here - that everyone naturally has along the hairline, and i just take some of my mousse. This is the lotta body moves and i take my baby hair brush and i just sweep it in to the hairline next, i'm going to tackle the top of the hairline. Now, as always, i am going to go on top of the unit using my faithfully asian beauty wax stick and my hot comb, because guys it's very important when you're installing any lace frontal that you have the top of your unit flat. This is going to prevent your hair from looking wiggish, i'm just going through with my two inch flat iron to slightly bump the ends of this unit, and now i'm tying it down on my silk scarf and i'm gon na. Let it sit for about 10 minutes before i put it on next. You guys know. I no longer do the ball cap method, so i did go in with my even new york lace braid to spray the unit just to give it an even color along the scalp and to get it to match my skin. Now i'm trying the unit on i'm just adjusting it along my hairline and, as you guys can see it's already starting to look good and i just did the bare minimum. So once you try, the unit on you do sometimes have to go through and make those different adjustments. So i'm just going back over that with my hot comb and then to blend everything in. I am going on top of my forehead with my foundation powder because i didn't have the foundation powder there before just to even everything up and lastly, i am going to go in with my concealer. This is in number 12. and guys everything is going to be linked in the description box down below and i'm just putting that in a parting space, and i'm also going along the hairlines just to fix up any loose ends and to get that fake baby hair. To blend in more seamlessly now putting the mousse on the forehead is going to help. When you do want to wear a unique glue list, it does help it to give that melt. Look that the glue or adhesive typically gives it, even though it doesn't glue it down so you're just going to tie your head down with an elastic band for about five minutes to get everything to melt on in and you guys can see once i take the Elastic band off that it is giving melted lace and now i'm just going back on top of the part in space, because i noticed the line of demarcation from the stocking cap can still be seen, but guys this was a simple install. You see how simple it was. This was a simple install, it didn't require any glue or adhesive, and it's still giving you that very natural lace look now. Let me give you the specs of this unit. This is a 10 inch unit. As i mentioned, this is their crystal lace, which gives you a very natural install, and i'm just lifting it up. Just to remind you guys that this is not glued down, even though it looks like it's melted, it could be thrown on and off, and these things that i did are stuff that you only would need to do at the beginning when first installing your unit, every Time after that, you can just throw your unit on your head and head out the door. Let me turn around real quick to let you guys see what this unit looks like from the back. As i mentioned, this is a 10 inch unit. Now i've, given you guys, let you see what it looks like as a middle part. You guys know i'm the queen of side parts. So let me go ahead and give you this different variation. So first i started to do a side part without parting. It and then i was like you know what let me just try and comb the hair to that back for those who don't really want to rock any part at all. So the first look i'm going to give you is what the unit looks like. If you just have the hair comb to the back, it's just like a slight middle part in the front it's barely apart, and this is basically what it will look like right for those of you who are just prefer your hair to the back type ball. Okay, so next i'm going to give you guys a little bit of that side, part action that you know i love to do, and this is what this unit will look like with a side part now, as you guys can see, this is a 13x4. So i can't really give too deep of a side part. However, if you do prefer, you can always shift your unit a little bit to the side to give the illusion of a deeper side part. So you do have the flexibility with this unit and guys you know your girl always look out for you. You know i got a coupon code for you. I'M gon na go ahead and put that across the screen. I'Ma also have it linked in the description box. Down below, along with the links to purchase this unit, but guys before we get out of here, i'm gon na need your help name of this unit. What do you think we should call her go ahead and leave your name suggestions in the comment section down below, and i did pick a name for the two videos i launched last week. The new name, as well as the person who submitted the name for the braided wig, will be across the screen. The new name, as well as the person who submitted the name for the short bob will be across the screen, so dogs. If you found this video helpful, don't forget to give it a thumbs up and if you're not part of the faithful fam make sure you hit that subscribe button before you leave, and it's always important until next time you guys say bless and if it be god's, Will i'll see you in my next video take care now?

Comments
Faithfully Asia: Hey Faithfuls, this one is perfect for everybody! Let me know your thoughts down below! ❤️
Carvella Hudson: Asia, you make this look so easy as always. I have an issue with cutting the lace, always. But, you are a champion when you do your videos on wig installs.
Eulita Watts: Very Nice wig !! Easy beginner friendly❤
Jerry White: Always looking beautiful good job
73pinkchocolate: So pretty and natural! Name her Tangi.
Atinahair: Fabulous look names are beautiful
Keesha Williams: I love the wig. I wish you could install my units. I think you should name her lovely Lisa. Okay just Lisa!
Dana Hudson: Thumbs up nice wig as always look gr8 on U.
Seleana M: Very nice! Can you please show us this in the sun?
Browndigs69: Hey Asia I'm late to the party why don't you do the bald cap method no more? I am really new to the lace world don't really bother with them simply because I can't lay and slay. I just bought a lace front but I'm scared off cutting the lace and customising cus I don't want to mess it up. was going to get it installed.
D.D. Jones: Suggested Name for this unit: "Faye".
Sheri Blake: Name her my Sheri amorie