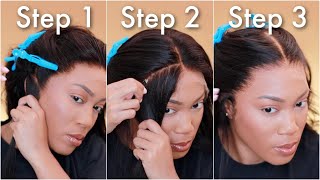
Very Detailed Frontal Bob Wig Install Tutorial/ Adding Tracks To Your Frontal For Fullness
- Posted on 27 August, 2019
- Bob Wig
- By Anonymous
Social Media
* Facebook : londoncurlstyles
* Instagram: @thelondontayy
* Snapchat: @londoncurls
* Business only email : [email protected]
Camera I use : Canon t5i with standard lenses
Lighting : Box lights
Editing software : iMovie
------------------------------------
keywords
frontal sew in,bob frontal,lace frontal,lace frontal wig,affordable hair,lace wig,bob wig,bob wigs for black women,very detailed lace frontal wig install,frontal bob wig tutorial,frontal,frontal wig install,frontal wig tutorial,frontal wig,frontal wig install for beginners,wig install with glue,wig install with ghost bond,esha,esha absolute wig glue
Hey guys welcome back to my channel. This is an intake coming to you with another video, since today's video I'll just jump right into the tutorial. Okay, her hair is already corn rolled back. That'S it about 11 or 12 corn rolls going to the back and connected them at the very back her head. Now, I'm just getting a nude cap and I applied that and cut the ear tops. I was ear holes out and now I'm just using the got to be glue spray and I'm just going to use that to mold the capsule her hairline once that is good and dry. I dried it on cold air, I'm just going to cut the excess cap off. I am using just whatever scissors. I have around, don't judge me, I'm just using whatever I have around yeah, I'm just gon na go ahead and cut that whole excess part off. So the parts that are not fully fully melted, like the beginning of the cap, where I cut out I'm just going to spray something that got to be blue spray on the edge of a comb on the right tail comb. And I'm going to press that into the edges so that way it melts completely down and I'm going to use the blow dryer own cool again to dry that spray. Next, I'm going to sew the back of the Nets so that way it stays with at the cap. I'M sorry! So that way it stays down in the back, because I'm going to apply a wig onto her head now here is a wig. I did make the wig myself, I don't know who she used. He said she was like a random company from Amazon. I think yeah from Amazon, and it wasn't that expensive, like $ 80. So that's something that she just decided to buy. So here I am I'm just using the Ruby kisses and I'm going to use that I'm in her shade and I'm going to use that to color the cap to make it more blendable. It makes you get the edges, because the edges are usually more lighter than the rest of the cap, but that is very important to make sure that the edges blend as well, and it is a frontal she gave me 12. 14, 16 inches, even though we cut it over to Bob. So she didn't even need that long and right here, I'm just putting the weight back on so that way, I'm trying to see you know how it fits and where I'm going to start cutting edge and where it blends that she has one of those hair lines Where it's like in the middle, it's like a dip and then on the sides. They come out a little more. So what I'm gon na do is I'm just going to go to a little towards in the middle and rips on an air out and then start plucking that part, quite so, I use that same color on her cap under the wig. So that way, the lace comes in a little bit more and I'm cleaning her hairline off with 99 % alcohol so that what you don't have extra residue so right here, I'm going to apply the Essure lace glue you buy from the beauty supply store supposed to Be like the waterproof use, lace clues on the waterproof lace glue and I'm going to just apply three layers. I'M going to apply three layers in the middle. Does that apply three layers on the side on the left side and then do the same on the right side, but I'm gon na do it in sections instead of doing it over the whole hairline. This just ensures that everything kind of is placed the way. It'S supposed to place and in order to expedite the drying process, you're just going so use a blow dryer. You can use it on warm just to keep the glue, melty and ready to melt the lace into the skin and some apply the glue I'm going to use as a popsicle. Stick that you can get from anywhere, especially the hair stores and I'm just using that top lasting layers of the greens onto the cap. Okay and after applying I'm just going to miss relation to the hair line and I'm going to just make sure that is secure and tack down. And I said I'm just going to cut the lace on the edges. I'M going to click where the ear tabs are to make sure that the wig it's and then I'm using the calm to just ensure that the glue is blended directly into released. Okay, I'm just going to take a little section out for the baby here. So I'm not gon na use all of this for the baby. Here, I'm just gon na cut. You know some hair just in case. I want to use those pieces for the baby hairs. I don't like excessive baby hairs or anything like that. So I'm just cutting some space off for possibility, tease of the baby hair being there, and that's that I'm going to use a pudgy moose and I'm going to use that to lay the baby hairs and to lay the hair, because they here does have like bulkiness. A little bit in the front so in order to smooth it down, cuz, I'm not using a hot comb today I am using primarily just an inch and my flat iron to mold her hair into place. Okay, here I'm just going to use one of those Alessa veins, actually so under the wig, it's a fit and I'm using one long long piece and I'm using that to further not release into the hair and let it dry. So, as far as the mousse I like to just go ahead, I plug them loose and then drive and move myself on the other part other than the hair line, just to make sure that it is so that's insecure, okay right here, so you know how frontals Don'T have enough hair in the front, especially if you want a full bein. What I like to do is I like to part where the vein area is on the frontal and parts where some of the lace is and snip sections of the track. The extra tracks that I have and a nice is so on top of each other here double wefted and I like the sole in spaces where I can make as a hair fuller in the front. So I did it three times and three different spaces where the band's gon na be in order for her to have a fuller, bang area, because she just wanted those clients got like a fuller bangs. So that's what we're going to do it in order to add fullness to it and then I'm just going to flat iron, the hair out with my baby, this nano flat iron it and I'm going to use that and just smooth the hair out choose one right. Then it's like right sleep-fighting might be that exciting. Okay here the mousse is dried. After about 20 minutes, I'm just gon na comb out the spaces where it was some baby hairs. Again, I don't like a lot of baby hairs. I just like a little something so on, and I'm just gon na call my that part out and get her ready to be fully fully styled. Okay, again, the hair follow 16 inches and she wants. She doesn't want to Bob at first. She wanted, like a Midlands. I'M hair cut a blunt cut, that's what she wanted. She wanted something longer than the bob, but nothing too long. That'S what she have now. So that's what I did originally as you can see she she wants me to we end up making like a bob at the end, because she just kind of gravitated more to us Bob she likes Bob's more on her face. You don't really like a midline mid-length. The way she thought she would and things like that, so we alternate her hair. Quite often, I started as a blunt cut, it's hard to transform from a blunt cut to like an airy bob, so especially since she had someone's hair in the back, and I didn't even know she want to cut it. So if I, if I would have known that she wanted to cut into a bob, I would have used less hair in the back. That way, the hair wouldn't have been bulky or anything like that, or let's think I would have kind of gravitated more so at the top and at the front but anywho I improvised, and I just cut it into a blunt cut bob and then alternated and started Razoring it in the back just some lighting up the weights of her hair. You you, okay here, she decided at this point from the blunt cut ball that she wanted it to be more of like a asymmetrical bob, so a short on one side and longer in the and the other side. So that's what we are doing right now, but then we're gon na go shorter than that, because she ends up wanting more so like a shorter, shorter, more layered Bob. So you know we did about three styles up in here, so you guys see right now. We'Re doing the high-low bob, this video is basically done. Um you're gon na see me do like. I said, a couple more styles and you can see the final result at the end, so hope you guys enjoyed this video. I know it's a little long. I decided to try to do a more detailed, a frontal wig install, so you guys can understand a little bit more. What'S going on more of a slowed down version compared to like on 10 minute frontal video, okay, guys well, hope you enjoy this video, and I will talk to you in the next video bye, guys.
Comments
SG247: This video is 2 years old and yet still very helpful today. I was wondering if I could sew tracks onto my frontal for added length and bam here comes your video first on the list.. I shall try and see what happens. TFS
London Tayy: Glue application : 4:00 Adding tracks to your frontal : 9:49
Jameen OD Motivation: This was really nice