Lace Frontal Bob Wig (Very Detailed) Step By Step
- Posted on 04 January, 2016
- Bob Wig
- By Anonymous
this is a lace frontal bob wig look from start to finish .. you will see how i took the hair and boiled it down then created a wig out of it.. i talk you through on how to get a nice fit , what i used and how to use it. i think you will find this as one of your favorites very soon .
I used 3 bundles of 16 inches of Malaysian wavy hair and a frontal to match .. i used concealer to fake bleach the knots and i installed a comb in the middle and a elastic band for a secure hold and you will have a nice fitted wig ...
if you would like to get a wig made please email me at [email protected] or DM me on IG
I am a Brooklyn wig maker
as always, don't forget to like comment and subscribe to my channel
and follow me on IG @beautybycd :)
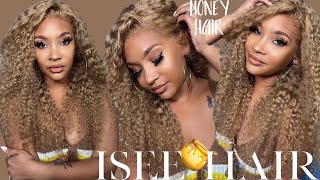
Hey you guys, did you see this bomb frontal that i created? This is a frontal. I have a little bit of hair left out only on my edges and then pull anything out. Baby hairs out cut is dope everything about this look. You will want to see so don't forget tune in like comment subscribe to my channel found me by at Instagram beauty by CD, and I hope to see you guys there with your comments and your forwards. So I had to take the hair that I had and I had to boil it down. I threw it on the stove in a pot that I don't really use and I just started to like boiled down. I had about three bundles of 16 inches in Malaysian wavy with a closure in the same texture, and I just wanted to really get it like cleansed and cleaned of all the impurities and, after was all said and done. The result was this big bushy type of frontal that had no moisture left in it whatsoever, so I definitely had to get back in and do some magic app that had a fight with it. I won, but you guys stay tuned and you'll, see what I mean. Alright, so I measured it to see where it's going to be on my head, I used the Wonder pencil, which is a NYX pencil in a light color. You can use anything. That'S like crayon, based just a kind of tag where it's going to be. I use it on my head to measure where the coach is going to sit. Then I place it on a mannequin from the mannequin. I am just sewing it down from the one side first on the ear and then I'm going to bring it over to the other side and so that bad boy down as well. Now the thing that you need to know about this, you guys is just because you measure it on your head doesn't mean you'll, get a good fit. Well, you'll get a good fit, but you have to keep in mind if you're going to put it on a mannequin that you must stretch this cap out, i'm using a spandex cap from the beauty supply store, and once I got one side down, I made sure I stretched it out because remember it's a front, so that's going to be made to fit your head and sit comfortably and snug. If it's not snug, it may not look too good. So I'm pulling it down i'm using my fingers to use to remove any pockets of air or puckering that it might do so that I have a flat installation once i'm done with that, and i have to kind of tame this bad boy and as you see What i was telling you about it's pretty dry, looking and looks like i can't use it at first has a little shocked and surprised. This is some hair that i had sitting around. So I wanted to kind of revive it and use it, maybe not at its full length, but just to kind of get it going a little. You know revitalization, so I pressed out the top after I got it sewn down just to see what it will look like and it looked pretty good. I use my fh I tool, which is a platform flat iron and it got the job done pretty quickly. Next, I'm going to start sewing in the back. I doubled the rose, and this is my first 16 inch Malaysian wavy hair and I doubled it in the back. So I can get the fullness because i knew i was going to do a bob look. So i want to make sure i had a lot of fullness, so i can stack it pretty good and I wanted to try to get all of that bundles in because I am greedy and I love to have a lot of hair. But again you want to Bob that looks full whenever you use bundles for Bob's, it's going to look it's going to duplicate what your real hair looks like it's not going to be. You got ta use more if you use in pack here it's a little different you'll get more spec edge from packed here, but for bundles, it's going to work just like human here, where you have to you, know comb it out, press it like maybe every other Day and add more bundles just to get the weight that you want so once i was done, you guys, i decided to go ahead and brush it out and just take a good look to see what i was going to do with her. I took out the t pins and then I put it on my own head just to kind of see what I was working with. Sometimes, if you're not kept with the T pins in your lace, it can get stuck I'm having a little battle here with the T pins. I got stuck in my lace and you don't want that because it could have ripped and I didn't want to tear early on in the game. So what I did here was flipped it up. I down and I added the lace to my head. Where I'm sorry, I cut off the lace, I cut off the spandex cap underneath because, as you know, you want the lace to show through sorry got a little confused there. So this is the full wig made from start to finish, where it's full on 16 inches. All over but it was very, very dry and not manageable, but of course i knew i was going to cut it and I just went to see how it looked so say goodbye to all this hair. That'S on my head and notice the wintertime and you might want to stay warm, but I'm going to go ahead and cut this here and I'm going to use a trick that we do in the beauty world and it's called squeeze cutting and squeeze cuttings. When you take the hair, you put it in a rubber band, you might have seen this on lots of other YouTube channels. It may not know what the term was so squeeze cutting is when you take the hair you put in a ponytail and you take it all together and bunch it and you cut from there, which gives you instant layers, it's a shortcut to cutting and it gets The job done really quickly, so you have customers waiting. You can definitely go ahead and squeeze cut, but you must know what you're doing you must have the vision for where this is going to go. So once I cut it, it's like my rough draft and I know I want to get a nice Bob happening in a v-shape. So I'm doing right now is visualizing, I'm taking it, I'm taking one end, bringing pulling it back like over directing it, and I'm visualizing where I want this V shape to kind of form and I'm as I move along, I use my guy, which was the bottom At the V - and I took it upwards to kind of get that a stack look and it's the way of getting layers and just kind of follow your guide. Everyone has different ways of cutting, but as artists, you kind of know what you see and how you're going to deliver it. So, whichever way you decide to go is up to you, as you see, my vision came true and all I'm doing is going back in and I'm cleaning up the look, i'm using a a shear thinning, shear and what it does is. If you take the hair, you pull it together, you can see where all of the little hairs that may have been missed from you cutting it and it kind of cleans it up for you without taking off too much you d bulks it also. So that way is not too heavy in one spot, while maintaining your length added a little bit of here, I started. I add a little a little bit of foil to this here, to give us some shine to revitalize it because after being boiled and whatnot, it really was just totally dry and I'm plucking it just this. I don't really need to pocket because I'm not going to have it off of my face, but I do want that nice. Look if I decide to like tuck it back behind my ear and have a little bit of the hairline slightly edited. So I kind of plugged it just a little bit now, I'm trying on the wig just to see how it flows and feels you know. I cut it on the mannequin, but you always want to cut again when it's on yourself, if you're able to and that's all I'm doing, I'm kind of just like checking it out and making sure that it's all good I'm impressed with how it's laying down so Far, you guys at home definitely get something to put underneath your hair. Like a stocking cap in a new de taupe color to duplicate scalp, I went ahead and I kind of fake bleach the not swear. I just colored the under bottom and i use some mascara. I'M sorry for some concealer just to get like the duplication of skin or to make it look like a part. I also use this pencil and the light colors of concealer pencil. It'S called the window pencil by NYX and it's a little too light, but behind the scenes that did a lot of manipulation I rubbed it off. Then I put some powder on there like some soap powder, just kind of like buff it out. So it looked good off camera and all that good stuff on camera looks a little too white but trust me. I went ahead and i fix that, so i use sum organics edge control just to kind of slick down my edges, because you want to make sure that you get a finished look and it's up to you what kind of educate or you want to use. I put too much, maybe on one side, so I decided to just kind of like brush it out as much as possible. I'M constantly checking out my work cuz. Remember it's only me. I'M only cutting my hair and no one's cutting it for me, and I just want to make sure I did a good job because I was going to be wearing this is my 2016 Bob look. I specialize in natural looking hair, so I definitely wanted something. Soft and bouncy and natural-looking nothing to look real hard and dramatic to wear. It does look like a bob so far. No one has guessed that this is a wig and this frontal wig is so dope. You guys, when someone like grads me to give me like a holiday kiss and they grabs my head. I was a little nervous, but they felt nothing because the frontal is so flat. Italy, so good that you are tricking everyone. Okay, so i definitely recommend that people get frontal wigs because it's less tension on your edges. The clip is in the inside middle back area and then you have a elastic band, which kind of helps pull it together to make it snug, and that is pretty much it you get a nice cut. I didn't cut too much because I knew I have plans for this, I'm going to continue cutting it throughout the times. I also i'm showing you guys how it looks if the win were to blow and you have it really pulled forward. It'S not going to show anything. All you're going to see is straight like edges, which is fabulous. You really don't have to do anything too slick, your hair down, make sure you conceal it, but if you lay right and you make your gear away good, you don't have to worry about it, not fitting this fit me pretty. Well, I, like the cut I like the way it looks natural and a 1 B color. I never colored it yet, but I really love this look and I'm getting a lot of. Compliments is very realistic and that's what I wanted. I didn't want it to look like that's a wig. No one can tell anywho you guys. This is the look that I'm walking for 2016. I might change it again if februari, but I wanted to show you guys how I created this and then maybe it can help you create your own frontal bob wig. I really hope that you enjoyed this video here's a couple of selfies of me just fix it up my hair and checking it out side. Look back! Look. You know different angles to see if I'm really filling it, which I am but thank you guys for watching. Don'T forget to Like comment subscribe to my channel beauty by CD, i'm on instagram at beauty by CD. Thank you guys. So much see you next time.


Comments
terricaaa turnerrr: Girl you put the life back into that frontal!!!
BabyNeysh: Your videos are amazing! You deserve so much more views, likes and subscribers!
BeautybyCD: Thank you doll ... I really appreciate you guys
Brittany B: why boil ?
Christa Christy' Bogan: You Welcum