How To: Make A Frontal Unit On A Sewing Machine (Very Detailed-Beginner Friendly) Part #1
- Posted on 30 December, 2019
- Bob Wig
- By Anonymous
Hey Y'all, Im Backkkkk. This Is My First Wig Series. This Is Part 1 On How To Construct A Frontal Wig On A Sewing Machine. Stay Tuned For Part 2 & 3
---------------------------------------------------------------------
♡ F O L L O W M Y S O C I A L S ♡
◦ instagram: https://www.instagram.com/lifeas_gabie...
◦ business instagram: https://www.instagram.com/laedollscoll...
◦ business website: www.laedollscollection.com
◦ snapchat @lifeas_gabie
◦ BUSINESS: [email protected]
---------------------------------------------------------------------
♡ F A Q ♡
◦age: 24
◦camera: canon G7x mark 2
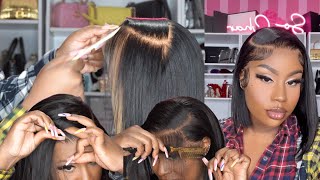
Hey guys welcome back to my channel today, i'm going to be showing you guys how to construct the custom unit on the sewing machine. The sewing machine that i'm using is a singer heavy duty. I can't remember the series number, but if i find i'll put it in the description box, but this is how the machine looks, i'm going to be using three bundles of straight hair, because i will be creating a ball, but it's going to be cut. And then i'm going to be using a frontal instead of a closure. So this is the front two. This is transparent: lace, 13 by 4. and let's get into the video. I already went ahead and did my guidelines on my cap. If you guys want a detailed video on how to get measurements and how to do my guideline, just let me know in the comment section and i'll be sure to get that video out for you, but i'm not going to talk too much, i'm going to get You into the video this may be, i want to say i might do this break this video down into 3 series, because it is kind of like a step by step, and i want you guys to pretty much know everything but, as i go along, i will Tell you what products i'm using and i'll also leave it in the description box as well. So i'm not going to show you guys how to set up sewing machine in this video, but i already have it set up. I am going to show you how to um how to thread the bobbin, because mine that's in here is running out, but once it runs out i'll show you guys it like as i go along, so i'm just going to get started um the thread that i Am using is the gutterman, i don't know. If you guys can see it is the gutterman um. What is it? Oh, gutterman, 100 polyester thread. I get it from joann's. I am located in hawaii, as i said it before. So i have to order everything offline because they don't have a joann store here. But if i do right now before my package from joann's come, i do use um some polyester thread from walmart. So, like i said, i make wigs for everybody i ship worldwide. So i'm going to be putting my logo on the inside of the cap and i also include a clip in the back and any additional clips. You know um would be additional call. First, you got ta start from the bottom and work your way up. This big line right here that goes across is where i will stop, because that's where the frontal will be placed, so my last track will pretty much be right here to fill in that gap between the front two and the last track. So we're just gon na go in. I always line my cap up. Let me adjust the camera. I adjust the cap to line the guidelines, the white mark and then you're going to take your bundle. I normally um go ahead and pre-weft or pre-double the tracks, but because um i have a lot of orders and i really don't have a lot of time. I just double them as i go, but if you do want to see how i double the wells, please check out my other video. This is more like a updated version or whatever, because i do have a new machine in this video compared to my last one and yeah so you're just going to take your tracks together, you're going to lift up your back hand, that's in the back of your Machine to lift up the lever and then i just placed my track on that line. I didn't even turn my machine on turn your machine on, but line it up. Let your machine go through and then you're going to take your reverse you're gon na back stitch. So i back stitch about three or four times you want to back stitch to make sure that the bundle does not come loose back stitching is important, so i do that about three or four times and then i just go ahead and sew the track all the Way to the end, once i get to this end, i'll backstitch about three or four times as well, cut the hair and then move on. I'M just going to tell you guys, because machine is a little loud. So that's what i'm telling you what to do. Also because the tracks are not double, you have to hold them close together, pretty much to pretend like they're already doubled. I cut my tracks where it's supposed to stop and then i double stick once you're done: lift it up roll your needle up using the handle on the side that you're just going to take your scissors you're, going to cut that thread exactly where it ends on The cap and then you're going to cut that extra thread on the side and in the back - and this is how the first tracks look, it should be not going anywhere that back stitch is going to make sure that track is not going anywhere, and this is How it look i added my first track and then um i go in, and i add my name tag just because i don't want it to be under. I don't want to sew the tracks onto the name that i want to be able to see. So once i throw that first one on i go in, i change my stitching. I change my stitching pattern into the straight and then i place my name tag right at the very bottom along the two lines. That'S in the mesh dome cap. You want it to be, even so, i position it there. I take that straight stitch and then i just go across. I will lift the needle up go down next, we need to go across lifting it up and go around. I don't stop and cut. I just do it on one like process: that's how it should look um, my vendor, that i get my hair from she made these for me as well, and i love them because it's my brand and that's how it should look, i'm going to go in and Proceed to do my second track and then i will add in my comb how your second track should look. This is how the outside looks like. I said it's not going anywhere y'all, that's why i say custom units last for a very long time, and even if your lace begins to ball, you can always get a new lace and switch it out. So it is not going anywhere. I showed you guys how to do the first two tracks, i'm going to show you how to add in the comb and then i'm going to complete the wig and come with the ending result. Add that comb in, i always add the comb on that extra black line. So i it was literally sit right here, so you will still see the hearts in my logo, so i'm going to place it right here. I don't use the straight stitch. How i did with the tag, i used a double because you wanted to come in between the comb to make sure that the comb does not move in the measuring cap and then you're just going to go back stitch. Be careful because doing this can break your needle so take your time because it will break your needle if you clamp into the cone. So so, once you have your comb, and this is how it should look, of course you're going to have that thread right there. But it's not a big deal, and this is how the inch side should look amazing, flawless inside and outside guaranteed beautiful work and long-lasting, with this method that i'm doing so, i'm going to finish up this wig continue to sew the tracks along the guidelines and then I'Ll come and show you guys the end result before we move on to part two, which will be the bleach knots, adding the frontal and then styling. So we are done you guys. I have completed the wig like i said this last white line is where the front two will pretty much connect or whatever. So we're done, i really suggest go ahead and brushing the hair really really hard to get all that extra hair out from when you're cutting the tracks to prevent more shedding so go ahead and brush this out and then we're going to move on to bleaching the Knots on the front too, and the placement of the frontal you


Comments
Aliyah Brianna: Thank you for sharing your process! genuinely appreciate this video, been fighting with my sewing machine for so long lol
Shakira Hall: you did such a wonderful job with explaining everything in this video
I Am Alicia: Hey ! Great Video, I Have Been Wanting To Start A Wig Making Business For A While And This Video Just Inspired Me Even More ! You Make It Seem So Easy Lol.
It's Nizz: You really helping us out here!!!! Thank you!
TKeyah E: This video helped me tremendously with constructing my custom units thank you so so much for Sharing
Pally KAPUKARE: Thank you, this very helpful
Luluspice Kay: Just made my first machine wig following all your tutorials . Everything was great until I put it on my head and noticed the wigs were not flat on the sides of my head even though they are properly stiched. Any suggestions on what went wrong and how to remedy it? I'm suspecting the elasticity of the dome cap I used maybe
Angelica Smith: Hi I loveeee your channel. May I ask what setting is your sewing machine on when making your wig? I have the exact same model and I tried making a wig for the 1st time but it’s lumpy and I made sure not to stretch the cap out.
GuardianAngelxo: I would love to see a video of you sharing how you got started and any challenges/obstacles you faced. I’m obsssed with changing my hairstyle and I make wigs by hand for myself from time to time. I want to go out and by a sewing machine and just teach myself how to use it but fear is holding me back do you have any advice or tips on how and where to get started?
Ashley Michelle: New Subbie HereGreat video. Ive always been curious on how to make wigs on the sewing machine. Quick question once you make custom measurements on the wig cap will the wig cap stretch back out to those measurements after sewing on the machine?
Uniquely Niqueee: when you’re sewing, is the needle going through the cap and weft or just the wefts? I don’t know why the tracks always bunch up on me and the wig becomes too big but i always keep in mind not to overstretch the cap. i swear as I’m sewing it, the tracks are flat but soon as i finish sewing it, I see that it’s lumpy. nothing I do helpssss, do you know what the issue could be?
N G: Amazing
Luv Bug: Thank you so much ! Where can I custom make logo tags
Glamorous Vanity: Wow!! U are amazing!! This is the best video HANDS DOWN!!!!
Briana Patrice: Can you make a video about complications with making units on a sewing machine and fixing them? . I keep running into the same two problems and can’t seem to figure it out.
Destiny Phanor: Does curving the wefts downward help the wig keep its dome shape ?
Tiyana Ferguson: Hey how do you put the tab in for your logo as in where can I purchase for my wig line?
HeyLe: Measurements & detailed guidelines video !
Shanikaa: Measurements video
Uniquely Niqueee: what thread do you use? can you link it? my thread keeps tangling
Brown Skin Beauty: Do you have a video on how to switch out the old lace on the wig?
Keke Farrow: What type of cap is u using
Melvin Brown: Do u sew barefoot
Jada Guinn: Tags from ?