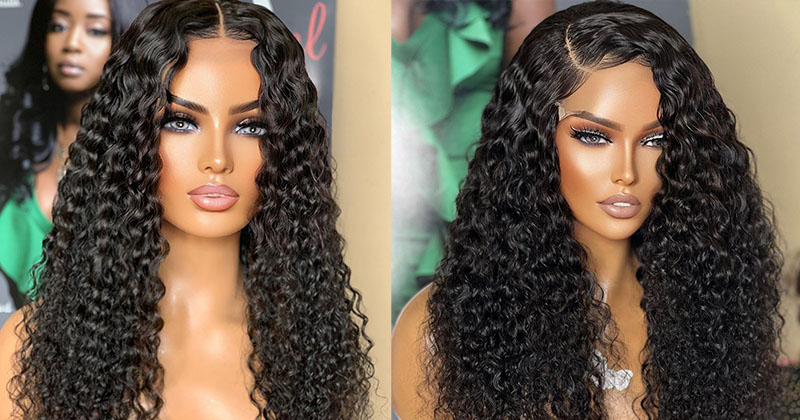
Spring Glow Up! Bob Frontal Wig Tutorial| West Kiss| Sincerelyoghosa
- Posted on 15 April, 2018
- Bob Wig
- By Anonymous
Welcome to my channel Sincerely Oghosa.Spring Glow Up video showing you how do to DIY a bob wig frontal using west kiss brazilian virgin hair from Aliexpress.
Subscribe: http://www.youtube.com/sincerelyoghosa...
How I Customise my frontals: https://youtu.be/N2lGWsl8Kbw
Malibu Dollface Hair Cutting Tutorial:
Dubai Vlog: https://youtu.be/8Rxd6BRHxNo
France Vlog: https://youtu.be/cuZYyQB6OTk
Greece Vlog: https://youtu.be/0ucP5_m7PWE
My experience in Morocco as a black woman: https://youtu.be/qs8MvC9wH_4
HAIR INFO:
Aliexpress Offical Store:https://goo.gl/35Qkg9
Body Wave 3 Bundles with Closure:https://goo.gl/mqoVC2
Straight Hair 3 Bundles with Frontal:https://goo.gl/4bUzUM
West Kiss Hair Official Store: https://goo.gl/wZQSYL
Straight Hair 3/4 Bundles With Frontal: https://goo.gl/NwB83u
Straight Hair 3/4 Bundles With Closure: https://goo.gl/2w3bvV
Straight Hair 3/4 Bundles:https://goo.gl/kpoHSj
➤West Kiss Hair Spring Big Sale: UP TO 20% OFF
➤3$ OFF WITH CODE "WESTKISS" FOR Each New Registered Member
➤Save $3 Off $129, Save $8 Off $259, Save $18 Off $399
Amazon Store Link: http://www.amazon.com/shops/westkiss
Body Wave Hair bundles with closure: https://amzn.to/2pG8AI7
Straight Hair bundles with closure: https://amzn.to/2GmQl3G
West Kiss Hair Official Store II: https://goo.gl/MoAdQf
Straight Hair 3 Bundles With Frontal: https://goo.gl/puV9PC
Straight Hair 3 Bundles With Closure: https://goo.gl/uJVNzD
Straight Hair 3 Bundles:https://goo.gl/a3b2Xy
Instagram @westkiss_hair_store : https://goo.gl/FQfTjV
Twitter@WestKissHair : https://goo.gl/mNaENJ
YouTube: https://goo.gl/njQCgY
FaceBook: https://goo.gl/CSpQG5
WhatsApp: +86 17719937631
E-mail: [email protected]
Hey guys welcome back to my channel. My name is Cynthia Rosa. If you haven't come across my channel before I upload VT lifestyle straight talking, videos so make sure you click that subscribe button and click the bell notification sign as well. So you can be part of the notification gang so today I'm doing a little kind of like cropped. Tiana inspired Teyana Taylor inspired ish short hairstyle. Now this hair is from West kiss hair. I got a 13 by 4 inch frontal Brazilian straight, and this is in 12 inches and I also got three bundles of 10 inches as well. Now. The first thing I wanted to do was to sort out the parting. I'M not sure why I did this before putting together the wig, but hey that's why I decided to do so. I wanted to have a really kind of deep side part. So that's what I'm doing here with this small tooth comb with the metal thing just to get it really really straight, and obviously I've got pins on my wig head head just to make sure that the frontal stays in place. While I do this, so I'm just gon na pluck where I want departing to be - and I also plucked around the perimeter of my head - so it looks more realistic and so there's like baby hairs and stuff. If you want to find out how I've plucked my front toes, I have a video on that, which is a lot more detailed and I'll leave that in the bio. Now what I did while doing this hair was, I made sure I sprayed it with a lot of water. It just makes it very easy to cut the hair so now that the wigs all sewed and stuff and spring it down with water and I've sectioned it off, and I watched Malibu doll faces detailed video on his Tiana tail inspired cut and he helped me a Lot so I'll link that below, because I'm not professional - and I just thought I'd - do this in case - you guys want to know how I had my hair, but I learned so much from him, so his videos down below now. What I learned is that with cutting hair, if you want it to have a nice natural layered effect, you need to pull it out towards your chest and then you can cut it instead of having the hair live flat and then cutting it. It will give a blunt cut, but if you do it this way, which is put pulling it out horizontally and then cutting it, where you want it to be cut, it will have a nice layered effect once you've finished. So what I'm doing is I'm getting rid of about one inch and a half from that. The 10 inch weft, so I'm starting from the bottom. Obviously, and what I'm doing is I'm just going track-by-track and pulling out to my chest straight out and then cutting it? Make sure that you do use sharp shears I've got mine from packs; it just makes it a lot easier to cut the hair properly instead of struggling with like paper scissors. So I did that and then, as I go up a track, I make sure that I cut the hair a little bit shorter than the last track, so, for instance, for the bottom track, I'm cutting off 1.5 inches ish and then, as I go up, I will Cut about 1.4 inches and then 1.3 1.4, as I go up and what I do is I just look at the last wept and I just pull out the next wept a little bit more and that kind of gives me a guide of where I should cut. I just measure it against the weft below it, and then I just cut a little bit less than I did on the weft below and the reason you do that is so that when the hair is finished at the back of the hair, it will have a Nice layered effect one thing that Malibu dolphin Malibu doll face. I hope I'm saying his real name right, and one thing he explained was that your hair, it should look like the number seven so the way that it's kind of like a slash like a a forward. Slash, that's how the hair should be so at the top. It should be longer and as the layers go down and down and down, the layers should get shorter and shorter and shorter just gradually, and it just gives a really nice layered effect. So, as you can see, I'm pulling another weft as I go higher. I'M checking that that hair against the length of the hair below it and I'm just gon na pull it out a little bit more and I'm gon na cut it there. And I just do that for the back section as I go all the way up and for the side section. I do a very, very, very similar thing and even though right now the hair looks kind of like disjointed and stuff, I'm just allowing more length so that I don't cut too too much straight away. So it gets a lot shorter gradually, rather than chopping off too much and then you're stuck and you don't know how to fix it. So this method of pulling out horizontally and cutting it is what I did at the front and I make sure that I put the wig on as well and make sure that the fringe and the bangs framed my face and that's how I got this look. Not obviously, I've added like baby hairs and gelled it down. I hope that this has made sense. I will put more video links in below which will help you guys a lot more, but I hope that you enjoyed watching this. Please do make sure you subscribe and click the notification button and if you are interested in west kiss hair, the links to all of the hair that I have is below and any links to their vouchers and stuff will be below as well. Thanks for watching


Comments
SincerelyOghosa: New season-New hair right?! Haha Absolutely loving this feathered bob wig I made. It's quite androgynous too which I love and it really suits big hoops too. Let me know what you think of this style on me. The hoops are from Aliexpress-just type in 15cm Gold hoop earrings-they were about £4-absolute bargain!
스: Screamed when I saw these hoops girl. You rock those so WELL ! You go!
Furaha Green: This hairstyle looks absolutely stunning on you
West Kiss Hair: thanks so much for your great video, a great job you did, hun~ love you
Amaya Raymond: Looks so natural i bloody love it
Sass Hil: U look bomb and I love those hoops tell me where you got them from plez
Jena Sebene:
Maureen Hope: Those hoops girl