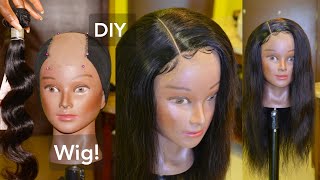
Braided Bob Wig | How I Did It @Joyce Arts
Hello, hello, guys welcome back to my channel. So today i did um a bobcat wave. Okay, this is how it looks that is bobcat wave. So i have my dummy here um and i have my net here, so i have to change my dummy because the other one has a small head and this one has 22 inches. So i have to fix the net first and after fixing the net the way. I'M doing so, i fix it that way. Uh this part here shows that it is on them on the left side, but when i turn it it will come to the right side. Okay, so i have to cut it again. So that's how it looks and i have this expression braid, so i have to cut it into four pieces and then, after that i have to compete first and after clumping i will start now the process whereby i'll show you how to i'll show you how to Rotate them first, okay, so you have to use the comb here to comb it after stretching it with your fingers and then you can apply a little bit of foam hair food, so i have to do first sample here. You lay your needle down there and then you put the braid and then you pull the needle on the the crotchet. I'M using sorry, the crotchet i'm using is a thinner crotchet. If you like to know the number, then you can ask and then i will give you under the comment. Okay, so i have to pull again this one actually. So these are four strands, but i have to make them to be three so to leverage them. I have to do that and then i'll start splitting like that and then i will add some strand of braid. So i add that one and then i play it then i add again, so i have to play it like that to the end, and i have to make sure that the braid is tightly plated. Okay, so come to here, then you can see how it flips after you make it tight. It'S not too straight. It makes a little cuff, so you have to check it and understand. Okay, so i'll be doing more of the projects up here so that you can understand more okay, so i'll be doing them here. So you have to lay your crotchet down the net and then you put the braid, you close it and then you pull that way and then you lay the crotchet again across it this way and then you fit the braid there and then you close it and Then you pull again so after that you can see. There are four strands, so you have to make them to be three uh. You can pick these two here to be one, and then you start by fixing it this way. You pick these two here, so you have to start plating this way. Then you bring these two together here so there you have to add. So you have to add another strand of bread and then you plate. You add another one. You play it. You add another. One you play it, so you have to continue plating and make it to be firm to the end. Okay, you see for them to flip, for i mean to carve to carve inside or to make it to be a nice bulb. You have to make the braids to be tight. Okay, that is the secret, make them to be tight, and then they flip. Oh i'm sorry i mean them. It will just have it coming nicely. Okay, so that way, so you have to finish until the end, then that is it, so you can put a knot here at the end so that it won't run okay. Now you can see this one, the way it's carving it's carved, so it's good for them. For the bob that way as simple as that, so let's do all this part day the braids. First we protect the braids and then we fix them yup. So the process is still the same. So let's do it. So this part is finished. Now you can see it now, this part here in front. I have to put this ready plated a onions. Okay, dana lines are gon na weave gon na weave in okay. So i have to start first by placing it here so remember. You have to use the pins to hold them first, so i'm using these t pins that way, and so i'm using my needle tool to weave it. So i have to place my needle under the net that way and then so i'll start by pressing it again. There to the other side just the way you do the normal ghana weaving, but this one you have to place under under the net okay and a line here, but under line under the net, because if you just place underline and then you don't make sure that It'S under the net, then it will not bring any change. Okay, so you press down the net and then you press on the line, the other side, and then you pull it. Okay, that way so press down under the net and then coming up. You have to touch there to bring it through the the braid or this line yeah that way so place it under the net, bring it through and under the line to the other side, then you pull so the process is still the same place it under the Net bring it through the line and then you pull it so use this method. Then you can't see the thread hanging somewhere. Okay, you have to be attentively when you're doing this. Not just you want to put the thread a line, or they don't underline that, and then you pull you have to consider also the upper part you have to to bring the needle to the edge. I mean to the outline of the line, not in the middle, so that you can pull it okay. So i'm doing here like this because i want to finish and then i have to turn the needle at the same same place so that you can't see the thread. Okay, good. I hope you're getting something. So you see it's firm, so we have to put another one there and then i have to hold with my t-pin that way and then also the other side i'll be doing the same. That way, so i just put like this, but i have to i have to knit this one first. Okay, so you just use the same method. I used uh for the first one as you continue going. Okay, the thread i'm using still the normal weaving thread, the normal professional weaving thread, okay and the needle i'm using is i bought it just like that. It'S carved it's carved needle the professional weaving needle okay. So, don't don't worry about it, you can get them in any shop in any afro shop in any hair shop. You can get those carved needle there. So we have to put this black here and then i have to knit it again. The same same method. I used so remember to lay the needle under the net and then bring it through to the side of the line. Okay, for a better result, okay uh - this line - some weaving - i made it by myself - so i did not buy them in any shop. So for those who are asking about them or they want to buy them - i don't know where you can buy them from, but these are just self-made, okay and for more details and many many questions just leave the question or the comment under the comment line and Then i will get back to you. Alright, so sometimes it's better when you leverage these things before you start putting them. Okay, you can do faster, an example. How you want them to be when you are sure of it, then you can start doing now. Then the the weaving okay yeah, because sometimes you can say - oh let me do this. The way you are thinking is not the way it will come out here. Sometimes it disappoints, but it's good for us to put the strands first to measure them fast before you. You continue with the weaving all right, so this is how it looks so this ends i have to. I have to burn them, i'm using my my fire whatever here, it's okay. I hope you understood i'm using my fire here and then i have to cut them. First like this, and then i have to burn it that way, then i use my fingers to press it. That way, you have to be very careful so that you won't burn your fingers. Okay, so here in front, i have to use this weave, so i have to cut it and then i compute a bit and i'll be using this crotchet hook. So i have to crochet like that to make baby hairs. Okay, so i will project creating that way to get there baby hairs, okay, instead of leaving it that way. You can do this way. Okay, but for those who don't like these baby hairs, then you can just use it in that one, but you have to cut the net closely to the lines here. So that's how it looks now. This is what we call braided bobcats okay. So here now we'll have to to show you how to how i put it on my head, so i have to hold my hair fast. So after holding i have this wig cap here is maximum hold, but uh you, it will depend with your skin color. This one is not too dark the way i wanted, but i'll just use it to show you how i want to do it or how you should do it, so you have to place it fast and then, after placing it, you have to do to add the Wig again it has a bunch. So, as you can see, my my wig has a two bands, this one and then i have the other one for the cape, this one for the cap here, so i will still tie all of them at the back. So the rubber bands are helping to hold this nicely, especially the one that i added by myself. Okay, so it helps to hold it firm so that it can't fall when you're jumping or making some movements. Okay. So then, this one's i have to use a gel brush, and this is here and then i have this isana from roseman, so just apply a little bit of it for a better result for this um edge. You have to you have to use a fan holding gel or holding gel so that you can, you can make it lie on your scalp nicely. Okay, so you can write with a dryer and then, after that, you spray. I am using time to spray oil shim. Okay, so let's see how it looks so, thank you so much guys for any question. I'M ready to answer and bye, bye,

Comments
Negra lopes: Fantástica, verdadeira artista!
Leah Ayimba: Eeeeish, am now jealous. It looks so cute on you. Thanks for sharing
Clemencia Durant: You young lady you’re a born star. I just wish I could just grow wings instantly to come buy myself most of the works of your Blessed hands as I need to be your Customer big time but how do I do this? ❤️
VITA NATURALE TV: Wow u did a great job, i really enjoy watching, we are now family
Gladys Gitau: Waooooh!!! its so cutethis one i can like million times,kudos
KENYA Pollard: Yu are blessed with talented hands
Glorious Princess: Super awesome
am Blessed: WATCHING LIVE my sister. Proud of your WORK.
Sandra Drew: I would love to have this wig made for me how can contact you
Christian Mburanumwe: Thank you very much.
Tonya Jones: Perfect
Lagah Delali: So cute and beautiful
KENYA Pollard: Tht is so neat and beautiful
Asana Rasheed Luuse: watching live my sis. i proud of ur work. Can u pls help me get the (toy) dummy hair for my practical pls
Faithful Muchape: Nice art
Lorna Nunez:
Tonya Jones: Great Job
Twinobusingye Dorcus: Where did you get that colorless net
Ida Bakoua: Salut Comment faire pour acheter ?
Sandra Drew: I would love 2 purchase one
Raymond Karikari: Dear how do I order one for personal use and the cost please?
Namithalie Mendes: ❤❤
Lenah Njoki: It's very nice,,wen you go to the shop wats the name of the net and the one you have added the cream one please
fidela nkatha: Am here just on time
Ruth Kemunto: Can someone use normal braids
Tonya Jones: Hi there if you need me to promote any of your products let me know with a your product link
Asana Rasheed Luuse: pls ur contact
Risper Ontita: IKO smart Sana
Sandra Drew: Do u make wigs 2 sell