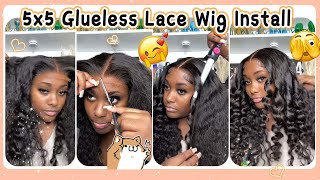
How To Do Curly Bob Lace Wig Install W/ Baby Hairs| Chinalacewigs
- Posted on 12 March, 2020
- Bob Wig
- By Anonymous
Diectly link:https://www.chinalacewig.com/chinalace...
Website link:https://www.chinalacewig.com/
Hair Length :10inch
Hair Density :150%
Facebook:https://www.facebook.com/chinalacewig0...
Instagram:https://www.instagram.com/chinalacewig...
Welcome to IAmBeautifulHustler Channel
Be sure to SUBSCRIBE & TURN ON YOUR ALERTS
CONNECT WITH ME✨
Personal IG: Iambeautifulhustler
Business Instagram:_Beautifulhustler & @thebeautifulhustlerbrand
Twitter:_Beautifulhustl
YouTube: IAmBeautifulHustlerTV
✨SLAY WITH BEAUTIFULHUSTLER✨
TO PURCHASE MY PRODUCTS :
WWW.iBhSlays.com✨
Lace Melt Adhesive,
Melts Belts,
GLAMWAX
and more ❤️
Have YOU Purchased your LACE MELT ADHESIVE YET?
To Purchase : www.ibhslays.com
✨✨✨✨✨✨✨✨✨✨✨✨
Spanish Mami Proof✨
Puerto Rican Mami Proof✨
Out the scalp proof
Swimming proof
Sex pulling proof
Waterproof✨
Sweat resistant
Adhesive : Lace Melt Adhesive
@thebeautifulhustlerbrand
YouTube :IambeautifulhustlerTV ❤️
To purchase: www.ibhslays.com
Hey beauties and welcome back to I mean beautiful, hustling TV today i'll be doing a curly bob lace, wig installation and today's hair is provided by china lace wigs now this hair already came a pre plucked and those did not so like slightly bleached, but even though Most weeks or some weeks come with the knocks out of the bleach, i still go back in and just bleach them a little bit darker just to make sure that the black lines completely disappeared. Now today i will be doing a simple, quick and easy bob style with this week at first, i thought about doing just a regular push, but i'm installation with this curly hair, but i am gon na - do a side part with some baby hairs. Well, it's not really gon na be a side car more liking. My fall over something because this is a lace front, so the side parting space is only like about two inches. So I would just like do like a little comb over top a look and just make it like really short and cute now off camera. I did go ahead and apply the stocking cap and I did not use any foundation on the inside of the lace. This time so pretty much, all I did was reach the not only put foundation on the cap so pretty much the blend that you get from her skin and delays. It'S just the lace itself was, I did not add any foundation to the inside of the lace. This time simply because the lace was thin and when I put the wig on her head to try it on it, just like blended so well with her natural skin tone, so I did not use foundation inside of this lace. I only use the foundation on her cap to make it blend now. I just went ahead and just started adding my layers of lace made adhesive. I did use four layers today for this installation and after you apply all of your layers and your gluts dries clear. You could go ahead and pull your lace down into that glue. Now, like I mentioned, this install was very quick and easy as far as plucking I'll be just wait. This way they come pre plug, so I'm gon na plug just a little bit more, barely really anything. I just really focus along like the sides in the middle, because I knew that you know I'm gon na decide to be extremely extremely I'm like end out, especially because I am gon na, be doing that. You know that push over style and I don't want the hairline to look too too too full, so I did just do a little bit plucking on this week. However, after I added all of my letters of the glue I'm, I just went ahead and blow-dried that lace on in using the heat setting always used to heat setting, because that helps the glue. I'M really mounting to that lace. And usually when I do cut off the extra lace I like to use my eyebrow raises, but today I just went in with my scissors and, as you can see, even though I'm cutting with those scissors I'm still going in that jagged motion, I'm just make sure There are really tiny, jagged motions and not big motions, because you still wanted to look as natural as possible without that straight across hairline. Look so I just went you know like in and now on, the hairline and you know like through the knots and stuff just to make sure it does have that natural appearance and, as I mentioned in the arm earlier in this tutorial, I did not use any Foundation on the inside of this lace, so pretty much the milk that you see is you know just from the bleaching and nos alone and I'm the least minute adhesive to really blend and really melt that lace on in. So this is just lace. The skin, as I mentioned before, no foundation use, but nevertheless you just want to make sure that you do cut off all the extra lace from around the hairline in the ear, and once you do that stuff, you could go ahead and make this next session. This next part much easier just by using some clips and just pull back the lace. So whatever is lifting you can just go ahead and tuck that down and it's just so much. You know easier for you, so just clip it all back and then you could go in and fill in those tiny places that still lift it up with your tool or your right telecom. Whatever you are using to hit those little creases that you miss the first time so now that you have everything tacked down and it's looking all natural and melted and very much like her real scalp, I am going to go ahead and begin to pull down a Section for the baby hair and then I'm gon na go ahead and use that melt belt to really mountains to kid that lace and I didn't use a little bit of holding spray today. You know just because I haven't done that method in a while. Just wanting to just you know, bring it back up, so I'm gon na use a little bit of their hard head bed hairspray and just for a little bit across the hairline before I tie down with the melt bill and I'm gon na pull out a thin Section, as I mentioned, for the baby hairs just all the way across the hairline, so we can do baby hairs from ear to ear and yeah. So I'm just going to pull the little section down and tie it down, and I let that stay for about five minutes before I actually came boy back on to the camera and started to do the actual styling portion um. As you can see this video, it's not that long, and I said because this was just like really quick and easy to do and I didn't have to do any cutting, because the bob was already short - and you know just the installation process takes about thirty minutes. On its own - and I do you know, speed up the video, so you guys don't get like board with the repetition I just like to get straight to the point so pretty much after I do this and I let that sit. I would just focus on getting the baby hair is done and just you know, smoothing everything into place. Now I did do like the little straight down baby hair. That'S been trending lately, like everybody's, doing like these baby hairs that fall downwards towards the front, and then you swoop it and scoop everything else. So I did kind of do that style a little bit. It came out nice, but you know trying to transition over to doing a different style baby here you know you're gon na have to do a lot of practicing and everything like that. So I know the more I do it this. You know in this type of style, I'm the Margay used to it. You know it's good to try to keep up with the trends. That'S going! That'S how you keep your you know your clients coming, because when something new comes out, it's like it's kind of like your job as the stylist to try to keep up with the trends. Even if it's gon na be a temporary style like you do want to keep that um, you know, keep your audience in tuned and you know pulling more clients and just saying you know current well what's poppin and that will help keep bringing your clientele like up And up so I'm for today I do use my motion smoosh and I also use a little got to be not got to be. I'M sorry guys, but are you some of my arm Jesus Christ? What is it called? I start on my bed head hair, styling spray for the baby hair, because I do like that soft look, but I know you guys well most of my clients well pretty much all of my clients, I'm like for their baby hair to last. So I do start with the mousse and then I just go back in on top of it with that, I'm holding spraying and really shaped and molded that way it does not move, and as I mentioned, it's not really a sidebar, because I can't really part is So what I am doing is just like pulling some hair down behind the ear and pulling some of the rest of the hair over to the side, and I'm trying to really just create that nice smooth layover type of look. So I will use like the holding spray and I also hot comb that side as well to get like that finishes: nice smooth, look, but before I do that I am going to go ahead and do the baby hairs on the other side, you just go with The flow like just do it, how you feel it should be done with everybody's head and depend on the style you doing that kind of like determines how you would do the baby hair, like you, can't do the same exact baby hair for everyone in every installation, Because everybody, you know face for him is friend or the everybody's hair line is different, so you just kind of got ta go with the flow and then with the style that you are doing as well. So there's no specific way. You have to do your baby hair for install it's just pretty much what you feel is best or what you feel like. You know you should do and you know a little bit of what they want to, because you know people make a suggestion, but you know as a stylist, you have to know for the best results. What you should do, as far as I recommend them, that you do with a certain way, which was not a problem with today, but I'm just saying, like some people want a certain look, but you know you have to do things for that person's face for it To look good but other than that, I'm not little baby. It'S all done. I'M just gon na go with some more of their motions moves and just really get those curls, nice and defined and pop in so I'll just use moves. I don't use any water today. Just moves only so I just you know, put the mousse in the hair comb detergents and make sure you get on all of the pieces of the hair, and I will do that for both sides of this week and just smooth everything out do a little hot Coleman, so that I really put the finishing such as going to look so thank you guys for watching just stay tuned for the finishing results, and let me know what you think down in the comments till next time.
Comments
Mau Hri: I recently bought some curly hair for my birthday and I’m definitely following this tutorial to get this baby hair look! ❤️ It’s so cute!
Amore Love: lol girl im the same way i love to get straight to the point. lol thanks girl we appreciate it lol
Ayuana May: I love your work you are so good at what yhu do dont never stop ❤️
Shelbbbsss: Girl tbh the wig didn’t need no baby hairs it was so natural and Cute
Menaa Gulley: I literally found you yesterday. I been binge watching all your vids.. You are OFFICIALLY one of my FAV youtuber’s now!!!!
Velvet Johnson II: This was a very nice look good work I would like to see a reinstall though
Lillian Kelly: Will you restock on the elastic bands soon?
Special Love: I'm practicing on a wig I got from Amazon
kelvin peralta: Hola megusta mucho su trabajo me encanta estas pelucas como yo puedo conseguir una y en cuanto me sale por favor
MissLadiiLace: Edges on fleek
Baraka Jenkins: AWESOME
Asia B.: you goated for sure .✨
Isabell E: When are you restocking
KeriaTheBratt:
M. Shh.: Have you ever seen the show on VH1 , beauty bar? You sound exactly like one of the ladies from the show lol but anywho thanks for another amazing vid
deseraymiles87:
Shandell kute:
Charminque Greer: Anybody orders come yet from the other day sale
Lynelle:
Keniqua Smith: You’re sold out of everything on your website
Pigmented Piff: Did it come from China now ♀️