Amazon Prime Wig | 8' Bob Wig Review
- Posted on 27 February, 2020
- Bob Wig
- By Anonymous
Please Comment, Like, Share And Subscribe.
Hey beauties welcome back to another video where I will be reviewing this affordable Amazon Prime Wig for yah..Hope y'all like!!!
Jaja Hair Short Bob Wigs... https://www.amazon.com/dp/B07MLFHHVZ?r...
B U S I N E S S I N Q U I R I E S
CONNECT WITH ME
SC:nessaslimzz
IG: nessaslimzz
FB: https://www.facebook.com/nessaslimz/
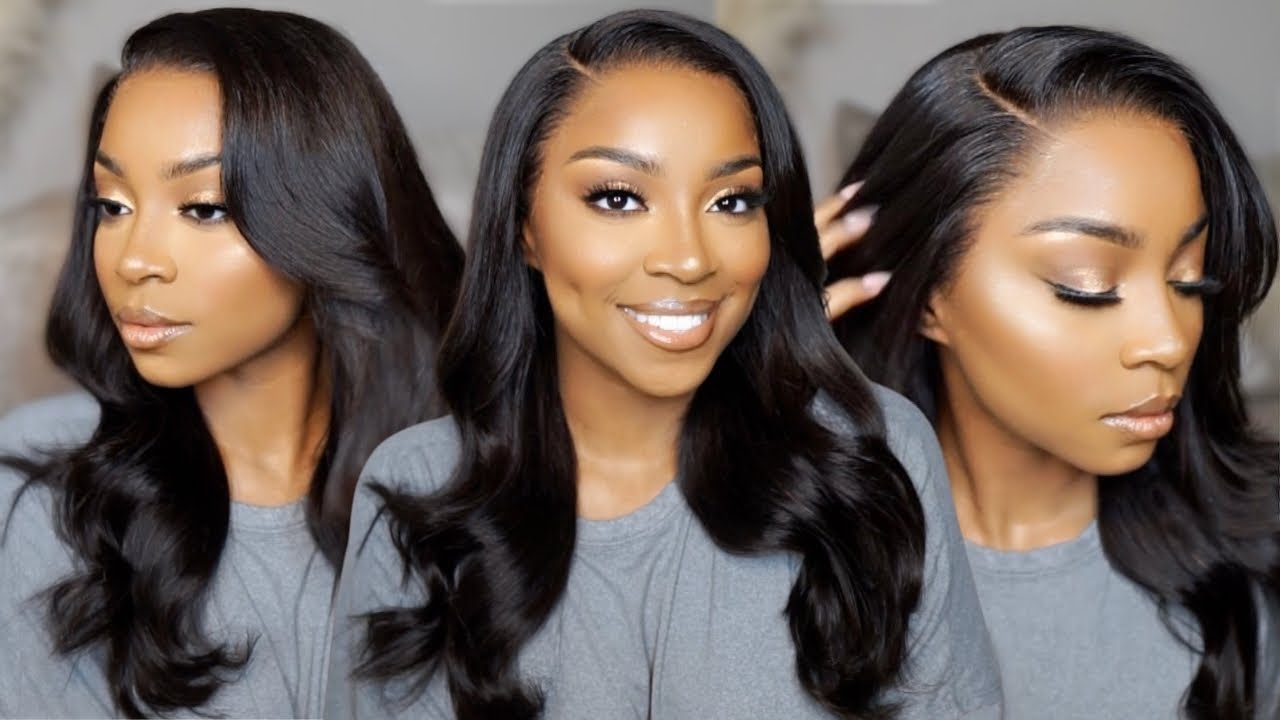
Hey guys welcome back to my channel your girl Nessa here and in today's video I'm going to be doing a Amazon, wig review for you guys yeah this week was SuperDuper affordable. It was like 48 dollars. Let'S go save fifty dollars, alright, so little bits about the hair or the wig. It'S from JJ here company on Amazon and it's a 8 inch bob, wig and and the packaging comes with the wig. They also sent me a wig cap and it's also has a card alright guys. So I know I'm speaking faster than what's in the video, but y'all get the drill. Okay, alright guys. So, let's get to the tee. Shall we alright? So this here is 100 % human here it has a strap in the wig, which is pretty cool. The strap fits perfectly. I didn't have to do anything extra to this wig when I first got it now. The lace is medium brown and it's a Swiss place and it's 13 by 4. Ok, so it's air to air. The hair itself is pretty soft. The week was lightweight. It was super easy to work with, so I'm gon na do a little bit of customization right here, not much. I'M just going to bleach the knots, and I took two scoops off my Clara BW bleaching powder. Well, it was like one 1/2 school, my bad and I'm gon na take my volume 20 developer cream, and this is from a salon care. I probably should have gone a little 40, that's because it was taking too long, and I did wash it out too quickly. So it didn't all that bleached, but it was alright. So I'm going to mix these two together into a really thick paste guys. You do not want it runny, because it will get all over the bleed through the lace, get all over the hair and basically ruin it somewhat, alright guys. So I'm just going to go ahead and like we spread that all over the lace - and I let it sit for maybe thirty minutes - I probably shouldn't let it sit a little bit longer, but it was alright. Okay, alright! So after I was done bleaching the delays, I washed the hair. I blow dried it just because I didn't want to wait, you know and then I straightened it and there he go there. You have it. I did not pluck the the front just because it came pretty plucked and it was perfect. I didn't mean to do anything else to this week. It'S perfect, as is alright guys, so now, let's get to applying the wig, so I'm going to go ahead and cut off that little extra extra nice right there that we don't need so - and this is the back of the wait guys. So I probably should have showed you the inside of the wig, some more because it had do comes with some clip and some adjustable straps. I remove the two clips from the side and yeah. That was all I did so now time to put on this little bad boy. You know something's going to make sure that it's straight on my head and I like to put on a stocking cap before I put my wig done, she's just so good. I have a short here and it kind of tames, my short here, what I put on a stocking cap now Tom to you know, get to the tea once again. So now we're gon na go ahead and cut off the air section when I'm cut around it. So that it blends so that it fits your head on my head properly, alright guys, anyone take your time when doing this, just because you don't want to ruin the way cuz once you make a wrong cut, like it's kind of like hard to. You know work around, so I'm just cutting off that extra nice right there on the air portion. I like doing this before I start laying down the hair. This is just so that I know what I'm working with alright guys. So yeah, that's! What'S up alright guys! Now we're going to pull back the wig and we're going to lay down some guts to be glue gel guys. I guess I was carried away with this video that I forgot to hold up the product to show you what I'm using, but it is the guys to be glued gel in the black tube okay. So I'm just spreading that all over my edges with my fingers of course your hand. Your finger is your best friend in in most cases, alright, so I'm just laying it and nice and flat make sure it's smooth. It'S not lumpy so that when you lay down the lace it doesn't seep through it. Now we're going to go on top of that with my god to be glued blasting spray and I'm just spraying it on top of the gel. So this is gon na make my wig a little bit more secured for it to last longer, even though I don't keep my wig on for more than three days, and sometimes I do take it off the same day, I put it on but anywho to speed Up the drying process, I'm gon na go in with my blow dryer and I'm using cool settings to do this, and now we are going to lay down the wig. Now I like to lay down my lace starting from the center okay. I also feel like it's easier that way, so once you later the middle down and you start laying the side down it, just comes together, really nicely so yeah and then I'm taking my tail call my right tail called power. You guys insane and I'm just going to like comb through the edges and kind of like press it into the glue or into the gel, so that everything lies smooth and nice. Okay, cuz really like trying to mimic real hair over here. Okay, so we're just going to press that in not too hard, though, because you don't want to let the goo seep up and get all into the here. You just want it on the lace. Now we're going to go back in with the blow-dryer using cool settings once again, okay, now time to cut away all this extra extra nice once again, and I'm going to cut away the lace in zigzag motion as close to the hairline as possible, okay and guys, If you're new to my channel, please go ahead and subscribe to your girl for more videos hit the notification bells so that when I upload more videos, you'll get a notification and comment down below. Let me know what y'all think at the end of this book: okay, alright! So I'm just still cutting away the leaves like guys. This is the process. Okay, there's no getting away from it. It'S the process. This took me like 30 minutes to complete, and this is how, based on how neat you want your your stuff to be, or whatever you're doing to be, so it takes a little time now. I'M gon na go ahead and clean up around the edges with some alcohol and now I'm going to start laying down all the little so the areas that got missed during the lane doing the sage process. So I went back in with my guts to be glued Joe, had some blasting spray to it and yeah that's what we're doing. Okay, we're just catching up on all those other areas. I did not get no boo or get it, but their mistake. You know and yeah we're just tightening up all those little loose ends. You know cuz, that's how we do it over here. Alright, let me shut up alright, so we're just laying down everything nicely all that good stuff now time for us to tight down, so that it notes. Okay, alright, so I'm just tying it down, I'm gon na. Let it sit for maybe mmm 10-15 minutes. I wanna jump off it here. Do my makeup real, quick cuz, we are go for still. You know here up facing up to. Is it me alright? So now it's time to lay these edges like you can wear it without baby, hair and stuff. You can tritter like that. I could wear it like that. I could have, but I was feeling the baby here moment, but before we get to that, I'm going to go in and make my side part. I'M a side. Part girl center part is just not my thing. I work side part now and again, but center part is the is the shape for me? Okay, so I'm just going in with my hot comb and I'll just lean it down going in with my back wax steak from easy edges or easy edge, or you want to say, and I'm just laying it down tying it together and then now for baby here. So, as you can see, I'm just parting little sections and I'm taking my little scissors, my little a scissor, that's what I call it and I'm just going to cut off what I don't need, because we don't want no giant size, baby. Here'S for baby here - okay, we chopped so I like my baby hairs - subtle, not too thick, not too much. You know I'm more like the whole natural stuff all right, so I'm just cutting away all that extra heared about don't need kids homegirl over here trying to create some baby here. Okay, all right! All right now, I'm gon na go back in with some of my got to be glued and I like using moose to lay down my baby here, but in the situation. If I had used moose, it would have started lifting my weight and I just did not want that. So I went with the got to be glued and I'm just taking my edge brush to just you know lightly, lay him down and, as you can see it wasn't extra. It was just simple and perfect for me, so yeah alright guys. So the rest of this is basically self-explanatory. I think I should just shut the hell up and let this video play through, like you know, alright guys. So let me know what you think about this $ 48 wig from Amazon. It'S really nice, I like it. It can be my everyday my go to week, just because it it's low maintenance. You know so yeah, alright guys so I'm gon na let this play through. Thank you for watching, like I said before, coming in the comment section down below, let me know what you think. Let me know what kind of video you want to see me put out. Ok and yeah I'll see y'all the next video thanks again, peace out


Comments
Godiva One: Thanks for the tutorial without the loud hideous music. I appreciate you. You slayed the wig.
Tiana Bee: Best video I’ve seen for this wig!!
Sachell Parkinson: Great video as usual boo. Love from
Ashanti Sims: Love it i just purchased..I need tips on starting a youtube
YANIQUE H: Love it
ITS NESSA: Hey nessa